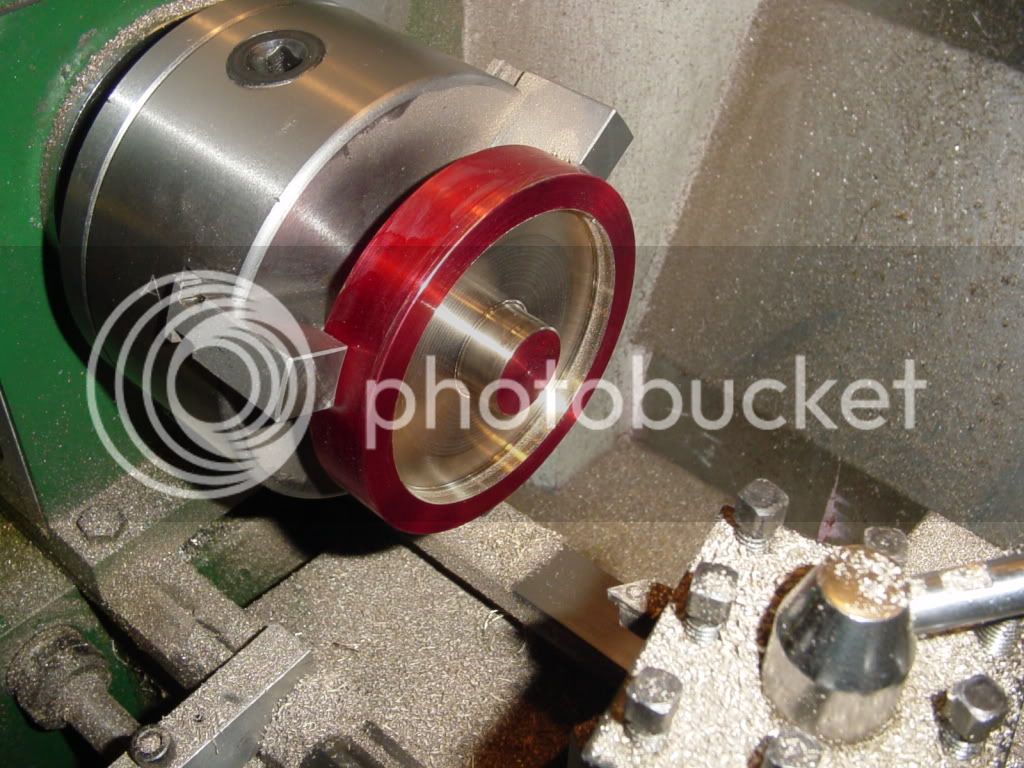
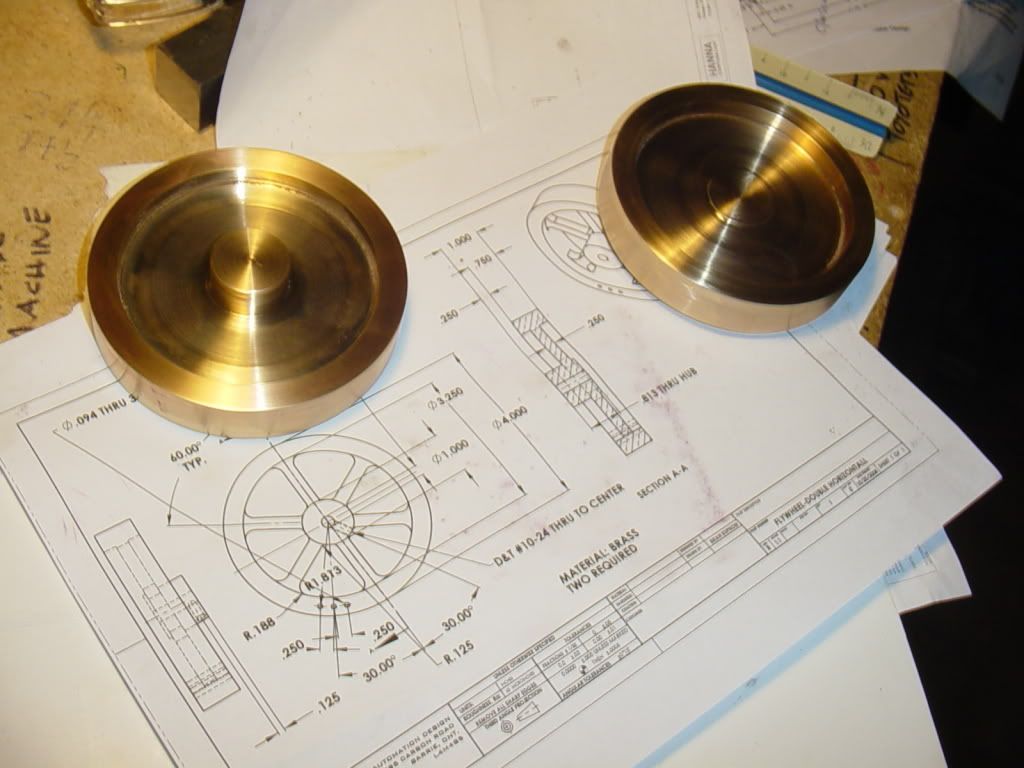
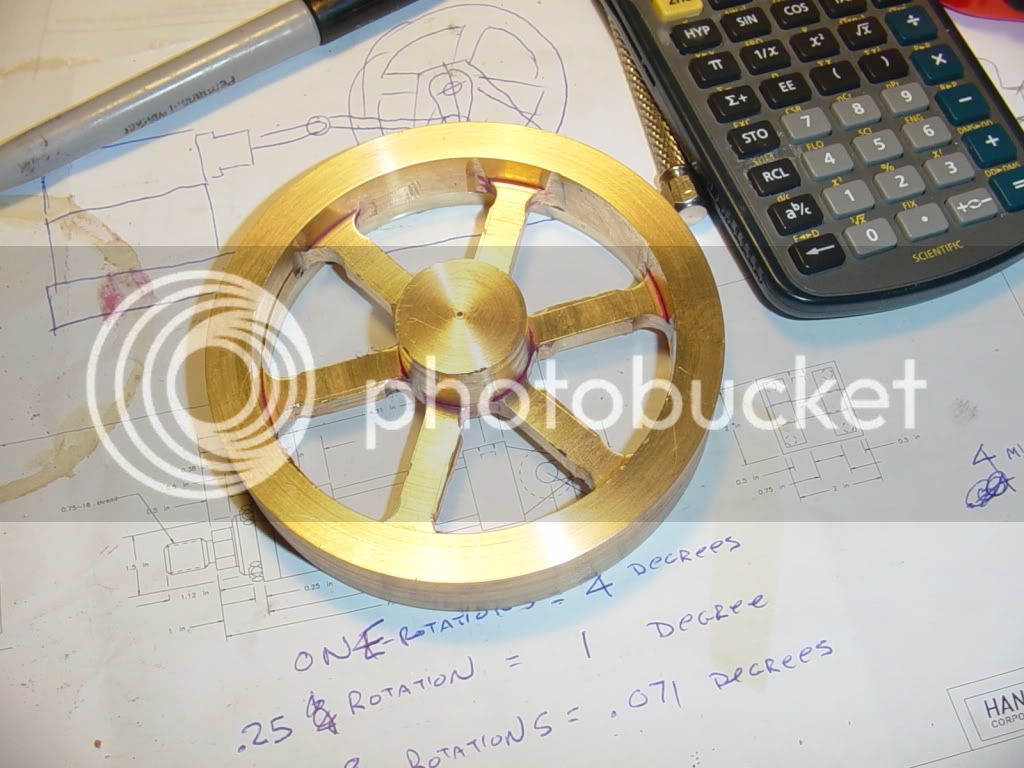
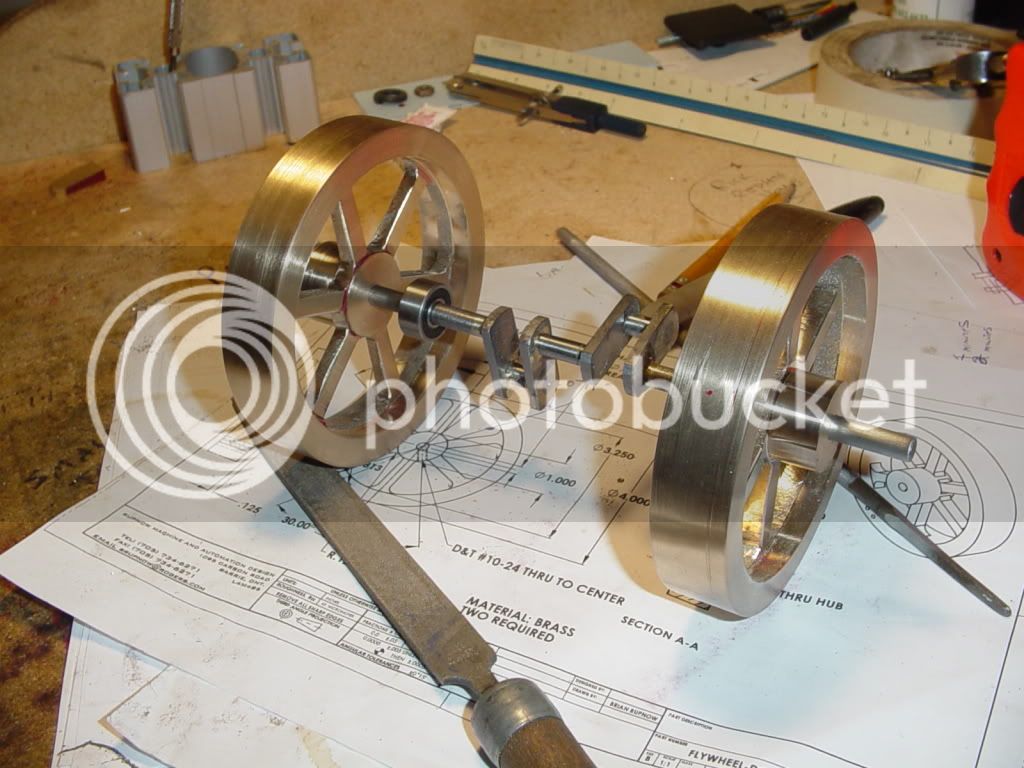
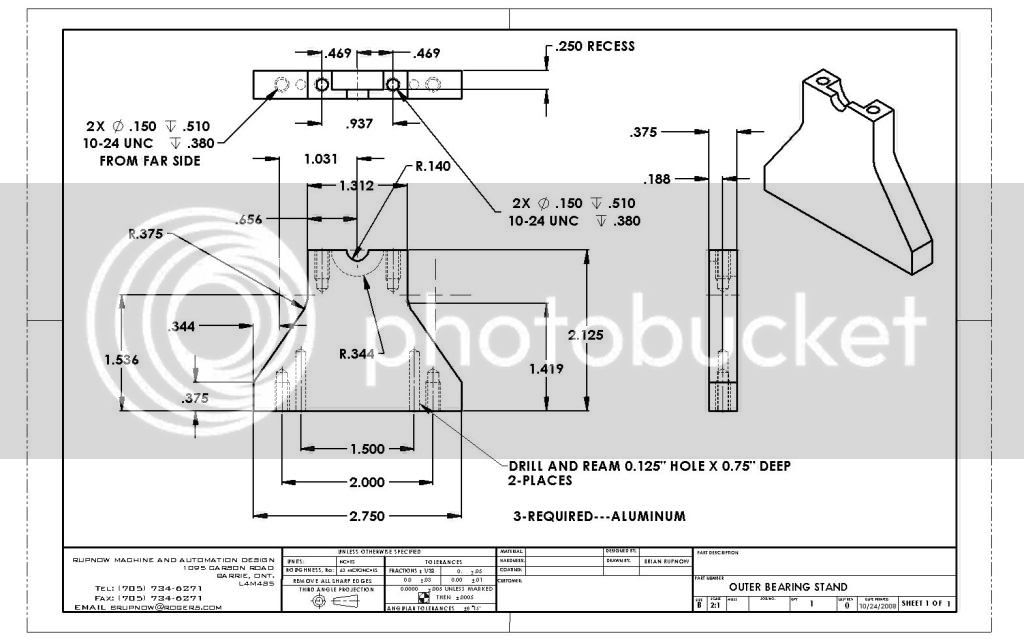
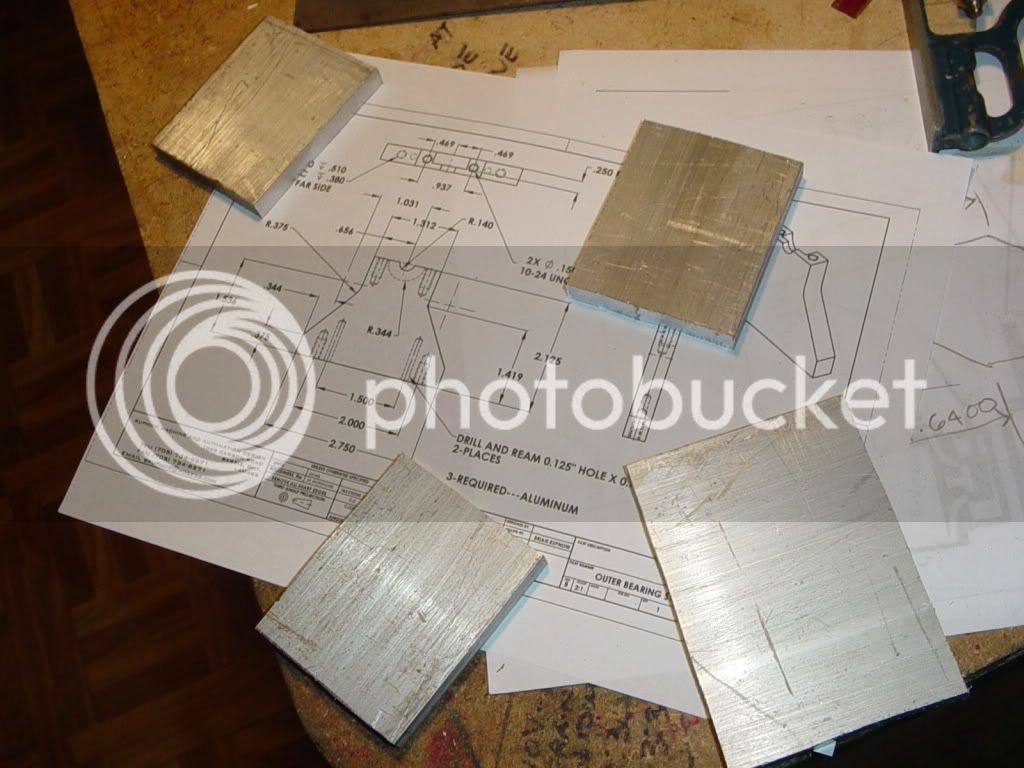
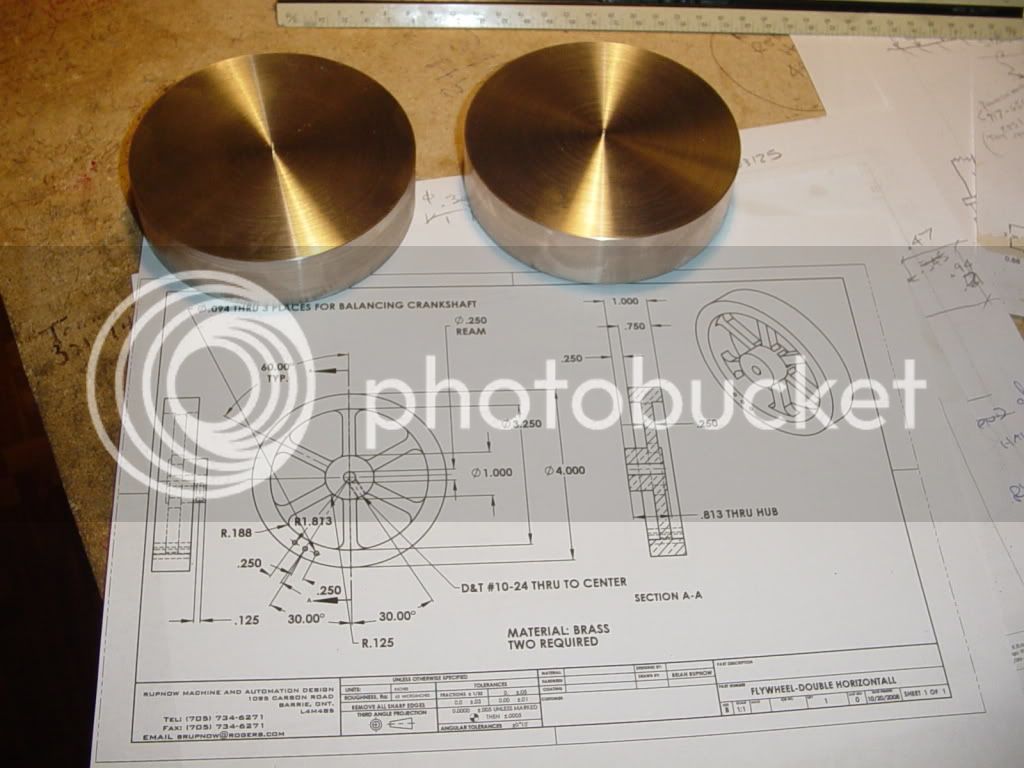
Horizontal Double acting Twin Self starter

Home Model Engine Machinist Forum

Help Support Home Model Engine Machinist Forum:

This site may earn a commission from merchant affiliate links, including eBay, Amazon, and others.
Brian Rupnow said:
I am fully aware that some of the people on this forum who I consider "Real Machinists" ...

That would be you, Brian. Next time you want to talk about "real machinists" look in the mirror 'cuz you are one. Every step in the design and construction of this wee beastie has been educational, and I know I appreciate the time that you're taking to explain and provide "visual aids" as you go. Not only that but I'm having a blast watching the engine go together.

Gail mentioned 12L14. Check some of the local machine shops in their scrap bins. I wouldn't doubt that a little leg work and some fast talking would net you a nice supply of material, especially of you work through some of your customers.

Several years ago, I received about 150 pounds of that, stainless and brass in round, hex and square shapes sent to me from the mainland for the cost of several USPS Priority flat rate boxes and some 100% Kona coffee, all from scrap bins. The gentleman who sent it to me, now deceased, said he could send me material up to around 6" in diameter if I could turn it but we stuck to 1" or so because I couldn't think of anything I wanted to turn at the time that was bigger. He asked me why I didn't scout around locally for a supply and I told him I had but to no avail. (I'm still hoping to hit some of the shops at Pearl Harbor but they're technically off limits so I have to find a friendly Chief to get me in.)

The bottom line is, that there is material out there to be had for cheap if not free (plus fuel) if one looks around the right corners.

Best regards,

Kludge
 
Brian Rupnow said:
Damn--I just lost 20 minutes of typing when I went to post.--It gave me a message saying "my uploader space is full"!!!

Brian I can't expand the attachment limit any more than I already have.
Please PM or email me and I will help you set a photobucket account to continue
your picture posts.

Rick
 
Okay--If needs must---We'll do the photobucket thing. I got 2 peices cut off and faced and turned to diameter this afternoon. I think I might have got bronze, not brass, but I can't really tell, however its yellow, its shiny, and its a lot heavier than aluminum. I am not 100% sure what I'm doing, but I am a firm believer in layout dye. I have coated both flywheels with layout die, and as I wait for it to dry I can update this post. I have used a peice of mild steel shaft, 3/8" diameter with a point turned on one end, and chucked it up in my tailstock chuck in the lathe. I used it to put a very small centerpunch mark in the exact center of each flywheel, simply by locking the tailstock in position and forcing the point up against the brass flywheels---they mark very easily. When my layout dye is dry, I will take one of my old drafting compasses, put 2 steel points in it to make dividers, and with one end in the centermark will scribe the outer diameter of the hub and the inner diameter of the rim, and also use my height gauge to mark a line around the circumferance ,in 1/4" from each side. that way I have some visible lines to work to when the flywheels are chucked up in the lathe.
FLYWHEELS-1001.jpg
 
Brian, those are purty! Can't wait to see what's underneath! ;)
 
Hooray Brian,
I can finally see your photos. Apparently an attachment to a post isn't recognized by my computer software and I've been unable to solve that problem :'(. So all your (and others who attach a picture to a post) previous images are lost to me. I'm looking forward to how you're going to do this flywheel,

Cheers,
Phil

 
Okay--First half of first flywheel done. Nasty stuff to machine--cuts easy but doesn't turn up a decent chip. Instead it bombards me with almost a powder.
flywheel-2002.jpg
 
Brian I have distant memories of those chips burning my hair.

These days they cause annoying little blisters on top of my bald head! :big:

Great Pics!
Please continue!

Rick

 
I just found out that the material is phosphor bronze. It machines easy, but like I said, nasty, nasty stuff coming off the cutters--think--Metallic Talcum powder at 200 miles per hour!!! I also found that it is unwise to get a finger too close to the spinning chuck when working with emery cloth. All I did was break a nail a little (not even down into the meat), but it sure woke me up!!!
 
So---That finishes up the lathework aspect of the flywheels, except for the center bore. Now for the scary part---window cutting.
FLYWHEELS-3002.jpg
 
As I posted on your other thread, I found having the center hole makes centering the blank on the rotab a lot easier. I would drill them out on the lathe. Just a thought.

I'm off to make some more parts on the beam engine build this afternoon, so I'll check back tomorrow to see how it's going. :)
 
I haven't abandoned this thread---I've been over at the "Questions and Answers" section of this forum figuring out how to build spoked flywheels. I will update this and start posting here again when the flywheels are finished.
flywheel-spokescut002.jpg

And Kvom, you are absolutely right about the centerhole. I wish you had posted 5 minutes earlier, before I took the chuck off my lathe to put it on my rotab!!!
 
Well, Son of a gun!!! Here are the peices that worried me most, finished. If I can make them (never did it before), then I should be able to do everything else. You can see the ball bearings that are going to be in the two outer bearing mounts. I know I've been jumping all over the board the last couple of days, but I just didn't want to shove everything into this one thread.
crankshaftwithbearingsandflywhee-1.jpg

crankshaftwithbearingsandflywheels0.jpg
 
Brian,

Congratulations :bow:

It sure is the greatest feeling when you successfully complete something you weren't so sure about ;D

Keep it coming mate.

Best Regards
Bob
 
Brian, that just isn't going to work. I'm sorry to be the bearer of bad news. Just send that to me and I'll see to it that it is well taken care of. ;) ;D

Okay, enough kidding around!! Man, that looks fabulous! You have raised your own bar. I will also say that when you get done with this engine, you will have something that you can and should be very proud of. Great work there!! Looking forward to following this build...
 
Good job, Brian. I like the flywheels, but I especially like the crank. I've got a 3-some I gotta build some day and your 2-fer looks like a good format to start with.

Chuck
 
Hi
cutting PB with the tool you have in the lathe will give you probelms. Negative rake knife tool ground from Stelite of HSS will cut PB much better than the indexable tool your using in the picture.
A little drop of tallow will also help the cut, if you dont have tallow a wipe with steam cylinder oil is almost as good.

kevin
 
Next on the agenda is bearing stands. There are 3, and I have opted to make them all the same. This is going to be a bit complex, and I'm learning as I go. To start out with of course, we have to make an engineering drawing. Then I cut 3 oversized peices of 3/8" aluminum plate and one much oversized peice of 3/8" plate. The much oversize plate is going to get sacrificed as part of the machining process. My aim of course is to keep all 3 bearing stands identical.
outerbearingstand.jpg

BRGSTANDS-1001.jpg
 
Sorry to butt in, :-[ I do agree with Driver. In my experience copper alloys cut very sweetly with HSS tools, almost to a silk finish. You will find an excess of long bronze chip "springs".
 
Andrewinpopayan said:
Sorry to butt in, :-[ I do agree with Driver. In my experience copper alloys cut very sweetly with HSS tools, almost to a silk finish. You will find an excess of long bronze chip "springs".
Andrew--Thank you for the tip. The only cutters I have as a newbee machinist are indexable carbides. I wouldn't know how to grind an HSS tool if my life depended on it. After I have mastered a few more of the basics of machining I will buy a proper tool grinder and learn the arcane secrets of HSS tooling.
 
Back
Top