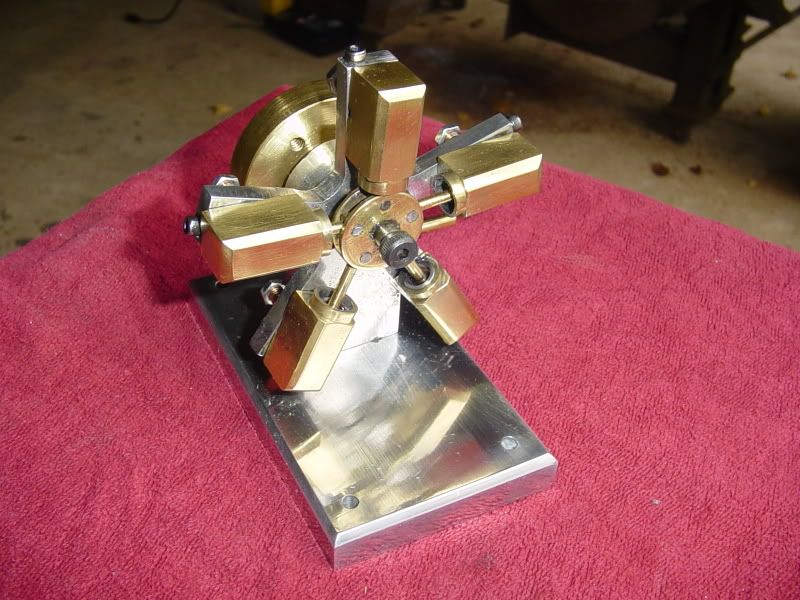
That is a great design and it runs superbly. Having seen the video I will have to study your porting arrangement in more detail, didn't realise it was all hidden!
Well done Brian. I wondered if the five cylinder might somehow seem less "alive" than the 6 cylinder version but both definitely have that same hyperactive organic effect. Congrats on coming up with a simplified design for what has been a classic eye stopping engine, for a long time.
Brian, thanks again you are so good to use for sharing your knowledge, got projects for some time to come, it looks alive instead of running, that is cute, my question is what is next, I know that you have to have something in mind, let us hear it now, thanks again, your great, Lathe Nut
I registered with "Youtube" this evening and posted the link on there.
[ame]http://www.youtube.com/watch?v=FuB7YPVqKC4&layer_token=2cf62e5aa9393472[/ame]
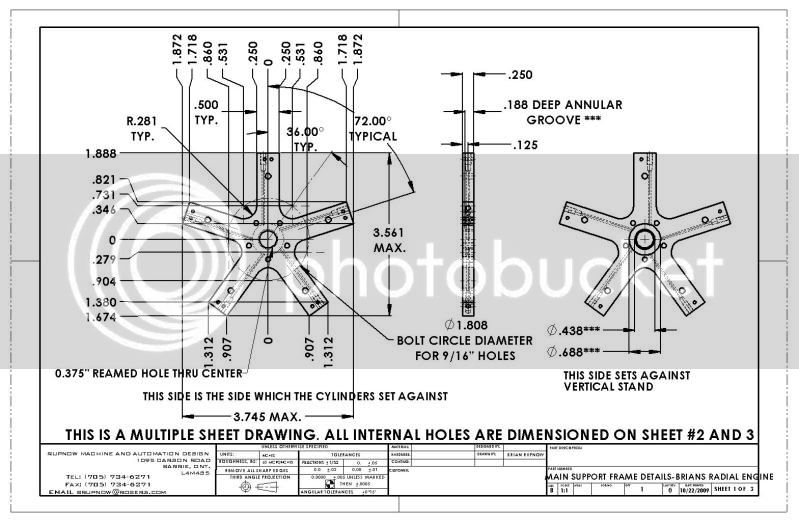
I am doing up an article based on this thread for a magazine publication. Consequently, I took some time and put the drawing of the star shaped main body on 3 seperate detail sheets, so it would be a bit easier to read. The .jpg only shows the first sheet, but the .pdf file has all 3 sheets on it, if you click on the link.---Brian
Thanks, that helps a lot.
There is a lot going on in the original drawing.
Im not a good print reader... uhh ... let me start over- I dont read prints very well, good ones or bad ones.
(I guess thats why I build my own designs, now that I think of it)
-B-
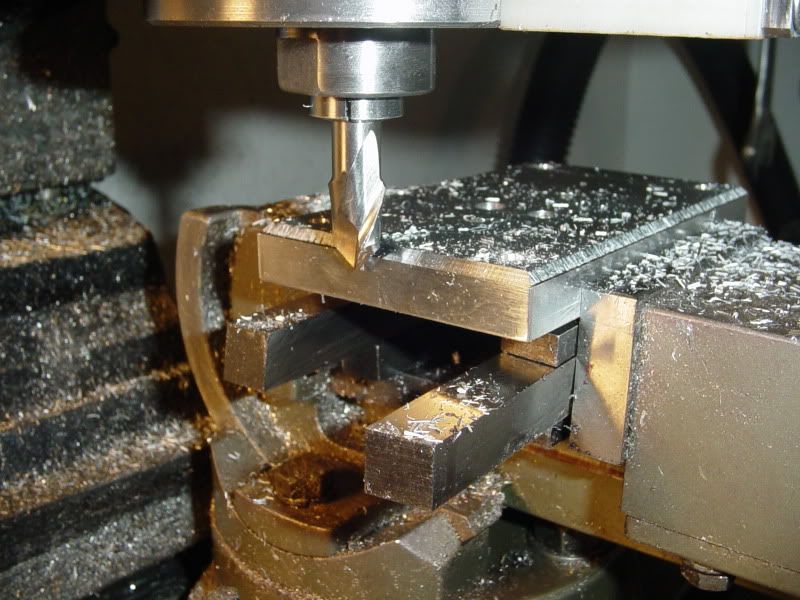
I found a fellow in Barrie who has a business sharpening end mills for all the local machine shops. He sharpened all of my end mills, and made me up a ball nosed cutter and a 45 degree chamfer cutter. He has a big CNC machine that can do sharpening and custom grinding amost instantly. this is a picture of the chamfer cutter doing its thing on the base for my radial engine. It works really slick, but I found it does leave machining marks regardless of what speed I run it at.---A bit of light sandpaper fixes that very quickly. So--the base ends up a lot classier with a 45 degree chamfer all around the edges.
Looking good all polished up, Brian!
I don't know which way you ran the bevel cutter into the work, but if you make the last pass about .001" and climb mill it at high spindle speed, it may clean up the cut a bit. You've got this piece all cleaned up now, but next time you use that cutter you might give it a try.
brian : if you make the base out of aluminum you could use carbide router bits they will give you a nice finish and they are not to expensive. they come in a multitude of different shapes and sizes and profiles.
Is anybody out there building this engine? I know Roland started to, then ran into a glitch and hasn't posted since. I'd be really interested in knowing.---Brian
Brian I am scraping around for some material and trying to build up enough nerve to try it, looks like a lot for me but guess If I build one piece at a time I can get it done, guess it is like life, its a sinsch if you take it inch by inch, I got the drawing and copy and past everything that you posted, bringing a copy to my Machinist friend retired 30 years in the trade and he good but we are some distance apart, I know he can do it with easy, thanks again, Lathe Nut
Brian, I am still working on the radial.
I had a set back when I cut the anulus on the wrong side.
I built the upright and base but I havent had time to do much more, I will post pics on the build log when I get time.
-B-
Brian, I am still working on the radial.
I had a set back when I cut the anulus on the wrong side.
I built the upright and base but I havent had time to do much more, I will post pics on the build log when I get time.
-B-
I think you could easily save that piece by drilling all 10 of the 1/16" holes completely though the star, then seal up the ones opposite the annulus side with some epoxy.