Upshur's opposed twin engine

Home Model Engine Machinist Forum

Help Support Home Model Engine Machinist Forum:

This site may earn a commission from merchant affiliate links, including eBay, Amazon, and others.

Brian Rupnow

Design Engineer
Project of the Month Winner
Joined
May 23, 2008
Messages
14,981
Reaction score
8,274
Location
Barrie, Ontario, Canada
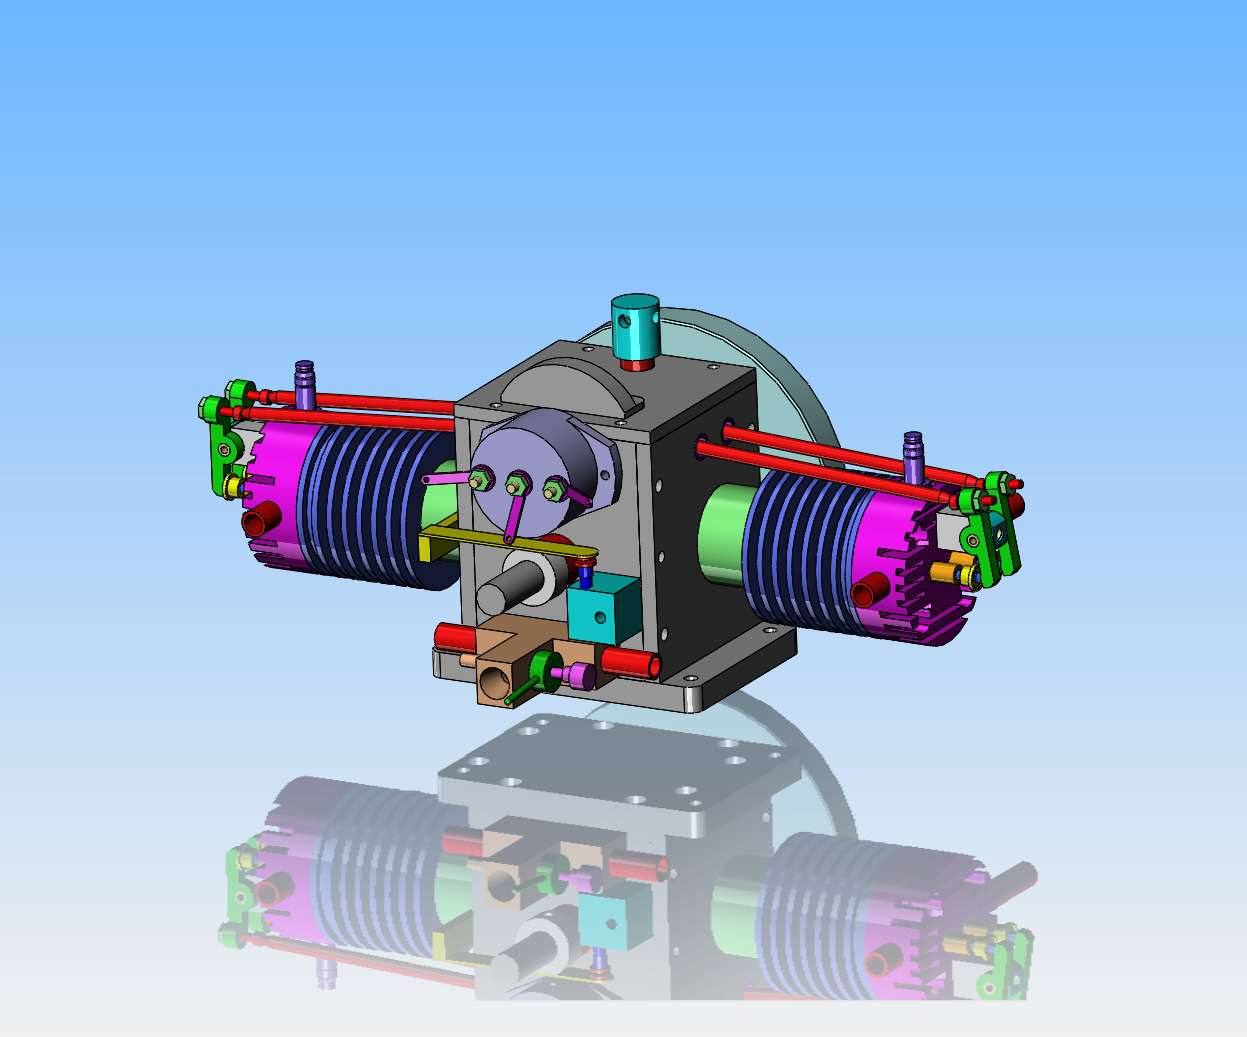
As work on my inline twin engine comes to an end, (and no, it isn't running yet) I've been feeling the urge to design something. Last week I purchased the plans to "Upshur's opposed twin engine". The drawing package is really well done, and is in 2D format. One of the big pluses about this engine is that it runs a distributor cap and rotor, something I have wanted to know more about. I have redone the plans in 3D format to familiarize myself with all of the components, and it really is a sweet looking engine. I won't be selling the plans to this engine, but it should make for a very interesting build. Andrew Whale of the U.K. just happens to be building this same engine currently. I will follow the plans for this engine---to a point. I may use a purchased set of ignition points instead of the spring brass with tungsten points soldered to it, which is used in the original plans. Stay tuned, as after I get my inline twin engine running, this will be my next build.----Brian
NJLDWi.jpg
 
on the points, my upshur single uses brass sheet with points soldered on and that works really good on mine and was easy fit in small amount of space it had. i like the upshur designs as well so i will want to watch along
 
I'll be watching...I have a start on this engine also, basically the crankcase is done. But I have some others to finish up before I get back to this. I have an Upshur Vertical Single that is almost complete.
 
You can use a TIG electrode and cut it up with a thin disc in a Dremel. To save them flying across the workshop make them well over length, solder on and then cut/dress with the Dremel then you can use the brass as a handle.
 
Here's a thread about my riffs on the Upshur twin design. I used Hall effect triggering and RCEXL twin ignition modules.
 
I'm building this engine "on the cheap". I have found enough material laying around in my shop to make the bottom plate, front plate, rear plate, cylinders and cylinder fins. The plans call for 0.156" machinists tooling plate for the sideplates, as they have to be silver soldered to the cylinders. I don't have any of that, but I think I have a way to substitute something else. I roughed out the plates on the bandsaw, and this afternoon I hope to machine them to finished size and put in any tapped holes and threaded holes.
2vJk5q.jpg
 
Now, this makes me very happy!! I machined the cylinders from cold rolled steel and machined what will become the fins from aluminum, both exactly as per the plans. The interface between the cylinders and the sleeves is a "heat shrink" fit. I machined the hole in the aluminum .003" less in diameter than the outside of the steel sleeve. Then set the aluminum in my heat treat furnace for half an hour, then used my vice and a big hammer to seat the steel sleeves into the aluminum. All went well. I have been told by someone else who is building this engine that it is much better to assemble the aluminum fin section to the steel cylinder before you cut the fins. There are always "score" marks from the assembly on the aluminum sleeves (It's kind of a brutal operation) and these marks can be machined away when the fins are cut.
vKqH21.jpg
 
Jason--you have a profound habit of stating the obvious. I just read a thread where a man building this did exactly as you say---and---When the engine heated up from running, the aluminum portion came loose from the cylinder. This made it necessary for him to use extremely long studs to tie the cylinder head into the crankcase.
 
Last edited:
Yes, I seen Andrew Whale's videos on his build of this engine. I wish he lived about 3000 miles closer to me, he seems like a good guy. I got up bright and early this morning and machined the fins into the aluminum on the cylinders. It went very well. A bit of butt clenching plunge cutting to 0.188" to make the fins, but lots of cutting oil and fairly low speeds got the job done. Now I have to call and order some ball bearings and sparkplugs.
gVAzvx.jpg
 
Brian I have been following your builds from the start. I appreciate all your innovation and documentation. I'm a little perplexed with your new build. Basically you're building this engine because it has a distributor? By this I mean you basically abandoned your 2 cylinder inline build for another 2 cylinder engine. What if you encounter the same issues with this one? Just saying! Good luck with your new project.
 
I can't say I did not have similar thoughts George, if it were just to try a distributor then adding one to a known runner such as the opposed twin Brian has already made some time ago based on the Bobcat mechanicals would seem a logical choice.
 
Probably would not score if made "exactly" as plans with the stated 0.001" fit rather than 3thou. And would not need a big hammer.
I quite agree.
I looked at some of Brian's projects and it seemed like the tolerances were too tight in the parts that needed to move, it was really a problem with small sized parts.
As I said before, Brian, you need to standardize how you build engines, compression standards, tolerances.... That will help a lot
Both projects are the same if you cannot find and solve the exact problem.
 
The inline twin is still setting on my desk, right beside me. I haven't forgotten it, nor abandoned it. Yesterday I took the battery over to the place I bought it and had them charge it and assure me that it took a full charge and that I didn't need another battery. Came home, tested it on the dual lead coil, and got lots of good spark. I tried to start the engine, even used some starting fluid, but the engine isn't firing. Engine has good compression. Next thing up will be to take another look at the cam timing. I'm sure it's right, but I will check it again to be sure. I considered putting a distributor on it, but the engine is really not configured for a distributor. ---In the meantime---I'm moving onto something else. It's just serendipity that the "something else" has a distributor on it. I will get it to run, but I need a break away from it for a little while.
 
Jason--you have a profound habit of stating the obvious. I just read a thread where a man building this did exactly as you say
No it was not exactly the same. His does not have the flange at the top of the cylinder liner so no "sandwiching" effect of tightening the head down onto the flange. If you look closely the liners are fixed to the cranckcase with a bolted flange (changed to studs) not soldered as per the Upsure drawings as they were made fron cast iron not steel so not easily soldered and if there were a flange at both ends the aluminium fins could not be slid into place.
 
Now, this makes me very happy!! I machined the cylinders from cold rolled steel and machined what will become the fins from aluminum, both exactly as per the plans. The interface between the cylinders and the sleeves is a "heat shrink" fit. I machined the hole in the aluminum .003" less in diameter than the outside of the steel sleeve. Then set the aluminum in my heat treat furnace for half an hour, then used my vice and a big hammer to seat the steel sleeves into the aluminum. All went well. I have been told by someone else who is building this engine that it is much better to assemble the aluminum fin section to the steel cylinder before you cut the fins. There are always "score" marks from the assembly on the aluminum sleeves (It's kind of a brutal operation) and these marks can be machined away when the fins are cut.
Brian,
I did the same thing when putting my Pioneer cylinder together, and you’re absolutely right, it made for a really neat assembly! I elected to cut my fins all the way down to the cylinder liner to maximize the cooling fin surface area, and it looks great.

I’m considering an opposed twin for an upcoming build and I’m watching your build as you go along for hints and tips!

John W
 
Back
Top