Back to Steam

Home Model Engine Machinist Forum

Help Support Home Model Engine Machinist Forum:

This site may earn a commission from merchant affiliate links, including eBay, Amazon, and others.
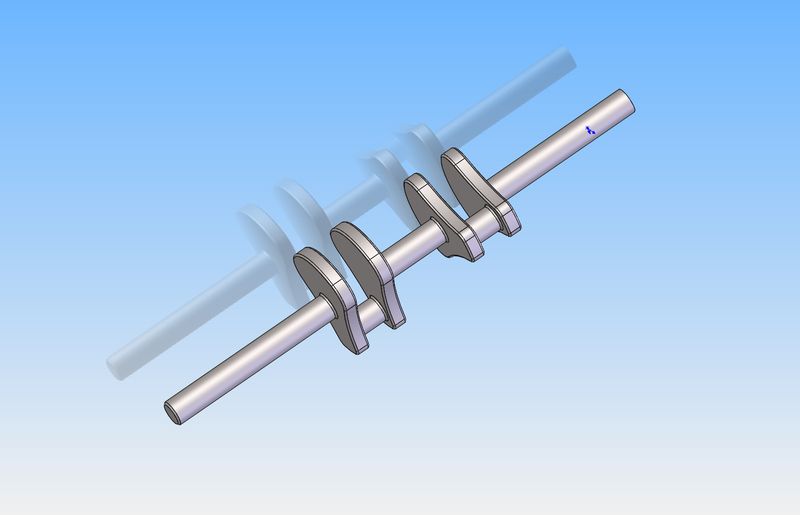
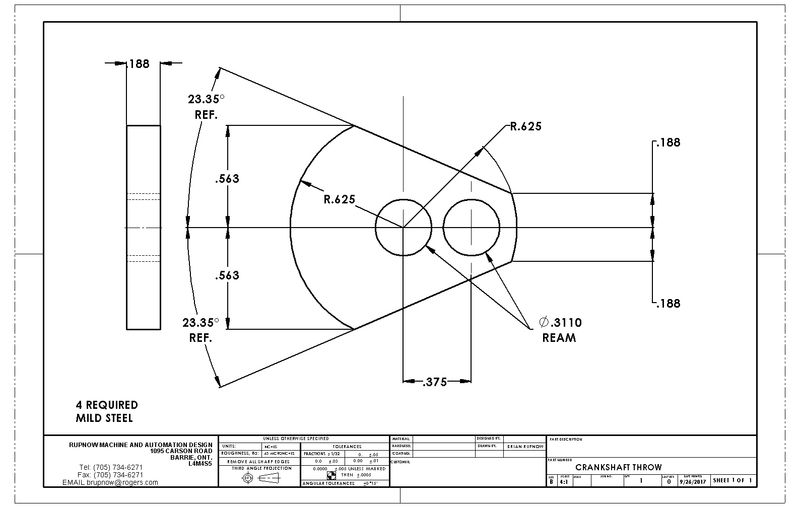
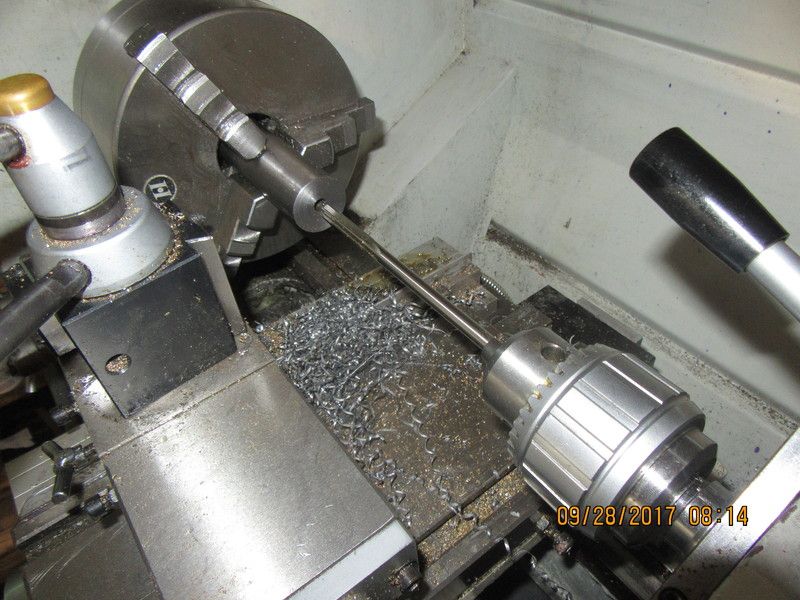
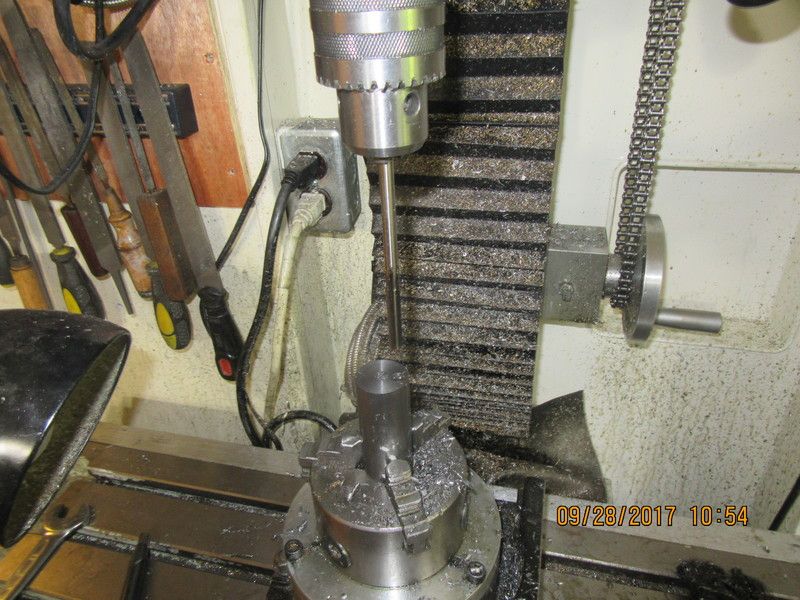
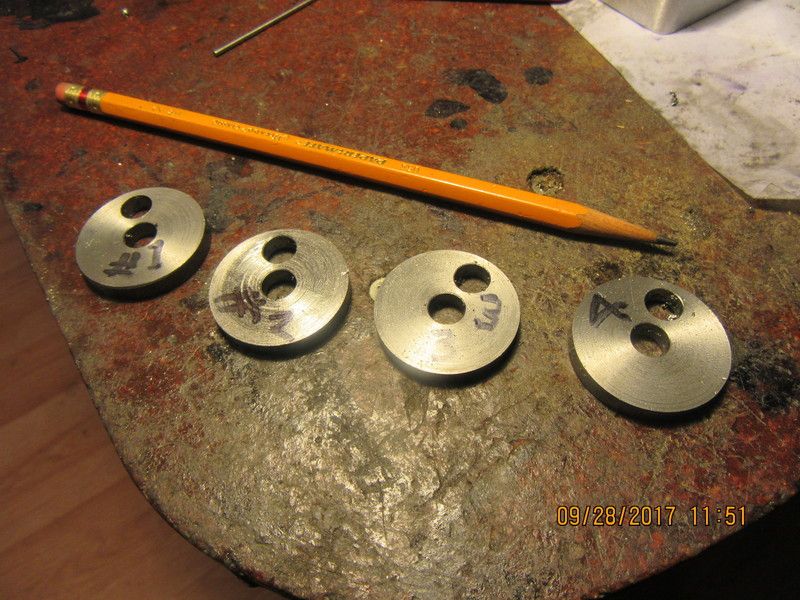
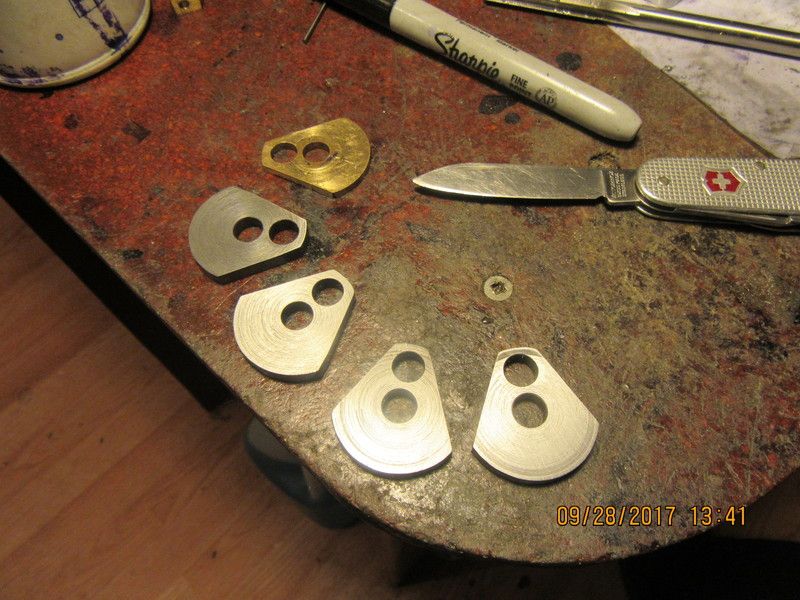
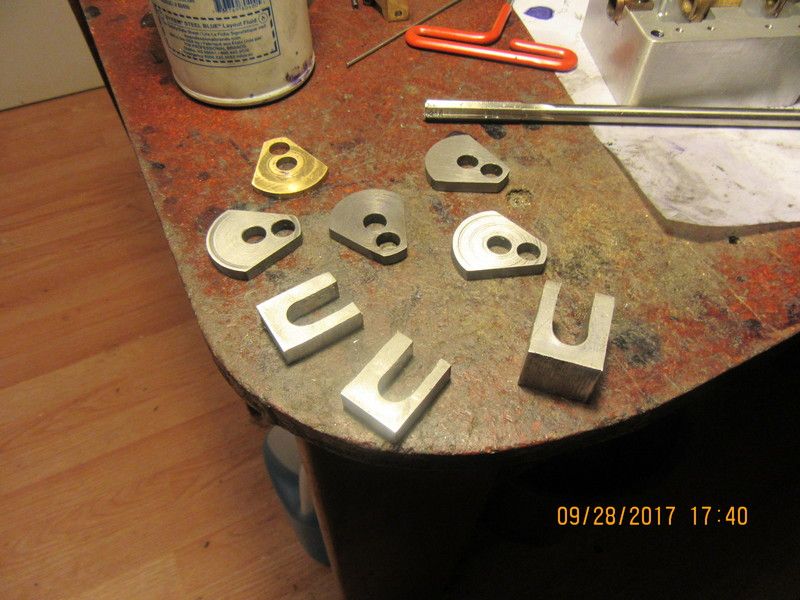
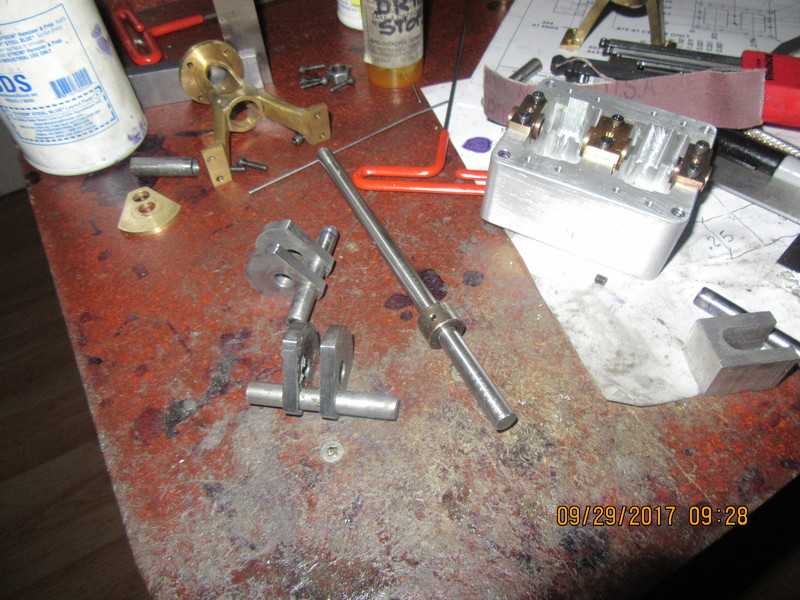
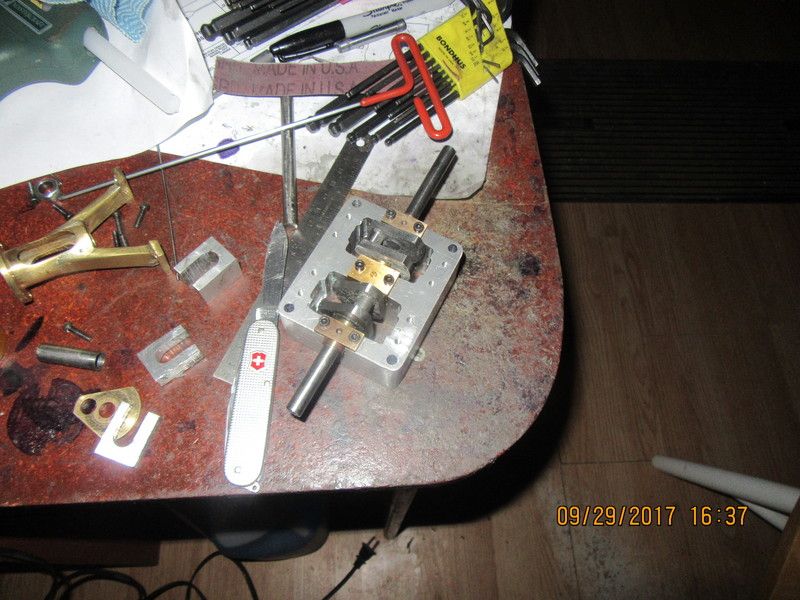
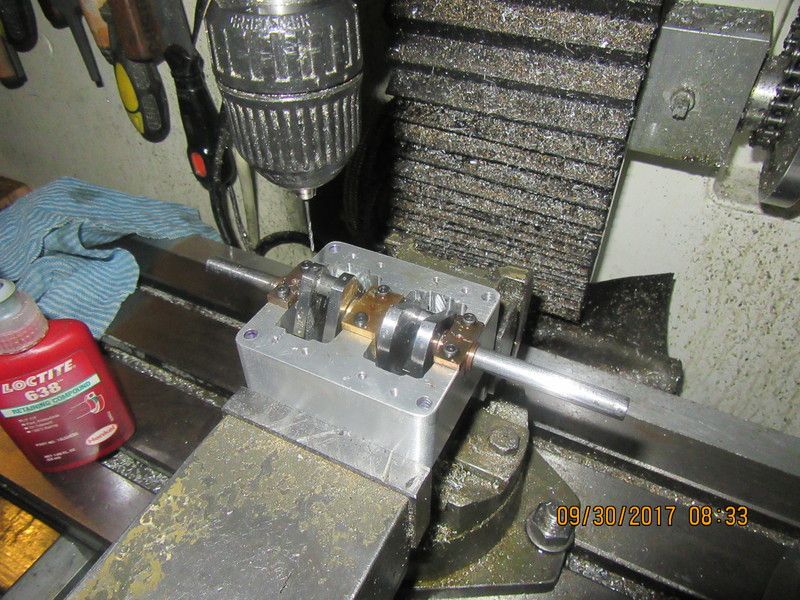
Next up will be the crankshaft. In the original plans, the crankshaft and rod journals were 0.281" (9/32") diameter, but I am blowing that up to 0.3125" (5/16) because I have reamers to suit that. The original plate crank-throws were .156" thick, but I am going to use 3/16" material, because I want the added thickness to help hold the pressed together parts more securely. I don't anticipate a problem making all the individual components, but getting everything pressed together and still maintaining the alignment required may be a challenge. The cold rolled shafting I have measures at 0.3120 to 0.3125" diameter. My undersize reamer is supposed to make a hole 0.3110" diameter. Probably a .001" press fit will work okay, as these steam/air powered engines are not high revving engines and not torque monsters.
VdzNj5.jpg
 
This is how I plan on going about the pressed together crankshaft. The grey 3/16" plates are the crankshaft "throws". The blue shaft is a "sliding fit" through these two plates and it's only purpose is to keep the two center holes in the plates perfectly aligned. The red round shaft will be the con-rod journal, and it will be a "hard press fit with Loctite" into the two grey plates. The green part is a temporary spacer which will be an exact fit between the two grey plates, probably held in place with some hot glue from my glue gun. The purpose of the green spacer is to prevent any movement of the grey plates relative to the red con rod throw and each other, when I press the long portion of the main crankshaft through everything--a hard press fit. once the crankshaft is fully assembled, I will heat and remove the green spacer plate, and mill away the remaining piece of the long main crankshaft from between the two sets of "throw plates"
8Q35WH.jpg
 
I dont know if you will be able to press fit the main shaft thru everything
maybe better a slide fit and silver solder ?.I successfully turned the
crankshaft from solid for the 8 cyinder successfully ?
 
Bazmak--I kinda sorta agree with you. I really don't want to turn this from solid. I have to study on it a bit more. The pieces are small and material is cheap. I will first try my luck on a built up crankshaft. If that fails, then I may have to turn a crank from solid material.
 
I have to make 4 of these for my built up crankshaft. My first thought was to rough saw them out of 3/16" cold rolled plate as full circles, then use the double sided tape trick to stick them to the nose of my lathes 3 jaw chuck and turn the outside diameter to finished size. (The point on the live center in my tailstock holds them tight against the double sided tape) Then I would tack weld all 4 together and set them up in the 3 jaw chuck on my rotary table to drill and ream the center hole and the other hole in the milling machine. Then I realized that these plates are only 1.25" diameter, while the nose of my 3 jaw chuck was 1.8" diameter when the jaws were completely closed.--That won't work!! --So--On to my next trick--perhaps I can chuck up a solid piece of 1 1/4" cold rolled steel round-stock in the 3 jaw chuck on my rotary table, drill and ream the two holes to at least 1 1/4" deep with my milling machine, (It is critical that the 0.375" center to center is held very exactly and that the reamed holes be perfectly parallel to the center axis of the round stock), and then move the material over to the lathe and part off 4 "slices" 3/16" thick. That works, but it will be an interrupted cut, and I never get a spectacular finish on the face of things I part off. Of course I can take a facing cut on the exposed side before each parting off operation, so the plates would have a good surface on at least one side. I'm still at the "thinking this through" stage. Material is cheap, and my time if free.--But I still don't want to have to make these more than once. The thought of machining this somewhat flimsy crankshaft from one solid piece of steel makes me quiver all over---
gJfXcZ.jpg
 
Brian, if it comes to your worst fear and you need to turn one from solid, do yourself a favour and get some 1144 stressproof. It machines really well (on par with 12L14 in my opinion) and gives a nice finish. If I can do it then I'm positive you can as well.

IMGP5936.jpg
 
Okay--Here we go. Crankshaft step #1. A piece of 1 1/4" cold rolled round stock in the three jaw chuck, the end faced, and the center hole drilled 1.7" deep and reamed to 0.311 diameter.
v78vnw.jpg
 
It doesn't show up really well, but this is the second step in my crankshaft build. After cutting off the 12" length of 1 1/4" cold rolled to about 3" long, I set it up vertically in the three jaw chuck on my rotary table. Then I picked up the center, and moved the mill table exactly 0.375", then drilled and reamed the second hole to 0.311" diameter. Now it has crossed my mind that if I wanted to, I could mount the rotary table on it's other face and mill the two flats on the crankshaft webs---but--I think I will have enough headache parting of slices of this round part because of the interrupted cut caused by the second off-center hole. I don't need the added interrupted cuts that would result from milling those flats now. I will get to that later in the process.
AtS658.jpg
 
So---With much butt clenching and clackety-clackety-clackety, I successfully parted off four discs on my lathe which are destined to become crankshaft webs. I have a 3 mm wide inserted carbide parting off blade that is worth it's weight in gold. One hand on the squirt oilcan full of cutting oil, the other hand on the lever that kicks the cross-feed out of gear if anything horrible happens. I love the power cross-feed, but it terrifies me.
9k6I6o.jpg
 
When you press fit a crankshaft together with Loctite, the Loctite actually acts as a lubricant--but---Ya don't have time to stop and take many measurements or adjustments. Once things start to move, you want as much as possible to keep it moving with no stops until you have reached the "home" position. Those three pieces of aluminum with the open slots in them are "spacers". Two represent the 5/16" between the web plates and one represents the space between the two sets of web plates.
tYeOug.jpg
 
Other than a bit of cleanup work, the crankshaft is finished. It fits where it is supposed to, goes round and round without smacking into anything, and is reasonably straight. I have found that these crankshafts for double or triple cylinder engines share a lot of characteristics with a wet noodle. When everything was first pressed together, without the main crank sections being cut out, I set one end up in the three jaw chuck on my lathe, right up to the first web plate, and put a dial indicator on the extreme outboard end. It had 0.135" total runout. After the main crankshaft was cut out from between the web plates, I stuck it back in the lathe and it measured 0.060" total runout. Then it was simply a matter of light smacks on the outboard end with a soft faced hammer, and chasing the high spot around until I got it down to about 0.008" total indicated runout. I went across town today to my tool shop, and bought a 1/16" straight flute reamer and the appropriate drill to go with it. I may drill and pin the web plates to both the main crankshaft and the con-rod journals. I have to think about that one overnight. After I was finished in the lathe, I installed the crankshaft in the engine with the bearing hold down bolts loose, gave it a few spins just to be absolutely certain that it didn't hit anything when turned thru 360 degrees, then tightened down all the bearing bolts. The Loctite I used takes about 20 hours to completely "set up". I would prefer that it "sets up" with the crankshaft in the position it will occupy, rather than just setting out on the bench. I ended up using 5/16" drill rod for the crankshaft, not because it is "better" than cold rolled steel, but because cold rolled steel shafting comes in about .0005" undersize, and I wanted more interference fit than plain cold rolled would give me. Drill rod comes in "full size", and that extra .0005" on the diameter gave me a much better press fit. I used my 2 ton manual arbor press, and had to put a 3 foot long pipe on the handle to give it enough "grunt" to press everything together.
gcgLOw.jpg
 
I got up this morning and drilled/dowelled the crankshaft webs to the main crank and to the rod journals. I don't think that in a million years this engine would create enough torque to make this absolutely necessary, but it only took an hour of my time and it gives me the feeling of a bit more security. I guess the next thing up will be the connecting rods.
1aYKul.jpg
 
Hind sight being 20/20, if I was designing this engine from scratch, I would have made the base longer, in order to allow thicker crankshaft webs. I would suggest that for engines using built up crankshafts, the design should allow for web plates at least as thick as the crankshaft diameter.
 
I decided to do something easy this afternoon. My flywheel is going to be a two part assembly with an aluminum center and a cast iron outer rim. I save all my short ends of stock, and keep using them until there is nothing left to hang onto with my chuck. That lump of cast iron just to the right of the crankshaft is going to become the flywheel outer rim.
5ENmad.jpg
 
I would just love to be doing some more with this project right now, but the pain in my back and right leg is just so ferocious I can't. All I can really do is lay around on my heating pad and take the Oxycodone pain pills my doctor has prescribed. I have a raging case of Sciatica that is still raging after two weeks. I have also developed something called "drop-foot" in my right foot, which is associated with the sciatica, and I'm walking a bit like "Lurch" of the Addams family. Getting old is not for sissies!!!
 
Take care Brian. I had a bad case of Sciatica in my late teens and know the excruciating pain you are going through. Wishing you a speedy recovery.
 

Latest posts

Back
Top