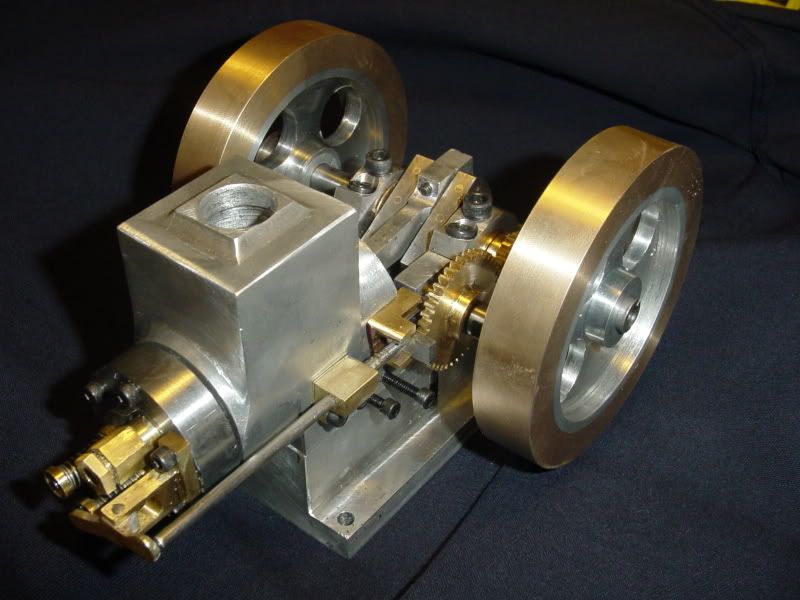
Tiny I.C. Engine

Home Model Engine Machinist Forum

Help Support Home Model Engine Machinist Forum:

This site may earn a commission from merchant affiliate links, including eBay, Amazon, and others.
John,
I started out using Coleman fuel (naphtha) but have since switched to gasoline. With the naphtha I tried running 1 percent two cycle oil in it for lube and it burned quite dirty. Switched to 5 percent WD40 with the naphtha and that was much better. Then tried regular gasoline with 5 percent WD40 and that made starting much easier and control was much easier. Then I switched to a lapped cast iron piston. This was a big improvement, still with 5percent WD40. Since there was still obviously plenty of lube I have dropped to 3 percent WD40. Exhaust is much cleaner and the piston still has plenty of lube and runs smooth. I have over 10 hours running on it with the 3 percent mix. I will be out of mixed fuel tomorrow and am going to drop to 2 percent for the next 100ml batch. I think it will be fine. It will filtered.

MB,
Test lead wire comes in all sizes. I bought a bunch when I needed some very flexible wire for some RC motors I was making. I have 21 gauge (0.080 OD) and 28 gauge (0.050) gauge. I am using the 28 gauge as I think it looks more to scale. The 28 gauge insulation is only good for 6kV so when I ran it through my metal base I ran it through some small silicon fuel line. 6kV is really OK as there is only about 4kV when the spark plug fires unless it is flooded. Then it gets above 20kV. BTWl if a Tiny builder needs some of either I can cut some off an mail it. Just can't be too choosy about color.

John, you obviously have a more artistic eye than I do, so what ever you do I am sure will look good. My work tends to be more utilitarian based on straight lines with even dimensions.

I think this group has 5 Tinys running now with at least 4 more under construction that I know of.

Gail in NM

 
Thanks for the info Gail, I think I will give the gasoline and the filtering a shot.

Arv--Your first post for Tiny was in Jan.---Did you ever think it would produce the results that it has---Great little engine---Thanks again for posting the plans

John
 
Man, you guys really dialed this thing in. I never really grasped the "Tiny" scale until I saw John's fingers.

Thanks Gail for the spark plug tips, Kel for all your carb and other input, John, welcome and awesome job, George, thanks for all your design inputs.

And of course put put man for this great design and new plague to hit the members.

;D

 
GailInNM said:
MB,
Test lead wire comes in all sizes. I bought a bunch when I needed some very flexible wire for some RC motors I was making. I have 21 gauge (0.080 OD) and 28 gauge (0.050) gauge. I am using the 28 gauge as I think it looks more to scale. The 28 gauge insulation is only good for 6kV so when I ran it through my metal base I ran it through some small silicon fuel line. 6kV is really OK as there is only about 4kV when the spark plug fires unless it is flooded. Then it gets above 20kV.
Gail in NM

Gail, You are correct. I should have said 'all my' test leads are 18-AWG. That's all I have on my equipment, and some salvaged spares that are too short for my purpose. A quick check on the internet shows that wire of many sizes including some not normally used on test equipment Ive seen and also covered with stiff PVC referred to as 'test lead wire'. :eek:

The spool of black silicone 14-AWG that I found in my collection will be used to connect the remote CDI box to the plug mounted on the base's of my up coming build's, unless some one who understands proper wiring says I shouldn't use it. From that point to the spark plug and a grounding lug on the engine, I'll be using the 3/32" 10 KV wire supplied by S&S. Not sure if the scale you mention will be correct for "Tiny" but that's what I'll be using on my larger first builds. I wonder if the spark plug wire that S&S supplies is also considered a 'test lead wire'?, or is it something else? What actually defines the description 'test lead wire'? ???

Wow, there's a lot for me to learn before starting a first I.C. build. :eek:

-MB
 
During the course of some preliminary planning I considered the shape's and construction method's commonly used on small fuel tanks for I.C. engines, I realized that tanks soft soldered together could be a cause of fuel contamination, and lead to erratic operation.

When applying heat to fluxed tank joints, Rosin flux will thin out and spread on the interior of the tank.

The use of a solvent or cleaner that will completely dissolve and wash out the baked on flux inside of fabricated fuel tanks and carburetors is needed.

-MB
 
Wow, I go away for a few days and look at all the videos!

First attempt starting mine today, ran for 20 secs or so each time. Not a surprise since I haven't done any tuning except to find the very tiny spot where the carb adjustment lets it run.

I need to get the photos out of my camera, although to be honest everyone elses look much nicer than mine. Maybe I should blur the pictures? :big:


Lee
 
Hi Lee,
Just the fact that you built one and it runs is what this forum is all about. Anyone who creates something with their hands has accomplished a great deal. Whenever you get a chance post a picture or video.
As far as the sweet spot for running, I have the same situation with mine. I spin it over until I hear it start to pop a little and from that point the carb can only be minutely adjusted before going too rich or lean.
gbritnell
 
Congratulations Lee,
Twenty seconds!! That counts. We now have 6 running Tinys.
Thm: Thm:

Actually, I was thrilled the first time mine ran for 20 seconds. Just a matter of refining one thing at a time and it will be a steady runner. Now it is one flip starting and then let it run for 10 or 20 minutes at a time for background "music" while I am doing something else.

My Tiny is torn down some what for some more modifications. More on that later today (I hope).
Gail in NM
 
I just love this tiny engine, this thread is awesome. Hats off again to Putputman for doing such a good job designing something from scratch, putting the design out there for people to try and not only that but everybody is getting a runner.

:bow:
 
Wow! I have been away from the forum for a couple days and they are three new engines running.

John, that throttle control works real well. I am going to add that to my engine. And yes, I am really surprised and tickled with all the activity Tiny has created. It is especially nice to see some people build Tiny as their first I.C. engine.

I can't believe all the fine tuning that Gail has done with this little engine. Between him and George there is a lot of good information that can be used on just about any small I.C. engine.

I do not have any background in I.C. engines so when I get one to run at all, I do not fool around very much trying to fine tune them. I have found that just about all of my engines are timed at TDC to slightly retarded. The only engine that run better at advanced timing was the V-Twin which was set at about 8* BTDC. On the three Associated engine I just complete I am using CDI ignition fromm S/S and have built an adjustable timing device similar to Georges. All three of those engines also run best at TDC or very slightly retarded. ??? ??? ???

Lee, I'm looking forward to some pictures and videos. Don't you dare blurr them.
 
Lee if it runs for twenty seconds, it's a runner. Please post pictures!

Gail---Seriously? One flip starting?---Very Impressive, how about some "tuner specs. and tips" Mine can still be tempermental at times, especially when cold.

Just a thought, but if anyone is good at photoshop, a combined group picture of the "Tiny Family" would be neat.

John
 
I may have found what made two hall sensors defective. I too am using the S & S ignition. I had the plug wire off, holding it still, when I saw the ignition was on. When I turned it off I got a nice shock from the plug wire.

Now I wonder if perhaps I had taken the plug wire off and then turned off the ignition in the past. Maybe that's what defectivated the sensors. ???

Just my thought for the day.

Yes, pictures coming. Really.

Lee
 
John,
No special tuner tips. Just tenacious as a bulldog. Actually I am having so much fun that I don't mind taking it apart at trying something new. It's so simple that all the important parts can be taken off and put back on in under 15 minutes. When something seemed to work then I would leave it. And yes, it really does start on the first flip almost every time.

In a sort of chronological order of the things that were done from the beginning, keeping in mind that it ran from the beginning. Everything is described somewhere in this thread.

1. Changed needle valve to close fitting annular needle. This greatly improved the ease of adjustment from "did I move it" to currently about 1-1/4 or 1-1/2 turns full rich to full lean.

2. Changed fuel from naphtha to gasoline and lube from 2 cycle ashless oil to WD40. Change was done in a number of different steps with final runs at 5 percent WD40 using o-rings and now at 3 percent using lapped piston. Goning down to 2 percent soon as next round of mods tale place. Some where along the way I started filtering the fuel and this got rid of surges while running.

3. Reduced venturi from 0.093 to 0.082. Improved fuel draw and eliminated mixture change from full tank to empty tank.

4. Replaced o-ring piston with a lapped cast iron piston. This got rid of overheating when running wide open lean for an extended period of time. Top end rpm also seemed to increase some and starting was easier as the reduced friction let me spin it over faster.

6. I played with compression ratios and they did not seem to make much difference. Currently at 5.5 to 1.

7. Went to a conventional spark plug negative electrode. I had been using a surface discharge plug. This reduced the plug fouling when rich and made flooding the engine a thing of the past.

For starting, I have a 3/4 inch knurled knob. I had made an extended crankshaft so it just fits behind the rear flywheel. My flywheels are quite smooth and difficult to get enough friction to start with finger on the flywheel rim. I can do it, but I have to put a lot of pressure on the flywheel. Smoothness comes from one of my extended full throttle runs. I put a load on the engine with a rag with metal polish. About 10 minutes on each flywheel.

Because of the annular type needle valve, fuel does not flow back to the tank draining the fuel line when stopped. Surface tension of gasoline and all that sort of thing. The key to first flip starts is to stop the engine with the ignition while there is still fuel in the line. I takes a little effort to get fuel past the needle valve if the fuel line is dry, usually choking for several revolutions after the fuel is up to the mixer. Then, even if the engine has set for a day it will start right up. If the engine is cold and I shut it down while running lean, I open the needle valve up about half way between rich and lean positions.

Gail in NM
 
Thanks Gail, a lot of good info, in one easy to find location. I thought my Tiny was finished, but I think it needs more tuning. Gonna go back and read about the carb needle change. Thanks again
John
 
Gail, I like your method of polishing the flywheels. Make the engine work for you, now thats cool.

This annular needle you speak of. Is it still a sewing needle, just more taper? I have not yet used a sewing needle. I have been using piano wire. By putting it in the lathe and using a dremel with a grinding wheel, I put a taper on the end of it, then using light pressure and high grit sandpaper I smooth it out a bit. I have made about 5 of them so far and it seems the one's with the longest taper work best.

I have yet to try filtering the fuel. I probably should though, I still haven't made a fuel cap yet. :hDe: and there is without a doubt dirt running through the engine, especially with my crude method of mixing and filling the fuel.

Kel
 
The annular needle setup was done with a sewing needle. They are smooth and have a uniform taper up to a point where they become parallel. The idea is to make the longitudinal hole in the spray bar just large enough that the needle can enter with the parallel section to form an annular passage for the fuel.

I opened up the longitudinal hole from 0.018 to 0.020 with a #76 drill bit and used a #10 Sharps sewing needle which measured 0.0195 for the needle. Measure the needle if you do this as I found some variation in diameter. This let the needle form a narrow passage to let the fuel flow through.

I posted a chart of the nominal sewing needle sizes in the downloads section.
http://www.homemodelenginemachinist.com/index.php?action=tpmod;dl=item309

Because of this skinny passage it is very easy to clog with any fine lint or other crud. That's why I keep harping about the filtering of fuel.

To put the amount of fuel in focus, my Tiny is getting about 30 to 40 minutes on 9ml of fuel for a fuel consumption of 1ml in 6 minutes. Now, a semi-standard definition of a drop is 1/20 of a ml, so a drop will run Tiny for about 18 seconds. At 3000 rpm, that's 900 revolutions, and being a 4 stroke engine 450 power strokes. So each power stroke is using 1/450 of a drop. Not much to be metering.

Gail in NM
 

OK I'm hooked; with the number of builds and tips in this thread this has got to be somewhere up there on my next build list.

No doubt this has been asked before but am I right in assuming that the Kerzel Brian is building over here http://www.homemodelenginemachinist.com/index.php?topic=10831.new;topicseen#new is the basis for the Tiny IC?

GEARSANDFIDDLYBITS004.jpg


Pete
 
Pete, when I designed Tiny I.C., I designed it off the Upshur engine and cut the dimension in half. There are also quite a few changes that I made myself. Some of them are the solid construction of the frame instead of fabricating it. The built in gas tank like I used on a larger engine I built several years ago. The connecting rod is different then anything I have ever seen and came about because of space limitations.
 
Sorry hadn't wanted to appear to be accusing you of plagarism just the coincidence that these designs are similar and was curious. I'm looking for a next build and this may just be it I do like the variations everybody has included.

There are soem marked similarities between the two types (if not size) and on the tank I see Brian was questioning whether or not to put his underneath.

Its a great job by everybody with the various improvments each have contributed.

Pete
 
My Tiny is put back together but the main modifications have not been installed. Just holes drilled and tapped in the frame to bolt them on later. One modification that I did complete was to put a three pin connector in the rear of the base. There is already one there for charging the battery so this one is of opposite gender so the charger can not plug in. The connector is just wired in parallel to the hall effect pickup so I can plug in some ancillary devices. A tachometer to display rpm with out having to fiddle around with holding up a photo tach or mechanical tach. Leaves both hands free for tinkering. A voltmeter to check battery voltage while the engine is running, and a timing light LED to verify the hall effect device is operating and to aid in timing. Nothing very exciting.

I plugged a surplus tachometer in that was supposed to be happy with that type of signal. It wasn't. Not too supprised as it ws old when I got it used for a couple of dollars. So, since Tiny is portable I carried it back to the electronics bench and hooked it up to my scope which has a calibrated interval counter in it.

Wide open it was dead on 10ms per revolution and very steady. Full rich was 45ms with some jitter as it was occasionally misfiring. This translates into 6000 rpm and 1330 rpm to answer the "how fast will it go" and "how slow will it go" crowd.

Gail in NM
 

Latest posts

Back
Top