Tiny I.C. Engine

Home Model Engine Machinist Forum

Help Support Home Model Engine Machinist Forum:

This site may earn a commission from merchant affiliate links, including eBay, Amazon, and others.
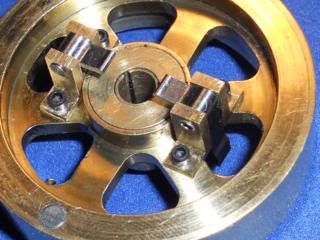
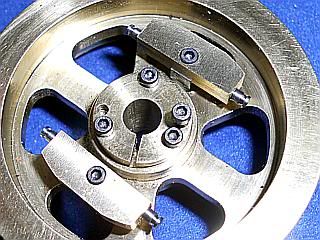
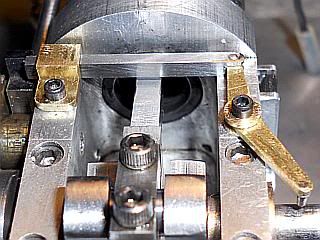
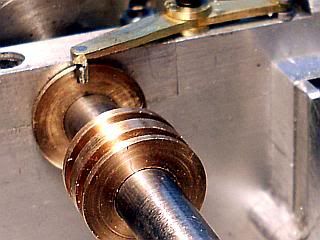
"Tiny" has gone missing. Actually Hit-N-Missing. Just a couple of teaser videos to show the work from this last week.
Video are with junk box springs in the governor and Tiny is running about 3700 rpm. New springs are about to be wound and there are a few other adjustments to be made. This coming week I will try to get some still photos up and maybe some more video as the tuning progresses. Busy week upcoming so I may be a bit slow.
Gail in NM

[ame]http://www.youtube.com/watch?v=0samHGH4dPw[/ame]
[ame]http://www.youtube.com/watch?v=ONUecyBnxoY[/ame]
 
That's great Gail! I can't quite see how the cam follower is being held away from the cam for the "miss' cycles, but I bet more info will be coming

Lee
 
Lee,
Here is another video showing the detent on the cam follower on the left. Operation is as follows.
The bell crank on the right side has a pin that is engaged in a spool that is driven by the pivoted weights in the flywheel. It moves the bar that is just above the cylinder so when it is extended to the left by the bellcrank it engages the detent on cam follower the next time the cam follower is operated. This holds the exhaust valve open. As the engine slows down the bar is moved back to the right and the follower is allowed to return to rest on the cam for a normal power stroke. Both the cam follower and the detent bar are hardened so there is a sharp edge for a uniform trigger action.

I have a new camera and am still learning how to use it to get close up video, preferably without getting oil on the pretty new lens. ;D Bear with me.

Gail in NM

[ame]http://www.youtube.com/watch?v=x12_EoLI7-U[/ame]
 
Wow! That's really nice Gail! I love the sound and all the action. :bow: :bow: :bow: :bow:

The experts on this forum are motivating me. I can't wait to see my first I.C. running. :)

-MB
 
Argh!! I can't see the teaser videos here - that's teasing even more! :mad:

I can't wait to get home, wife will go crackers as I will be straight on the computer! ;D

Nice work Gail!

Nick
 
Gail, I love it. :big: :big: :big:
I was wondering how you were going to squeeze all that activity into the area by the gears. ??? I never thought about putting it on the other end of the crank. Very clever. ;D
Are you targeting any particular RPM to kick in & out?

 
Thanks MB, Nick, Arv and Tim. I am glad you are enjoying the Tiny H&M project.

MB - We are not experts. We have just made more mistakes than the beginners and occasionally learn something from them. All of us will be watching for your first IC engine.

Nick - Just a little more incentive. Besides this post has a new video with it.

Arv - Now I have played with the rpm range some. The rpm I stated in my first videos was wrong. Did not look at the range setting correctly so the rpm was actually about 3400. I now have played with springs a bit and have settled on 2000 rpm which is what it is running at in this video. I did not design any hysterisis into the design so there is very little variation between pull in and drop out speed. Watching on scope maybe 200 rpm max. I had it running at lower speed, about 1600 rpm, but it would not take a load and recover very well. I have a project in mind for this engine eventually with a variable load so I was targeting that. Since this video was shot yesterday I have improved the hit and miss action so it is much smoother today.

On a slightly different note, before the H&M conversion my fuel consumption has been increasing as I tweaked timing and exhaust cam position. I was down to 40 minutes on 9 ml of fuel. I think this was because the engine was running faster at any fuel setting so while the fuel consumption per stroke was the same, there were more strokes in a given time so more fuel was used. Any thoughts on this anybody or am I full of it?

Continuing on however, with it is H&M mode I have made one sustained run on of 9 ml of fuel and got 2 hours 5 minutes. The run was broken into two parts as my batteries went dead 50 minutes after starting the run. So my fuel costs have dropped a bunch. ;D

Gail in NM

[ame]http://www.youtube.com/watch?v=P4eWX8Vz02Y[/ame]


Thanks, Ron.

During the last run I noticed that a couple of times the engine would slow down going through a few power strokes without firing. It would not stop, just miss a few strokes that it should not. I pulled the plug and had a look. A bit dirty. ;D

Hit it with a blast of brake cleaner and then some compressed air and reinstalled it. I have a micro-grit air eraser (mini sand blaster) but was too lazy to get it out. Engine has run fine since. I don't think I have ever cleaned this plug. It has been in probably 25 to 30 hours, much of it running slow and rich before the hit and miss conversion.
Gail in NM

Spark-0013.jpg
Spark-0014.jpg
 
Here are the promised photos of the hit and miss conversion parts for Tiny.
HitMissParts-0001.jpg

Top row has the governor weights with spring mounting pins mounted in one of the. Also the spool which is made of SAE 660 bronze.

In the middle are the arms and arm mounts along with a semi-tubular pin used to mount the together.

On the bottom are the cam follower which is made of O-1 steel and hardened. The bushings for mounting it are next to it. On the right is the bell crank attached to the latch which is also hardened O-1 steel and the pivot bushing for the bell crank.

HitMissParts-0002.jpg
HitMissParts-0003.jpg


Detail photo of the governor weights with spring attachment pins Loctited in place with Loctite 680 and a photo of the operating arms with the mounting brackets assembled with the semi-tubular pivot pins.

HitMissParts-0008.jpg
HitMissParts-0004.jpg


Operating arms attached to the flywheel and on the other side the weights attached to the operating arms.

HitMissParts-0005.jpg
HitMissParts-0006.jpg


The bell crank and latch are mounted on the frame. Notice the pin on the end of the bell crank in the lower right corner of the photo. It is made from a hardened 1mm drill blank and silver soldered to the bell crank. Not shown in a previous photo is the guide for the latch near the left end of the latch. The pin on the bellcrank engages the spool on assembly as shown in the second photo.

HitMissParts-0007.jpg


The the operating arms are engaged in the spool before the spool and flywheel are slid on to the crankshaft. The bell crank has been left loose so it can be lifted to engage the spool.

Not shown are the springs. They were made of 21 active turns of 0.012 music wire wound on a 0.093 mandrel. When released from the mandrel the expanded to 0.14 diameter. I wound about 30 turns on the mandrel then cut to length and formed the ends after releasing from the mandrel.

Gail in NM
 
Great work Gail, and many thanks for the detail on the governor linkage. Outstanding as usual. :bow:

And economical too. If my numbers are correct, with that 9ml of fuel over 2 hours and 5 minutes, 2000 rpm, and 1.75 inch flywheels, you're getting 9,126 miles per gallon... ;D

Regards,
Rudy
 
Great Job Gail!!

You sure know how to fit a lot in a small space :bow: :bow:

I love the pic of the spark plug, Now that is some carbon buildup.

Kel
 
Gail,
What a fantastic project. The many experimentations and the development you have put into this little engine is outstanding. I would recommend to anyone wanting to build a 'Tiny' engine to seriously consider this one as long as you can work in smaller sizes. Although I have built some very complicated and time consuming engines I was completely taken with this one when I first saw it. I even put aside one of my other projects to complete it. I don't have the fortitude to keep playing with it as you have and wish I could get it started by hand but it seems no matter what I do it just won't quite keep going when it is running very slow like at start up.
Congratulations for your fine contributions throughout this project. I would also be remiss if I didn't include Arv for starting this whole thing.
gbritnell
 
Thank you for your kind comments Rudy, Kel and George.

Rudy, I don't think I will go broke buying fuel. Fuel cost should be around one cent an hour including both the gasoline and WD40.

Kel, The amazing thing is the engine was sill running well with all that gunk on the plug. Actually that was mostly an oil gunk on the plug and not hard carbon. I pulled the head and it was dirty also along with the combustion chamber portion of the cylinder. It all wiped off with a paper towel. Since it was an oil buildup I have reduced the fuel mixture to one percent WD40. Inspection showed that the cylinder and piston still had plenty of oil. I have run an hour on the new mix and the piston/cylinder still look like they are getting plenty of oil. While I was at it I gaped the plug up to 32 thou from the 25 thou that I had it at.

Update!! while I was typing this, the engine stopped. The piston was dragging in the cylinder due to lack of lube. It had run about an hour and half on the one percent mix. What I really should do is put an oiler on the cylinder and do away with mixing fuel completely. But for now I think I will just try 2 percent.

I put a drop of oil on the piston and turned it over by hand a couple of time and it is back to running just like it had been.

George, I enjoy refining things just as you enjoy putting a fine finish and finish details on an engine. I just want to see them run and as long as the machining marks are gone it is an acceptable finish for me. I like smaller models and have done them for many years. Unfortunately my eyes have deteriorated the last few years where the smaller models are more of a challenge. It takes a 2 power visor to find a 0-80 screw, 3power to tell which end has a head and 5 power to tell what kind of head. But as long as I can keep building toys I am happy.

There are several more "Tinys" underway that I know of. It is a good starter IC engine. It is easy to get running, although like any other engine it takes a little time to get it where you want it. Mine ran stock right away, but was difficult to hand start. Biggest improvement in hand starting was changing to a lapped piston/cylinder using cast iron for both. That's something you might try if you have a lull in your other activities.

****
I think that this concludes my "Tiny" project. I still have to replace the bottom plate with revised engraving for the gasoline fuel, but that can come anytime. Maybe I will build an oiler sometime if I feel the need, but not right away. I have some other projects in mind that I have been drawing while playing with "Tiny". Just have to decide which one to do and order material.

Thank everyone for their support and following along my portion of this thread. I will still be following this thread and will be glad to help anyone who is building, or decides to build, a "Tiny" in any form. And many Thank You's to Arv, Putputman, for starting this fun project that many of us have been and are enjoying.

Gail in NM
 
Gail---Fantastic work. I admire your conversion to a hit and miss style engine. Now---Help me out guys, please. I am going nuts trying to get some appreciable compression on my Kerzel engine build. Its just not happening. Tonight I screwed an adapter with a small hose on it into the sparkplug hole and tried to blow through the tube with both valves in the normally closed position. I couldn't do it, although if I manually pushed down the end of the valve stem on either the exhaust or intake valves, I was able to blow through the tube with no trouble. This lead me to make a few calculations. Volume of the cylinder with piston at top dead center is 0.093 cubic inches. Volume with piston at bottom dead center is 0.447 cubic inches. This gives a compression ratio of only 4.8:1-----Maybe thats why I'm not feeling any noticable compression when I turn the engine over by hand??? How much compression can you "feel" when turning one of these Tiny engines over by hand?----Brian
 
Thanks Nick and Brian.

Brian: I was just getting ready to respond to your Kerzel thread on compression with some suggestions. I will do so in that thread so people can better follow along. Probably in 20 minutes or so.

A little update since I am here.
I reset the ignition timing and valve timing and am getting about 2 hours run time on 5 ml of fuel. It is hitting about 1 in every 10 revolutions or 1 in 5 power strokes. I have run on 2 percent fuel now for about 6 hours and pulled the plug. It was a little bit dirty, but not enough to have to clean it. Just an oil film on it. I will put an oiler on it sooner or later however so I don;t have to mix fuel.

Gail in NM
 
A few days after my last post, about 2 weeks ago, I took a break from my next project and put an oil cup on Tiny.
Since then I have run 160 ml of straight gasoline through it. I run it in the background while I am doing other things. I put 5 ml of fuel in it and when it quits running I take a break. I have been getting about 1 hour 50 minutes on 5 ml of fuel. That makes for about 58 hours of running since adding the oil cup. I pulled the plug and there is no oily residue on it. A little bit of carbon, but nothing serious. I brushed it off with a tooth brush and reinstalled it.

I had to offset the oil cup from the center line as there is a cylinder mounting bolt on center line. On the bottom of the cylinder, I cut an 1/8 inch wide groove 1/32 deep and drilled 6 evenly spaced 0.040 holes from the groove into the cylinder. I wound about 20 turns of cotton/polyester thread loosely into the groove to distribute the oil.

The oil cup was turned out of 3/16 brass with the cup part about 5/32 inch long and the cup drilled out with a 1/8 drill. The feed pipe was turned to 3/32 diameter and drilled with a 0.040 drill. It is just Loctited into the cylinder mount. I use 10 weight machine oil, DTE 24, for lubrication. I put 4 drop into the cup for every 5 ml of fuel. I tried 2 drops but s little drag starts showing up after about an hour.

OilCup-1.jpg


Just for fun, this evening I pulled one of the governor springs off. With both springs on it was running about 2000 rpm. With just one spring it is about 1100 to 1200 rpm. It would run slower, but I am too lazy to wind more springs. It has been running for 2 hours 40 minutes so far this evening and still going strong. I am going to bed in another 15 minutes if it out of fuel or not. I will update the final run time when I know it. .

EDIT: It just made it before bedtime. 2 hours 53 minutes on 5 ml of gasoline.

Here is a short video of it at low speed. Now back to the new project.

Gail in NM

[ame]http://www.youtube.com/watch?v=eKB8uECIksY[/ame]
 

Latest posts

Back
Top