Building a Bonzer Bonzer

Home Model Engine Machinist Forum

Help Support Home Model Engine Machinist Forum:

This site may earn a commission from merchant affiliate links, including eBay, Amazon, and others.
Thanks for the tip on the carby window Brian. I've also had an offer by a HMEM member to make one by laser cutting from a sheet of acrylic. What a great bunch of guys here.

I remember your post about running in the engine Brian. IIRC you posted a video or at least described it in detail. That's encouraging because I have some compression now so adding to it can only help.

Cheers,
Phil
 
A little more fiddling tonight with valve spring tension and I'm getting the intake valve to open while I spin the flywheel by hand.

I put a restrictor on the intake port that will be part of the Ridder's carby air makeup air valve.

All of a sudden it occurs to me...carby and ignition and I'm there. I'm getting pretty stoked.

Geez Louise, I gotta go and buy some (Coleman) gas!;D;D;D;D

Oh yeah, flywheels and the water tank too. It'll be a while:(

Cheers,
Phil
 
Last edited:
I've completed all the parts for the Ridder's carby and loosely assembled them. All I need now is the acrylic disk for the window, coutesy of HMEM member GailinNM. Once that arrives I'll put the carby together permanently with some adhesive.


I wasn't able to smuggle a pimento jar out of the Kitchen, my wife uses those types of jars to store spices. So I made the tank out of some aluminum pipe I had on hand. Besides, when she saw the finished engine with one of her spice jars full of fuel I'd be busted:mad:

I've started to acquire ignition parts. I went to a small engine repair shop and got some breaker points and condensor. Last time I bought breaker points was in 1983 when I did a tuneup on my pickup. 30 years and I've not advanced one whit.

A friend loaned me an ignition coil from a Deutz tractor to try. I need to make a cam for the breaker points and have no clue how much lift I should give it so I'll play around with that.

As soon as I had the valve train and piston rings in and established I had some compression/vacuum I purchased a pair of flywheel castings from Martin Models. When they arrive I'll be busy for a week finishing those.

Thanks for looking in

Cheers,
Phil
 
Philjoe--The ignition cam only needs about 0.060" of lift. It doesn't even have to be cam shaped. Just take a 1" diameter disc the width of the rub block on the points and drill a hole offset 1/32" from center for the crankshaft, and put one set screw in to hold it in position on the crank. The setscrew can be centered on the face of the disc and pass under the center of the rubbing block on the points without any problem.---Brian
 
That's a good looking fuel tank Phil, much better than the Pimento jar.
And the ignition is coming along too!
It should run with one flywheel if you can't wait to machine the other one.

Jim
 
It should run with one flywheel if you can't wait to machine the other one

Thanks Jim. That's good to know in case I botch one up.

The acrylic disks have arrived and they fit perfectly. Thanks GailinNM. That finishes the carby except for Brian Rupnow's check valve. I just received the steel balls for making that.

The flywheels have arrived and look super.

If I was a pessimist I'd be telling myself, no need to make the water tank, this engine will probably only run for a few minutes anyway. BUT I'm an optimist, so I started on the water tank and will post pictures of that item when completed.

Thanks for looking in

Cheers,
Phil
 
Had one of those days in the shop where I learned something but didn't make anything.

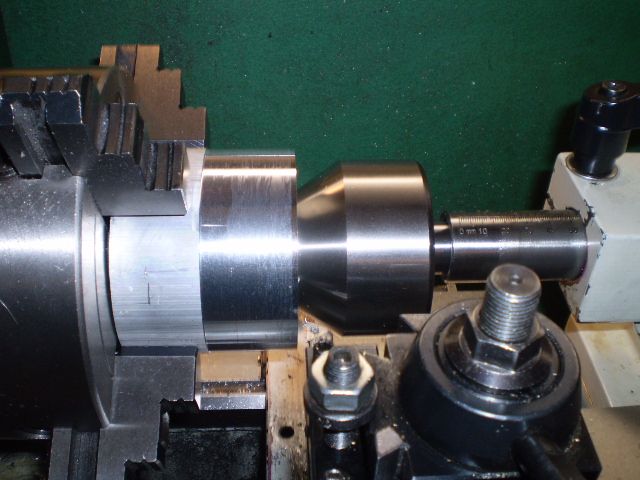
I'm making the water tank which is a bit over 3" diameter (80 mm). I found some 3" (nominal OD, actual is 3.5") aluminum pipe. At first I gripped the workpiece on the inside jaws of a 6" four jaw chuck. Turned the OD using a bullnose center


When I flipped the work around I ended up with a very bad junction on the OD. I do not expect this using a 4 jaw independent chuck.


I found that the inside jaw capacity of this chuck is just over 3". So I thought maybe I wasn't getting a good grip on the work, so I switched to the outside jaws. A bit better result but still an unacceptable junction. At one point I noticed when facing the work, the inside bore was not concentric to the OD.


When I put the bullnose center back in the bore and tuned the lathe on I could see the very slightest wobble of the center. So the bullnose was part of the problem causing the work to wobble while turning the OD.


I bored the center about 0.030" out on one end since I need to eventually expand the bore anyway. Put the bullnose in place, turned the OD as far to the chuck as I could. Switched the work around, bored out the end true, put the bullnose in place, set the handwheel for the OD and the junction is almost invisible.


I'm sure I could have made an OK water tank with end plates. But I really didn't want to move on until I understood what was going on.


Sometimes what seems like a simple straightforward machining operation throws you a few curve balls.


Cheers,
Phil
 
(Quote)When I flipped the work around I ended up with a very bad junction on the OD. I do not expect this using a 4 jaw independent chuck.

Did you use an indicator when you turned the piece around in the 4 jaw chuck, indicating off the part that you had already machined, or did you just put the pipe centre back in and rely on that for getting it central.

Paul.
 
Hi Paul,

When I flipped the work around I indicated off of the machined surface. That was the puzzler, but I'm confident I traced the problems down. Whenever I've turned down stock in a 4 jaw and had to machine the entire outside diameter I always get a junction that's almost impossible to spot.

On these hobby lathes (mine, anyway, a 330 pounder) there's enough flex in the tailstock so that a bullnose center placed into an eccentric bore will put a wobble in the work.

Cheers,
Phil
 
Phil, with the short piece that you are turning, using a centre is a bit of overkill. It seems that the centre was causing your problems.

Paul.
 
Paul,
I'm sure you're right. In hindsight, I had chatter using the inside jaws, so I used the center to reduce it. Then went to the outside jaws when the junction was bad, then finally traced all my woes to the center being used with an eccentric bore.

I tend to use a center unless it's not physically possible or when I have more than 1.5x diameters sticking out of the chuck.

I never turned pipe before and made the bad assumption that the bore was true.

Cheers,
Phil
 
I finished making the water tank and the end plates. Parting the first end plate was an adventure with the amount of stock sticking out of the chuck so I used a center to get most of the way through, then finished the cut without the center


The tank with one end plate


And the tank installed on a "bad" cylinder but with the appropriate external dimensions:

One view:


and the other end:


Your plan dimensions are dead on AussieJimG!

I still need to mill a hopper port in the tank. Otherwise, I'll fill the tank with water (or sodium metal:rolleyes:) and hermetically seal the tank and be done with it. All right, I'll make a hopper port.:p

Check back in a few days.

Cheers,
Phil
 
Moving right along, the water tank pieces have been completed:


And shown from the cylinder end


and the head end


The tank is loosely put together while I determine whether it can be permanently fixed and still slide over the cylinder.

T(h)anks for looking in:p

Cheers,
Phil
 
How do you seal the rectangular box to the outer cylinder so its water tight

I'll probably use JB Weld to put the tank together. It's the same color as ally and blends right in. Then some Permatex gasket compound to seal the joints between the tank and cylinder.

Cheers,
Phil
 
It should slide right over.
You can just see the JB Weld and it is watertight.
I was lucky to have a length of 50x50 Al tube with the radiused corners.

It looking good, not long now.

Jim

PA190862.jpg
 
With a bit of filing on the corners, the square ally tube fits nicely into the hopper. Thanks for the info Jim, I was hoping it would slide over but wanted to be sure.

Many years ago I built this 8' dingy in my basement. Only one way out.
I had about 1/16" clearance in the doorway but managed to remove it.


Cheers,
Phil
 
I started permanently assembling the water tank today using some 6 year old JB Weld I had laying around. Still sets up like new.

I made a batch of oilers and put them in place. I made them with some 7/16" brass hex stock.


Won't get to the flywheels until next year:p. Which reminds me have a Happy and Healthy New Year everyone

Cheers,
Phil
 

Latest posts

Back
Top