Looks great so far. I'm suprised at the 6 year old JB working.
You are using an out of date browser. It may not display this or other websites correctly.
You should upgrade or use an alternative browser.
You should upgrade or use an alternative browser.
Building a Bonzer Bonzer
- Thread starter Philjoe5
- Start date

Help Support Home Model Engine Machinist Forum:
This site may earn a commission from merchant affiliate
links, including eBay, Amazon, and others.
Philjoe5
Well-Known Member
- Joined
- Jul 12, 2007
- Messages
- 1,727
- Reaction score
- 321
Steve,
I've had mixed results with T-88 type epoxies. I built the boat shown in post #139 of this thread in 1983 and used an epoxy supplied by Chem Tech of Chagrin Falls, OH. I still have some of that epoxy and it sets up perfectly after over 30 years.
On the other hand I've bought epoxies at the local hardware store for quick repairs that come in those double syringe applicators and they won't set up properly after having been opened and stored for just a few months.
I don't know if JB Weld is in this class of epoxies but it is great stuff.
Cheers,
Phil
Philjoe5
Well-Known Member
- Joined
- Jul 12, 2007
- Messages
- 1,727
- Reaction score
- 321
I had one of those "Oh geez" moments in the shop today. We all know that a mere 0.001" (or less) of metal can bring us mortals to tears.
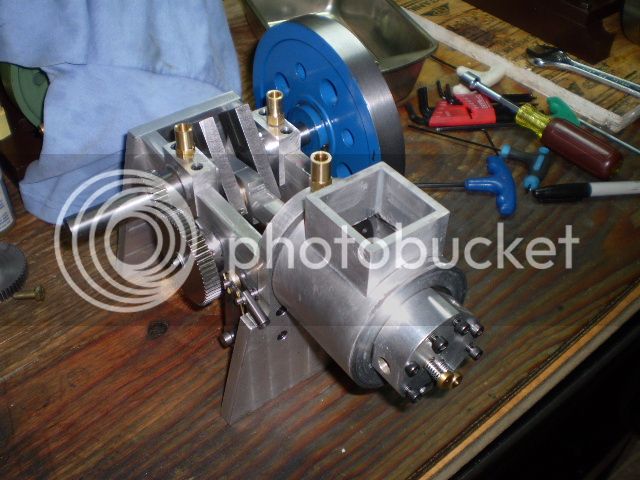
With the engine in a partially assembled state (post #140) I didn't want to disassemble it to fit the water tank. So the trial fit you see in post #134 is on my first cylinder that had the misplaced mounting screw holes for the head.
Now that the tank is (permanently) assembled I realized I better check it for fit on the "real" cylinder. At first it seemed like it was toast but a little wiggling around and presto:

Man, that was close and just luck really that it fit. We're talking slipping a tank end plate of 56 mm, over a flange ring on the cylinder of 56 mm. When I machined both pieces I must have kept it in mind to slightly overbore the end plate and overturn the flange.
I hope this is a good sign for 2014
Cheers,
Phil
With the engine in a partially assembled state (post #140) I didn't want to disassemble it to fit the water tank. So the trial fit you see in post #134 is on my first cylinder that had the misplaced mounting screw holes for the head.
Now that the tank is (permanently) assembled I realized I better check it for fit on the "real" cylinder. At first it seemed like it was toast but a little wiggling around and presto:

Man, that was close and just luck really that it fit. We're talking slipping a tank end plate of 56 mm, over a flange ring on the cylinder of 56 mm. When I machined both pieces I must have kept it in mind to slightly overbore the end plate and overturn the flange.
I hope this is a good sign for 2014
Cheers,
Phil
Philjoe--The more you do, the more it impresses me. You are doing fine work, and that is an excellent looking engine!!!----Brian
AussieJimG
Well-Known Member
- Joined
- Oct 17, 2010
- Messages
- 890
- Reaction score
- 118
Fourteen weeks to Cabin Fever (or is it 13). Bags of time.
Jim
Jim
Philjoe5
Well-Known Member
- Joined
- Jul 12, 2007
- Messages
- 1,727
- Reaction score
- 321
Thanks Brian and Jim.
I made a device that fits my portable drill and attaches to the crankshaft today. Gave it a nice ride and maybe it's my imagination but that seems to have increased compression. I do get a bounce back on the flywheel as the compression stroke starts but it does seem weak. Time will tell.
Jim, it's 22 degrees F and you've got me sweatin'*club*
Cheers,
Phil
I made a device that fits my portable drill and attaches to the crankshaft today. Gave it a nice ride and maybe it's my imagination but that seems to have increased compression. I do get a bounce back on the flywheel as the compression stroke starts but it does seem weak. Time will tell.
Fourteen weeks to Cabin Fever
Jim, it's 22 degrees F and you've got me sweatin'*club*
Cheers,
Phil
Philjoe5
Well-Known Member
- Joined
- Jul 12, 2007
- Messages
- 1,727
- Reaction score
- 321
I've been contemplating the ignition system. It doesn't seem complicated, but keep in mind my knowledge of electrical components can be summed up this way:
Electrons flow through a wire and make electricity. There should only ever be 2 wires - one to carry the electrons to the "device" and one wire to carry them away. After that it's all fuzzy.
I'll eventually figure it out like making gears, but just bear with me on this.
I'm considering a simple cam activated micro switch. Something like this:
http://www.ebay.com/itm/TEMCo-HEAVY...109?pt=LH_DefaultDomain_0&hash=item5657c343bd
I know the spark happens when the breaker points open, so with a microswitch do you get the spark when the switch is switched off?
Cheers,
Phil
Philjoe--If you are using a conventional 12 volt coil and 12 volt battery, the spark occurs when the points open. However, that switch won't work very long with a conventional ignition system. If you are using a cdi, then the spark still occurs when the points open. So----That switch must be a "normally closed" style of switch, which gets "opened" by the cam.
Philjoe--I use points off an old Chrysler product. They work very well and are easily adaptable to these small engines. If you want part numbers, etc. you can look up my build on the Kerzel engine, the Webster, or the Atkinson or the Philip Duclos "Odds and Ends" engine that I have posted about. Don't forget to buy a condenser to go with the points.---Brian
Philjoe5
Well-Known Member
- Joined
- Jul 12, 2007
- Messages
- 1,727
- Reaction score
- 321
Thanks for the tip Brian. In my usual fashion, when I read those threads, I thought I'd never be building an IC engine so I didn't file that information.
The latest On the Bonzer is that if I drive it with my portable drill I can see the intake valve working.
I'm permanently assembling the fuel tank/carby today
Cheers,
Phil
The latest On the Bonzer is that if I drive it with my portable drill I can see the intake valve working.
I'm permanently assembling the fuel tank/carby today
Cheers,
Phil
Philjoe5
Well-Known Member
- Joined
- Jul 12, 2007
- Messages
- 1,727
- Reaction score
- 321
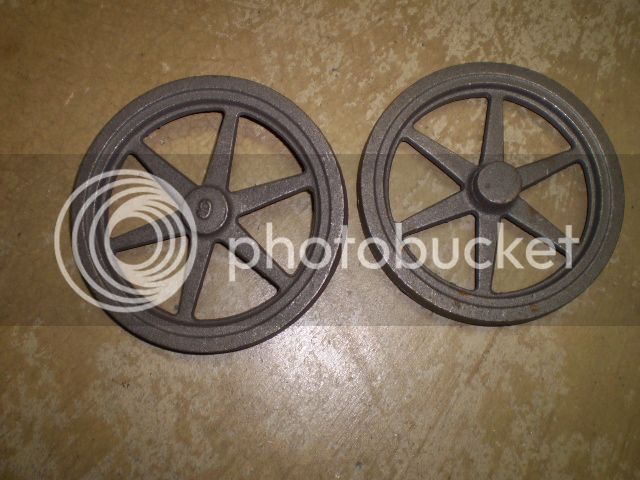
Having received these 2 beauties from Martin Models:

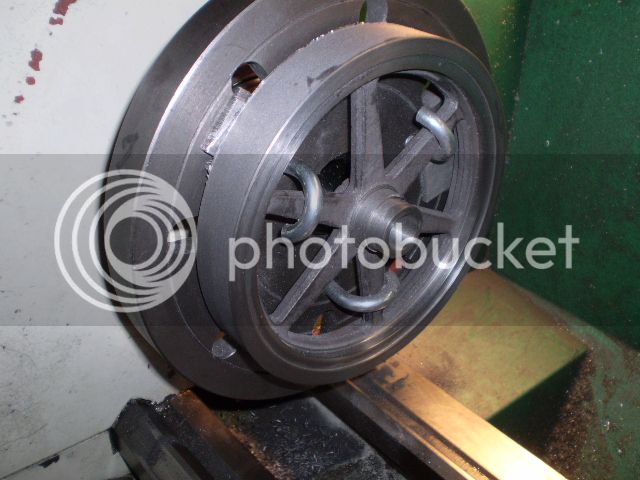
I let the fun begin. Clocked the flywheel as best as could with TIR of 0.020" which I think is darn good for a casting. You can see the sacrificial ally spacers to prevent cutting into the faceplate

A wise sage told me once to get good results with a flywheel do everything you can on one side. So I've got the OD, the hub, the rim recess and the bore finished before I remove it from the faceplate:

Beautiful castings, annealed, no hard spots, no voids.
I have lots more work to do and will post when these are finished. I'm making 2 of them.
Thanks for looking
Cheers,
Phil

I let the fun begin. Clocked the flywheel as best as could with TIR of 0.020" which I think is darn good for a casting. You can see the sacrificial ally spacers to prevent cutting into the faceplate

A wise sage told me once to get good results with a flywheel do everything you can on one side. So I've got the OD, the hub, the rim recess and the bore finished before I remove it from the faceplate:

Beautiful castings, annealed, no hard spots, no voids.
I have lots more work to do and will post when these are finished. I'm making 2 of them.
Thanks for looking
Cheers,
Phil
Philjoe5
Well-Known Member
- Joined
- Jul 12, 2007
- Messages
- 1,727
- Reaction score
- 321
AussieJimG
Well-Known Member
- Joined
- Oct 17, 2010
- Messages
- 890
- Reaction score
- 118
That was quick work and they are looking good.
Jim
Jim
Philjoe5
Well-Known Member
- Joined
- Jul 12, 2007
- Messages
- 1,727
- Reaction score
- 321
Thanks Jim. I got the set screw holes tapped and need to clean up the castings a bit.
I'm working on making a stand for the carby out of ally. Nothing fancy, just to keep it from hopping all the way to OZ.
Cheers,
Phil
I'm working on making a stand for the carby out of ally. Nothing fancy, just to keep it from hopping all the way to OZ.
Cheers,
Phil
Generatorgus
Senior Member
- Joined
- Feb 25, 2010
- Messages
- 362
- Reaction score
- 166
Hi Phil, I'm just catching up to present on your build.
Coming along beautifully, looks like you should have it done for CF, I'll be looking forward to seeing it in person.
GUS
Coming along beautifully, looks like you should have it done for CF, I'll be looking forward to seeing it in person.
GUS
Generatorgus
Senior Member
- Joined
- Feb 25, 2010
- Messages
- 362
- Reaction score
- 166
When is the Kinzer show, work allowing I'd like to go?
I reassembled the Wyvern a couple weeks ago after making a new carb and some other improvements.
It starts, but it seems the timing is way advanced and not responding to adjustment the way it should. I'm thinking on replacing the sensor.
I started another build, much simpler than the Wyvern and no the Wyvern is playing second fiddle, but I'll get to it, no rush.
GUS
Philjoe5
Well-Known Member
- Joined
- Jul 12, 2007
- Messages
- 1,727
- Reaction score
- 321
I'm moving ahead but slowly. I'm off plans here because I'm using a points, coil, battery ignition system instead of CDI. So I made a cam for the points with a lift of 0.060" per Brian's recommendation. Then instead of buggering up my engine side plate I took a scrap of ally and played around with dimensions for mounting the points.
As you can see from the picture I would have made a mess of my side plate if I'd gone with my first estimate.

Gettin' close,
Cheers,
Phil
As you can see from the picture I would have made a mess of my side plate if I'd gone with my first estimate.

Gettin' close,
Cheers,
Phil
Similar threads
- Replies
- 61
- Views
- 8K
- Replies
- 148
- Views
- 20K


