Back to Steam

Home Model Engine Machinist Forum

Help Support Home Model Engine Machinist Forum:

This site may earn a commission from merchant affiliate links, including eBay, Amazon, and others.
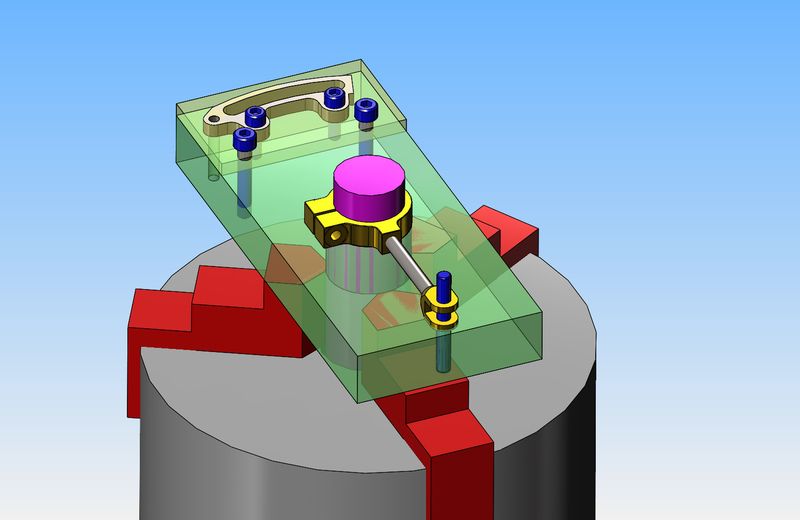
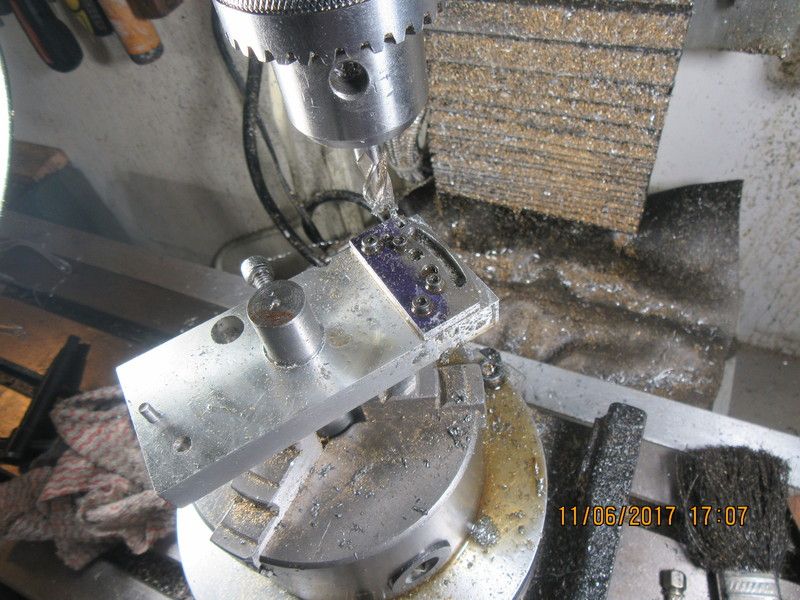
This is sorta/kinda what I had in mind. The green plate is 1/2" thick aluminum with a red 3/4" shaft 3" long hard press fitted to it. The red 3/4" shaft is held in the chuck jaws, The chuck is bolted to the top of my rotary table. The yellowish colored plate is 1/8" thick steel from which the finished link will be cut. Three #4-40 threads will be tapped in the 1/2" aluminum plate, and three "size on size" corresponding holes will be drilled thru the yellow coloured steel plate to hold it in place during the milling operation. The center of the red round part in the chuck is concentric to the center of the slot being cut in the link, and is centered under the mill quill. Since the rotary table will be locked until all of the holes are drilled, I can probably drill holes at the ends of the inside arc at the same time. Then when the rotary table is unlocked to begin cutting the arced slot, the drilled holes will tell me when to stop cutting at either end of the milled arc
qPlPLq.jpg
 
I would mill / drill 2 pcs drag links at the same time to get the exact size. I did with 2 pieces of the drag links for the Stuart D10 and 3 pieces drag links for stuart triple expansion when i created the drag link in same time. It save much time.
 
I have all the parts except the rods with 1/8" bends in them already finished. I will modify the fixture to let me set all of the eccentric strap sub-assemblies to the same length.
AKFqgI.jpg
 
It's Sunday night. I hurt my back yesterday, so I'm not up for much machining (until tomorrow at least.) I've spent today thinking about reversing gear, doing a bit of layout work, and yacking with my internet friends.--When I built this engine, I put Viton O-rings on the pistons. One ring per cylinder. All of the other "steam-engines" I've built, about a dozen, never had any rings at all---Just two or three very shallow grooves around their circumference for oil retention. They all spin very freely, and I never noticed any of them having a problem with pressure "blowing by" the pistons. With this engine I just finished, I was expecting some binding as all the pieces were firmly bolted together, so my reasoning was that if I leave a little more clearance between the steel piston and the brass cylinder, there would be less chance of the piston scoring the inside of the cylinder. The Viton ring would ensure no leakage of air, even though the piston wasn't as tight a fit as on my earlier "steam engines". A 1/16" cross section Viton ring is actually about 0.070" in cross section. I made the groove in the piston 0.060" deep, which is about .003" more than I do on my internal combustion engines. Everything works, just as I had planned. What I didn't plan, is the amount of drag that Viton ring would create. I know this engine should run easily on about 5 psi.---it doesn't. I have ran it for about 6 hours now, and it isn't going to wear in anymore than it has already. 10 psi is about as low as I can turn my air regulator without the engine stalling out. And---When the engine sets for a while, not running, the Viton takes a "set" and is a real pig to get the crankshaft rotating again. Soon as the crankshaft rotates even a little bit that "set" goes away, but it never goes totally away. I'm not going to change things now, but I just thought I would post this as information.---Brian
 
I got up before the chickens this morning and snuck (that is the Canadian form of sneaked) down to my shop and finished the jig for milling my reversing plates. At one end, the links can be set up and adjusted to all be exactly the same length. (the one shown doesn't have the 1/8" rod running between the brass end pieces.) The other end will come to life and hold a reversing plate later today.---And yes, after I had the plate firmly bolted to the shaft, I set it up in the lathe and took a 0.015" clean up pass on the face of the plate. This plate was a piece of repurposed scrap, so there are a few holes in it that don't mean anything.
vFPo0W.jpg
 
Second radial cut. Not as much breath holding this time, as I was able to use a 3/8" endmill. I'm running the mill at about 900 rpm, and cranking the rotary table slowly, cutting in both clockwise and counterclockwise direction. I advance the tool 0.010" each time I get to the end of a rotation. In a way part of this is climb milling, but a great deal more of the cut is endmilling.
XXmbcn.jpg
 
before you start milling,using the same setup,its easier to chain drill holes
then swap the drill for a slightly smaller endmill.You can then lightly plunge cut
and cut the slot full depth with combination plunge and climb milling
Using the DRO then you can open up to exact size by conventional milling
and running back over a few times climb milling for a good finish
I am well on my way to making a pair for my Simplex will post when finished
A bit bigger and more involved than yours,with more setting up time than
machining.Keep posting.I too have just snuck into my shed before i have to
take the wife shopping and put a bet on the Melbourne Cup
 
This is as much as I'm going to do today. There is more that I can chew away before tearing down this set-up, but this is as far as it's going today.
rbrthT.jpg
 
In hindsight, I wish now that I had put both plates on my fixture and machined them both a once. Since I can only take about 0.010" depth of cut for fear of breaking my 0.156 endmill, it wouldn't have been a problem if I'd had both plates on there.---live and learn.
 
Bazmac--I've seen other people do the chain drilling thing, but here's what I find. Without chain drilling, the endmill has a fairly constant load on it thru the full arc. With chain drilling, the endmill sees highly fluctuating loads as it goes from chain drilled clearance to areas of material that haven't been chain drilled (between the chain drilled holes) and is more liable to catch on the edge of a drilled hole and snap off. This applies with small diameter endmills more-so than larger endmills.
 
I see your reasoning,but from experience i prefer to chain drill first
I dont like to use the correct size endmill as you finish up oversize
and usually a chatter finish. I usually take a cut on the convensional
milling cut and reverse back a couple of times for finish(climb milling)
I have just had a successful couple of hours and almost finished
my expansion links. Its not easy making multiple screwed connections
M2.5 thru 5 piece laminated steel,but almost there.Will post on my thread
soon. Regards barry
 
This job ought really to be done with a slot drill. They tend to cut closer to size than an end mill. However, I agree with using an undersize cutter for roughing out at least, and with climb milling a finishing cut of a very few thou. Personally, I find chain drilling usually turns out to have been a waste of time.
 
I have reached the limit of what I can do in my milling set-up. The remainder of material to be removed will be done with bandsaw and file.
jCa9iM.jpg
 
So---we have one reversing link finished. All of the holes and centers of radii are exactly where they should be. The arc is exactly where it should be. Sid was right, cutting the 0.156" wide arc with a 0.156" endmill held in a drillchuck is not accurate---The slot ended up at 0.165" wide. This does not pose a problem for me, as I am the one who makes the "follower" that runs in the slot. When I do the second link, I will hold my 0.156" endmill in a collet and see if that yields anything different.
OeNOuD.jpg
 
For what it's worth---I cut the arced slot in the second part with my 0.156" four flute endmill held in a collet. The slot measures 0.161" wide. When I cut the slot in the first part with the same endmill held in a chuck, the slot came out at 0.165" wide.
 
Slot drills or end mills, collets or chucks the slots always come out oversize
However i would always use collets and slot drills.If you are making the
fitting part then this can be made to suit the slot.However i prefer to cut undersize and then open out for a better finish.When i use the term endmill
i refer to modern phrasiology it can be any no of flute as all can be classified as endmills or slot drills.I personally prefer 2 flute,you get easier cutting and bette
finish with 4 flute but for us home engineers 2 flute are easier to sharpen and get extended use and easier for plunge cutting.Just nipping out to the shed
to finish my linkage. By the by the wife got first in the Melbourne cup and i got 3rd.My winnings has just bought me some more endmills,and i broke an M2.5 tap
 
Live and learn, Bazmak. I have always heard that any endmill will produce a somewhat larger slot than the endmill size. This may be the first time I have actually cut a slot that required some control over the finished width. As far as two flute cutting a more "on size" slot than a four flute, I believe it to be true, but sometimes I don't have both types of cutter to choose from. I know that for side milling I prefer the four flute style because there is a lot less "clunkety-clunkety-clunk than when using a two flute.
 
So---we have one reversing link finished.... This does not pose a problem for me, as I am the one who makes the "follower" that runs in the slot.

Brian, the bit you have made is an 'expansion link' and the bit that it slides over is a 'die block'.

It is called an expansion link because you can set the gear at intermediate postions away from 'full gear' in either direction in order to give an earlier cut-off and thereby have the engine run more economically. This is very much a feature of railway practice, but traction engines can also be 'notched up' or 'linked up' to a lesser extent. I am told that it is not done in marine practice, as the engine does not have to start against much load, so the full-gear cut-off can be optimised for cruising speed. If you notch up an engine running on air you will soon find the cylinders get cold because of the expansion. Experimenting with notching-up could provide an extra dimension to 'playing with' your engine.

Do tell me if my seemingly frequent terminological corrections start to grate.
 

Latest posts

Back
Top