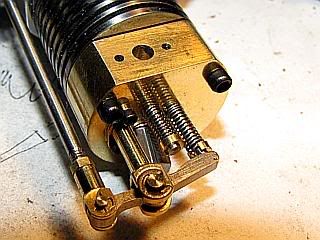
A little more done. The valves, springs, valve keepers, rocker arm, pivot pins and push rod finished up and installed. A head gasket was fitted made out of 0.007 PTFE. Fair compression bounce when spinning over the flywheel so I think the valves are seating OK. First photo is from the bottom of the engine. Spark plug body is in place but no finished spark plug done yet. Still to go is the fuel system and ignition system plus a lot of details.
Kevin, Nick, Sam, Bob and Paolo: Thanks so much for following along. Sorry it's been a while since I posted. I had some shop maintenance to perform and while I was at it I made up some machine tool accessories that I have been trying to get to for some time. Then with spring here rose pruning and other outdoor spring shores wait for no engine.
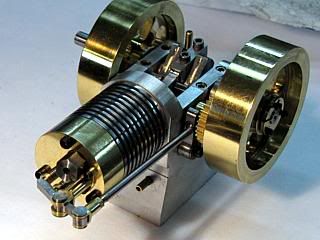
But a little bit of progress has been made with the fuel system now complete and ready for installation.
Gail in NM
Hi putput
I finerly got some time in the shed and started on the case oh the Tiny
but could u please give me a pointer on the .030 oil hole, is it just cylinder oiling or guden pin oiling anyway i borrowed the wifes camera again to show u a pic
Pete, good start. Once the main frame is done you get the feeling your well on your way.
The oil hole is just to lubricate the cylinder so the o-ring slides easier. I also use a little Marvel's Mystery Oil mixed in with the gas.
A drop or two of oil on the guden pin once in awhile is all that is necessary.
Hi putput
not getting much work over the Easter break so i did a little more on the "Tiny"
I only had the material for the flywheels so started with what I have,
(In between Beers of course)
cheers Pete.
I have been out of the shop for the last three months. Not by choice, but some times life gets in the way.
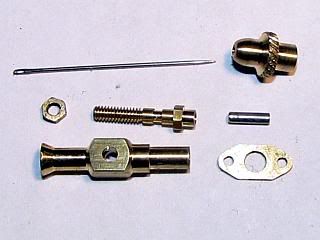
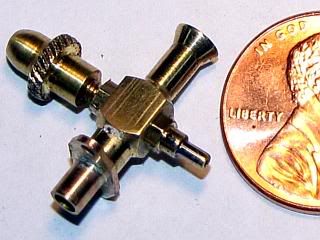
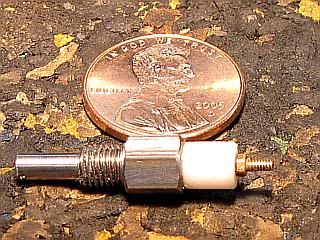
The only progress has been to get the spark plug built. My plug differs from Arv's in two ways. First the thread was changed to 10-40 as opposed to his 10-32. Just a matter of personal preference. Second, I drilled a 0-80 x 1/8 screw to take the electrode wire and soldered it to the electrode to make the plug wire connection.
Hopefully I will be able to get the "Tiny" finished up in the next month. Not too much left.
Gail, I certainly hope things start going your way soon. I really miss your attention to details on your engines.
I like the way you provided for the wire connection. You sure must feel comfortable with those 0-80 threads. I still have not gone that small on anything.
What type of end do you have on your spark plug to provide the spark gap?
I haven't seen any activity from Pete on his Tiny I.C. lately. I hope he is still working on it.
Hello Arv. I thought this question should be asked on this thread.
I started to make the cylinder. I do not have a .375 reamer so I bored it out with a .379 reamer I found, and then lapped it to .380 using an acetal rod and lapping compound. I though everything was well, until I remembered the O-Ring for the piston is store bought and the ID of the cylinder has to match this.
My question is weather or not I can make a piston ring, or even lap the piston to fit this bore? I assume its to small to make a steel piston ring. Or would 5 thou over be OK for the O-ring. (I still have not bought any o-rings, although I may have one that will work)
Did you try anything different before coming up with the o-ring Idea?
What did you use to make the bore? I can never get a good finish with a reamer.