Tiny I.C. Engine

Home Model Engine Machinist Forum

Help Support Home Model Engine Machinist Forum:

This site may earn a commission from merchant affiliate links, including eBay, Amazon, and others.
Arv, thanks again for an excellent writeup :bow:.

To me, smaller the engine, the more interesting it gets, especially on four-strokers.
 
Thanks for posting the drawings and all the good documentary on the build.
Very impressive.

PS. Ordered a CDI ignition and got it on Saturday haven't had time to try it out yet
Thanks for posting the info on it. I've been wanting to make a smaller package for my ignition box.
 
Solver, Greg, & Doc, thank you for your comments and I hope you will get started on the engine soon.

Gail, a karma to you for keeping me on track.

Doc, I am really happy with my CDI unit. As I mentioned before, I have little to no knowledge on how these things work so the information & help that Roy Sholl provides is invaluable to me.
 
Arv, excellent job on the spark plug, well the whole engine for that matter. The small stuff is fun but it takes some ingenuity to get things done, like your rod cap.
george
 
I too noticed the rod cap and thought thats a new twist I haven't seen before one for the old memory bank. :bow:
 
Yes, thanks again Arv,

I will certainly be having a good look at these drawings. I was thinking the other night about trying to use a glow plug for my first engine, and, if possible a petrol vapour carb - do you think these two things would work or would the glow fuel not vapourise enough?

If not, what about 1 or the other?!

I'm just trying to take out potential stumbling / stopping completely blocks for my first I.C which I think would be ignition system and carb!

Nick
 
George, Doc & Nick, thanks for the compliments. They are really appreciated.

The rod cap was a desperate solution to a space problem. After it was done, I kind of liked it also.

Nick, I have never had any experience with a glow plug. I'm sure there are plenty of people on this site that have though. The little I know about a glow plug is that they are primarily used on 2 stroke engines.

As far as vapor carbs., I have built Jan Ridders' design and also one like Chuck Fellows design. They both work fine & I love them. I don't know if something like that would work for this small of an engine. Maybe you will be breaking new ground for all of us.

Don't be scared of the carb for this engine. It is small but a simple design. I will be uploading prints for the fuel mixer soon.

 
Back again with a few prints. Getting close to the end. I have been getting some real nice comments on these posts and I thank all of you. I would like to make any necessary corrections on these prints before I put the entire package into one PDF file. I need some feedback from anyone who has found errors or missing information of the prints. You can post or PM any corrections.

The fuel mixer is a very critical part of this engine, and I guess for any engine. This one has some pretty small holes to drill so you might have to prepare for that if you don't have the drills, taps, & dies.
SmallDrillChuck.jpg


SprayTube.jpg


The spray tube is made from 1/8 dia. brass. Turn the .085 dia. And cut 2-56 threads for the required distance. Next drill the .025 and .018 holes. It is important the drill to the correct depth so the gas flow work properly. Turn the .062 dia groove.
SmallDrillChuck002.jpg


The needle assembly and mixer body are pretty easy.
FuelMixerB.jpg


I couldn't find any 1/16 plastic tubing locally so I ended up buying a 10' piece from US Plastics. Kind of an overkill, but maybe I'll find use for the rest of it someday.
FuelLine.jpg

 
ppm,

:bow: :bow: :bow: :bow:

I wish my eyes and my machining skills were up to the task.

Best Regards
Bob
 
OMG Arv, will you stop with the assorted pocket change for size references please!! I'm starting to get migraines thinking in such scale, damn that thing is 'tiny' (ya' think that's why it is named "TINY"?) Nice work, and thanks once again for making the drawings available to us non-lilliputians
Rof}

BC1
Jim
 
ARV

Thanks for sharing. :D

I have added your engine to my bucket list.

No matter how hard I try, I can not catch up.

My bucket list gets longer each day.

Thanks again.

SAM
 
There is one possible alternative source of small dia fuel tube:
122.jpg


Above is long-nose, butane gas stove igniter. It has ~150mm(~5.9") length of about 1mm id tube.

That might be a bit too small size, when compared to 1/16", but it seems to stand the gasoline anyway.
 
The final prints deal with the exhaust actuation. Most of the parts are fairly simple and won't require any special instructions.
HeadAsmOut.jpg


What you use for an ignition system is up to you. I personally felt that a small engine like this one deserved a small hidden ignition system. Most of the engines that I have built in the past used points and either an old buzz coil or a large automobile coil. Either way they are just physically too large.

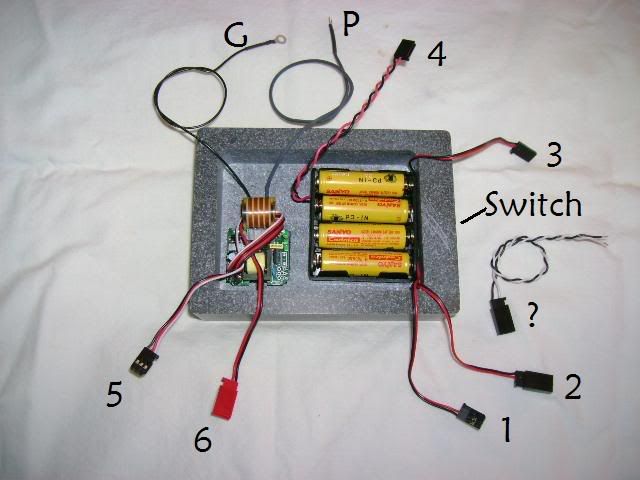
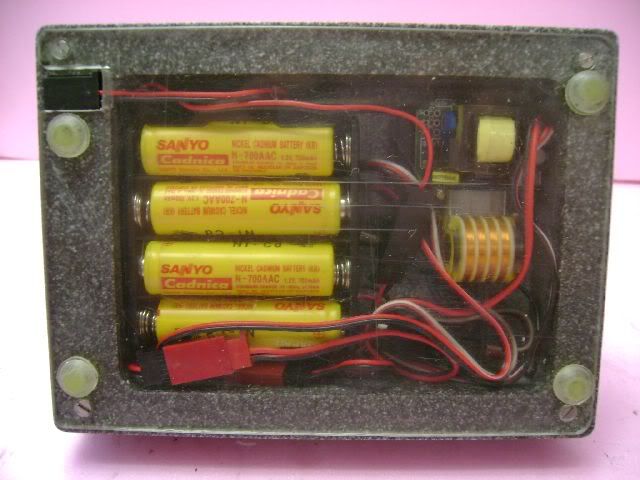
My friend Jim recommended looking at the S/S Machine & Engineering CDI units. I contacted Roy Sholl, owner/operator of S/S, and he recommended the complete CDI ignition system which included the coil, battery pack with rechargeable batteries, charger, switch, spark plug wire, hall sensor & magnet, and all Futaba connectors.
CDIGNITION001.jpg


After receiving the unit I made the base that would house all the components. I guess there is plenty of instructional information to install & hook up the system for anyone with electrical knowledge, but in my case, there were a couple emails and phone conversations between Roy & myself to make sure I didn't mess it up. I just can't get my head around electronics.
HalfScaleFinished018A.jpg


I started out using contact points but couldn't not get the engine to run. It was a system similar to what Jim is using and his runs very well. Roy is trying to figure out why mine wouldn't run.

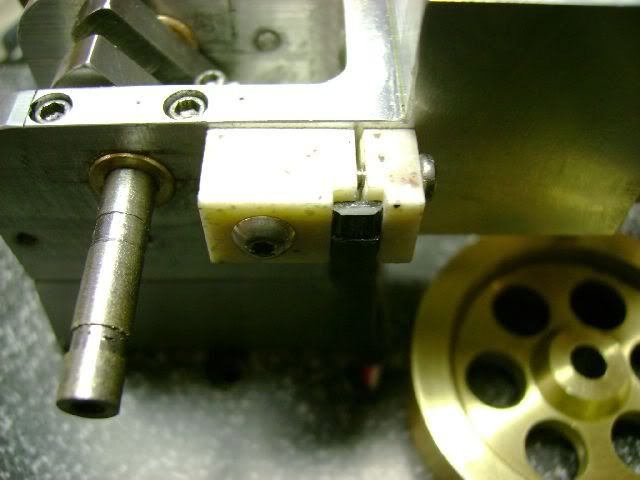
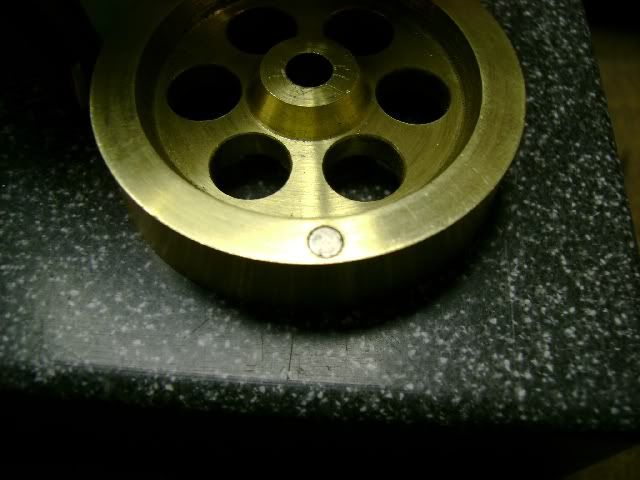
After failing to get it running and not knowing if the problems were electrical, fuel, timing, or quality of the build, I then switch to using the hall sensor and magnet. I made a plastic holder for the hall sensor and mounted the magnet in the side of the brass flywheel. After adjusting the timing to fire at TDC, the engine immediately run.
HalfScaleHall008A.jpg


HalfScaleMagnetA.jpg


This is about all I have at this time. There have been a lot of downloads but I have no idea if anyone is building this engine. If anyone finds errors in the drawings or needs additional information, please feel free to contact me.

I do plan to upload the complete package of notes & prints once they are updated to correct any mistakes or omissions. This will be within the next month.

If you are pleased with post and information provided, a karma would be very much appreciated.

Best of luck & I hope to see some new Tiny I.C. Engines on HMEM.

Arv (putputman)
 
putputman said:
This is about all I have at this time. There have been a lot of downloads but I have no idea if anyone is building this engine. If anyone finds errors in the drawings or needs additional information, please feel free to contact me.

I do plan to upload the complete package of notes & prints once they are updated to correct any mistakes or omissions. This will be within the next month.

If you are pleased with post and information provided, a karma would be very much appreciated.

Best of luck & I hope to see some new Tiny I.C. Engines on HMEM.

Arv (putputman)

You've got it Karma to you. Yes when I finish my current build I'm thinking I want to tackle it next even though I said to myself "self next time bigger motor less squinting". :big:

I really like that little engine you've created and want to thank you for the postings and tips!
 
You have Karma!

It will be a couple engines before I get to this but a hearty thank you for your contribution Arv!

Regards,
Sean
 
Indeed a K'point to you sir, a mere pittance for all of the work you have put into this and tenfold the enjoyment I have gotten from same. I currently have something in the works but this one may be the next project afterward. The doggone thing is just so darned, well,,,, tiny. I admire the way that you hid all of the electronics in the base as well Arv. Nicely done. Thm:

BC1
Jim
 
Thanks a million Arv for your work and offer of the plans. This will make an excellent project to sharpen my CAD skills.

Greg
 
I have replaced all the old PFD notes & prints with new ones at revision "B".
They will include any omissions and corrections that were on the first set.

The changes that were made should not have caused any problems for those of you who have already started this build.

Again, I want to thank all of you for your comments and help with thread.
 
Back
Top