Nemett Jaguar--Canadian style

Home Model Engine Machinist Forum

Help Support Home Model Engine Machinist Forum:

This site may earn a commission from merchant affiliate links, including eBay, Amazon, and others.
Ok back off the rockers or remove the push rods. Next pull the sparkplug, put the piston at bottom dead center, use a different sparkplug and put it in with generous oil on the threads. Next try to crank the engine by hand and see if you get good compression and no bubbles around the sparkplug. This process has always helped me narrow things down.

Ray
 
As of this moment I have modified the ring grooves to accept Viton o-rings. I am off to Hercules o-ring at the other end of Barrie to pick up the rings.---Brian
 
Just for kicks Brian put the rings in the bore and shine a light behind them and see if they are sealing all the why around.
 
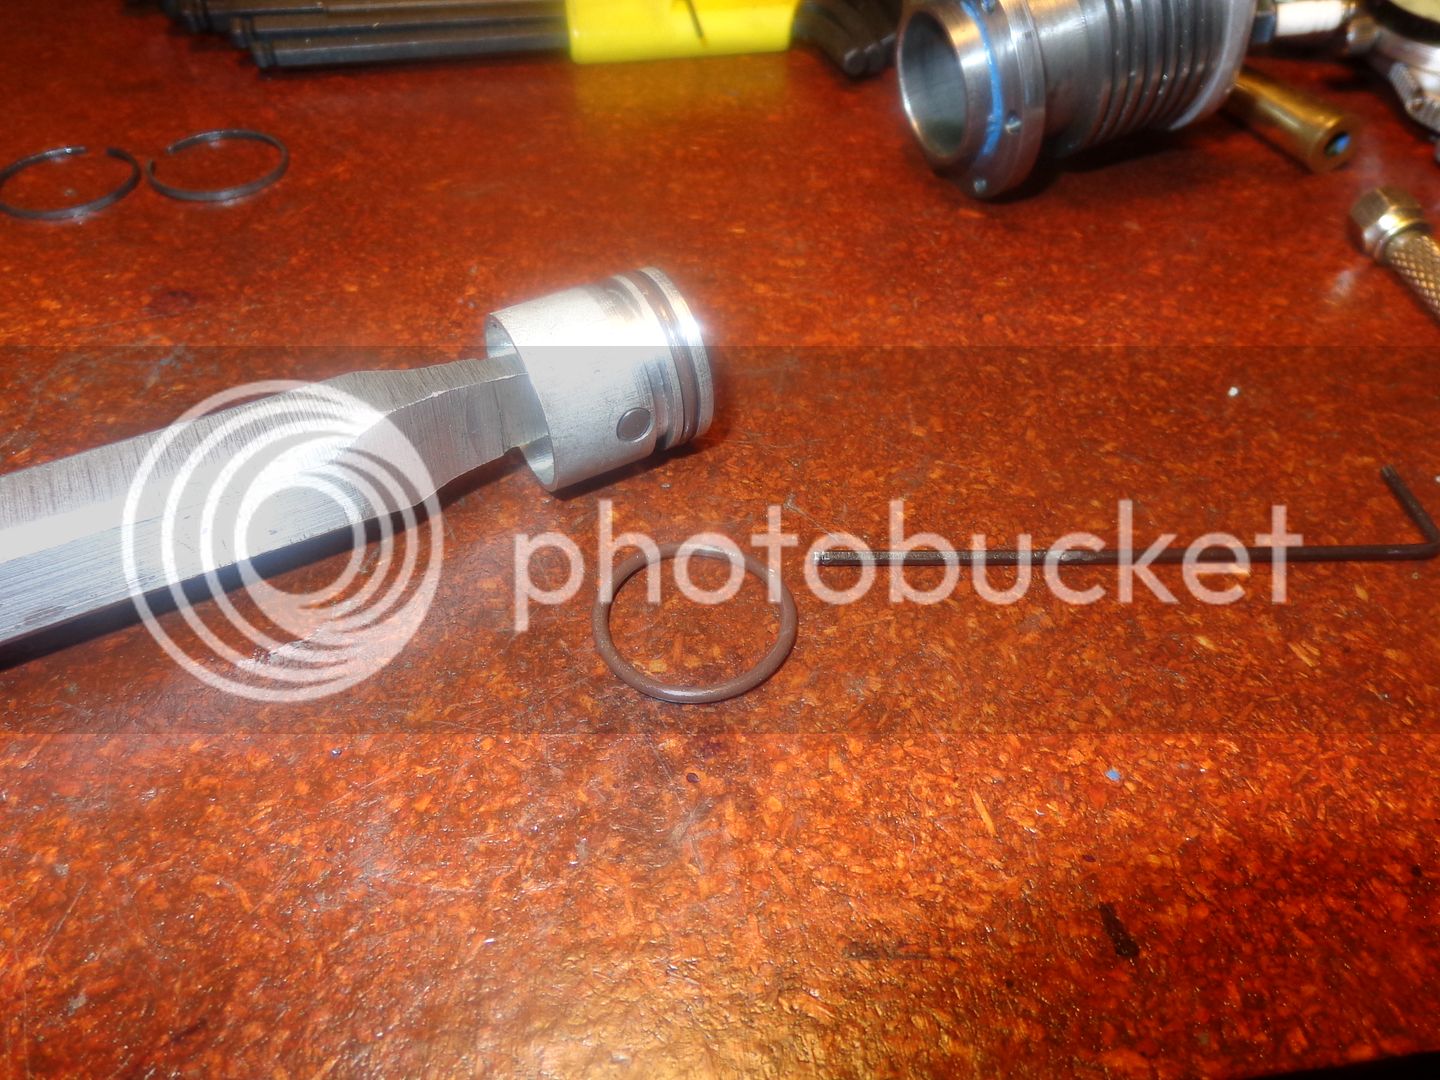
Too late Johnny---The piston has now been modified for 1/16" cross section Viton o-rings. the groove now measures .085" wide x exactly 1/16" deep. One ring is on the piston, one is laying in the foreground. Also in the picture is my "handle" which I can fit to the piston (it has a hole in the end of it that the wrist or "gudgeon" pin fits into). With the handle I am able to insert the piston into the cylinder/head assembly and work it back and forth by hand to see if I can feel any "compression" or suction. With the cast iron rings I couldn't feel anything. With 2 Viton o-rings there was too much friction. With one Viton o-ring there was both compression and suction when I worked the piston back and forth in the cylinder. I am going out now to the main garage and reassemble the engine with one Viton o-ring on the piston and try it. All of you anti-Viton scare mongers---don't bother posting all of your dire warnings about Viton. I've heard it all and I'm not interested!!!
 
I was just courious weather or not you could see light, I wasn't sugesting not to go with "o" rings. Looking forward to noise.
 
That's a shame Brian, after all that work on those piston rings. I assembled my piston and rings yesterday and inserted it into the cylinder, with just a small amount of oil wiped on the cylinder, I have good suction when I place the palm of my hand over the top of the cylinder.

Paul.
 
Swifty--Nothing really hurt here, except maybe my pride----I spent $5.00 for a 3" length of grey cast iron for my ring making experiment. When I get to this point, an engine all finished but doesn't run for some compression related issue, its easier for me to go directly to Viton rings that just about any other possible solution. The engine now has compression and is firing along with the electric drill, the cylinders is getting hot and I see smoke coming out the exhaust with every "pop", although I haven't had a sustained, unassisted run yet. My theory is that if I can get the engine running and firing regularly, it will seal up the valves completely after it runs a bit. Its a couple of hours work to make a new piston with the correct depth of grooves, and I have a lifetime supply of rings now. So---Get the engine running, then after I am satisfied with its running, put in a new piston with cast iron rings and try again when I am sure it is not some other issue keeping the engine from running.
 
Johnny--I apologize if my answer sounded kind of ignorant. I didn't intend it to be. It's been kind of a wild and crazy afternoon here, and the o-ring place is about as far from here as it could possibly be and still qualify as being in Barrie. I am posting all of this stuff in "real time" and sometimes I have things changed before I see a post and can respond to it. Your idea certainly has merit, and I do intend to pursue this cast iron ring business, once I get the engine to actually run.---Brian
 
That's all folks!!!--for today anyways. If I do any more today, I'm going to be too stoked to sleep tonight. (If I'm not already.) I have progressed to the point of short duration runs, but none long enough to make me run for the video camera. I am down to that very fine balancing point between fuel mixture and ignition timing. The Chuck Fellows carburetor that I built has an extremely small range between too much gas and no gas at all. It doesn't have a sewing needle for the main (only) mixture control, but instead has a home made needle with a long taper made on my lathe. I may have to switch it out for one of my store bought model airplane carbs until I get good sustained runs. (They have a much wider range of mixture, because of their construction.) Thanks for watching and commenting today.---Brian
 
Well--For the moment, I am snookered. I hooked everything up on the engine and cranked it numerous times with my variable speed electric drill, but other than a couple of smoke rings, it was a no run situation. I checked my valve lash and the lash is okay--the valves are closing completely. I even got my can of ether "Quick Start" out, and gave the carb a shot while cranking the engine over, but no joy. I have lots of spark, and its coming at the correct time. The valve timing sequence is correct. I just pulled the cylinder off and the rings LOOK okay, but there was very very little compression, and the heavy oil down the sparkplug hole didn't make any difference to the compression when turning the engine over by hand. Once again, I held my lips over the open end of the cylinder and blew until I thought I might pass out, and there is absolutely no leaks at the valves unless I depress them by hand. The ring grooves in the piston are actually deeper than they should have been, but I don't think that would prevent the rings from sealing at any rate. The grooves are however, just about the perfect depth for a Viton o-ring, although they are a bit too narrow. Right now I am approaching burn out on this engine. I think perhaps I will pull the piston out and widen the grooves enough to accept a Viton 1/16" cross section o-ring, and see what happens to the compression with a pair of Viton rings.

Hi Brian,
Take care as its only a hobby. Burnt-out is no fun, The 1997 burnt-out took me two months to but not fully till another 4 months. This after successful design and construction of a fully automatic non-contact roller conveyor lines to transfer finished compressor packages to main warehouse.
 
That's all folks!!!--for today anyways. If I do any more today, I'm going to be too stoked to sleep tonight. (If I'm not already.) I have progressed to the point of short duration runs, but none long enough to make me run for the video camera. I am down to that very fine balancing point between fuel mixture and ignition timing. The Chuck Fellows carburetor that I built has an extremely small range between too much gas and no gas at all. It doesn't have a sewing needle for the main (only) mixture control, but instead has a home made needle with a long taper made on my lathe. I may have to switch it out for one of my store bought model airplane carbs until I get good sustained runs. (They have a much wider range of mixture, because of their construction.) Thanks for watching and commenting today.---Brian


Hurray!! You got putting away. th_wavCome back in three days,she will run and purr like a cat. The Webster Engine did this to poor Gus. Just very slight turn of the fuel jet and she ran.
 
I can't get over how fast you build these engines Brian, looking forward to a video
 
Brian,
I think I know way your rings did not work.

.....I made a fixture to heat treat the, and made the diameter of the fixture where the rings fit onto 1 mm or 0.040" larger than the inside diameter of the rings. ....... I found that when the rings are stretched over the fixture, the gap becomes about 0.100".....

With your fixture the rings are expanded in a radial manner, that is they are expanded into a circle around the fixture. This would be no different than just cutting them oversize and removing material in the gap. Since they are formed to a circle then when compressed they are no longer a circle.

The mandrel should not do more than touch the split rings. A bit under is OK. Then when the ring is spread to fit over the spacer for the ends they will only touch at the point opposite the spacer and the ends at the spacer. You are expanding on a tangent and not a radius. At this point they are no longer a circle. After heat treating they are not a circle. But, when the gap is closed they will be very close to a circle. It will not be a perfect circle but it is close enough for our purposes.

The math behind all of this is daunting but you can do a simple demonstration that may help you visualize it. Wind a couple of turns of bare straightened electrical wire around a round rod. Number 14 wire around a 1 inch diameter rod shouldl be fine. Cut a 1 turn section out of it. Now expand the diameter by spreading the ends. You will see that the wire bends differently all along the half circle to the point opposite the split.

There is no simple way to make a perfect ring in the home shop but the tangent expansion is one of the closest ways that is practical for us.

Gail in NM
Edit: A little bit of reading that can explain it better than I can"
http://www.modelenginenews.org/techniques/piston_rings.html
http://jerry-howell.com/PistonRings.html
 
Gail--I have 7 rings left un-heattreated. I will try this method on a couple and see what happens. Thank you for looking and for the advice.---Brian
 
What to do---what to do----I am at that juncture I always seem to arrive at when trying to get one of these engines to run on it's own. I put the model airplane carburetor on. Results are about the same as with the Chuck Fellows carburetor. This probably means that it wasn't the fault of the Chuck Fellows carburetor after all. Engine will start and run along with drill if I choke it by putting my finger briefly over the air intake.-Trouble is, it will only run until this extra rich charge of fuel is burned, then it quits firing. At this point, logic would dictate that I should open the needle valve just a touch more to give the extra fuel, and the engine should keep running---only it doesn't. It floods. I think I actually had better sustained firing with Chuck's carburetor. If we take compression out of the equation, there are only three things involved.--Carburetor setting, ignition timing, or valve timing. I hate to think it would be valve timing, because that involves taking the points and ignition cam and fancy brass gear cover off to change it. I have tried two different carburetors that performed flawlessly on my other i.c. engines. --Maybe that knocks it down to only two variables, ignition and valve timing. Maybe I will pull the remaining hair out of my head---or maybe----
 
What to do---what to do----I am at that juncture I always seem to arrive at when trying to get one of these engines to run on it's own. I put the model airplane carburetor on. Results are about the same as with the Chuck Fellows carburetor. This probably means that it wasn't the fault of the Chuck Fellows carburetor after all. Engine will start and run along with drill if I choke it by putting my finger briefly over the air intake.-Trouble is, it will only run until this extra rich charge of fuel is burned, then it quits firing. At this point, logic would dictate that I should open the needle valve just a touch more to give the extra fuel, and the engine should keep running---only it doesn't. It floods. I think I actually had better sustained firing with Chuck's carburetor. If we take compression out of the equation, there are only three things involved.--Carburetor setting, ignition timing, or valve timing. I hate to think it would be valve timing, because that involves taking the points and ignition cam and fancy brass gear cover off to change it. I have tried two different carburetors that performed flawlessly on my other i.c. engines. --Maybe that knocks it down to only two variables, ignition and valve timing. Maybe I will pull the remaining hair out of my head---or maybe----


How about trying some glow fule anh


Sent from my iPhone using Model Engines
 
And glow plug i have got some running like that just to check it out


Sent from my iPhone using Model Engines
 

Latest posts

Back
Top