Model Sawmill Dreaming---

Home Model Engine Machinist Forum

Help Support Home Model Engine Machinist Forum:

This site may earn a commission from merchant affiliate links, including eBay, Amazon, and others.
Hi Brian

You must live in your workshop mate. Yet another Rupnow creation takes shape before we mere mortals could even do the drawings. Amazing!

Regards Mark
 
I had to go across town today and spend 8 hours working with a small company that gives me paying work from time to time. Then I came home, ate supper, and squeezed another few hours out of the day to whittle out this connecting rod. I got a bit excited and drilled the clearance holes in the rod cap, so had to thread the end of the con rod itself. Directly opposite of my drawings, but it works just the same. Everything goes round and round and up and down just like I had intended it to. I am almost at the point where I will have to buy material for the baseplate that everything gets mounted to.
CONNECTINGROD-SAWMILL002.jpg

CONNECTINGROD-SAWMILL001.jpg
 
There are a lot of things that I am unsure of regarding this sawmill. I have only ever seen one, and that was many years ago. I don't know if any of the engines I have are going to be powerful enough to drive it. I have studied as many videos as I can find on youtube, and sussed out how the ratchet and pawl /rack and pinion carriage drive worked. I have only seen ONE video that showed how the carriage was returned, and that was by a friction wheel engaging the ratchet wheel, and it was powered by a totally seperate water wheel. I was not aware that the saw was stopped while the carriage was returned, and consequently I have made no provision for that. I know that MY saw isn't going to stop---ever---unless I shut the engine off. I think that I will only provide enough length of rack under the carriage to saw my 6" long log, and then the drive pinion (which also never stops unless I disengage the pawl) will run out of rack teeth to engage, otherwise the carriage is going to hit the endstop and stall everything out. I haven't fully thought that one out yet.---Maybe I can imagineer something that rides on the carriage and lifts the pawl at the end of carriage travel. It would have to lift the pawl into a "detent" that keeps it disengaged while I either manually "crank" the carriage back to its home position, or devise a way to power return the carriage.---Brian
 
Thinking out loud..
What about a disenganing clutch on the saws drive pulley?
maybe disengaging the pulley would drive a gear that would
return the carriage. A "Cone" drive?

John
 
Add in a reverse gear that is flat belt driven with a hand lever to tension the belt to engage it and disengaged the paw?
 
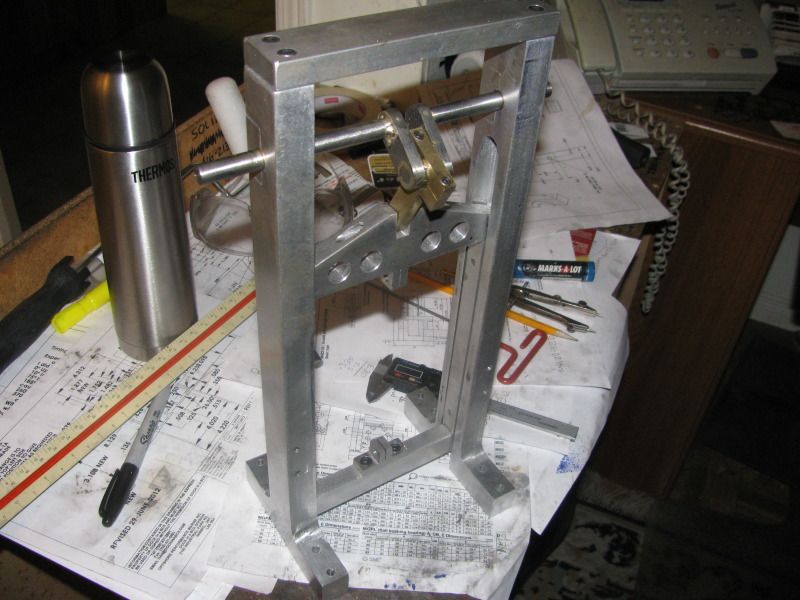
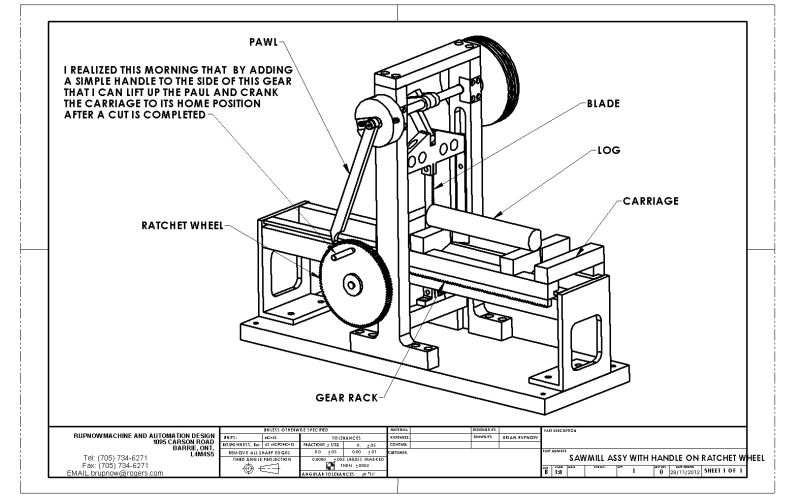
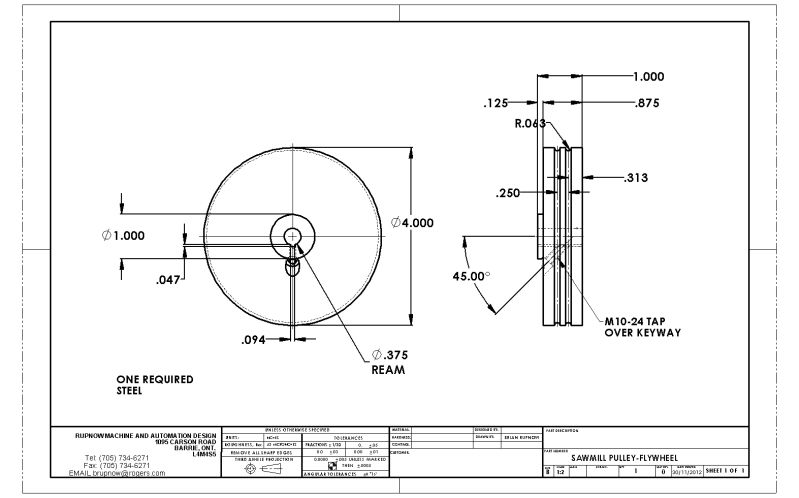
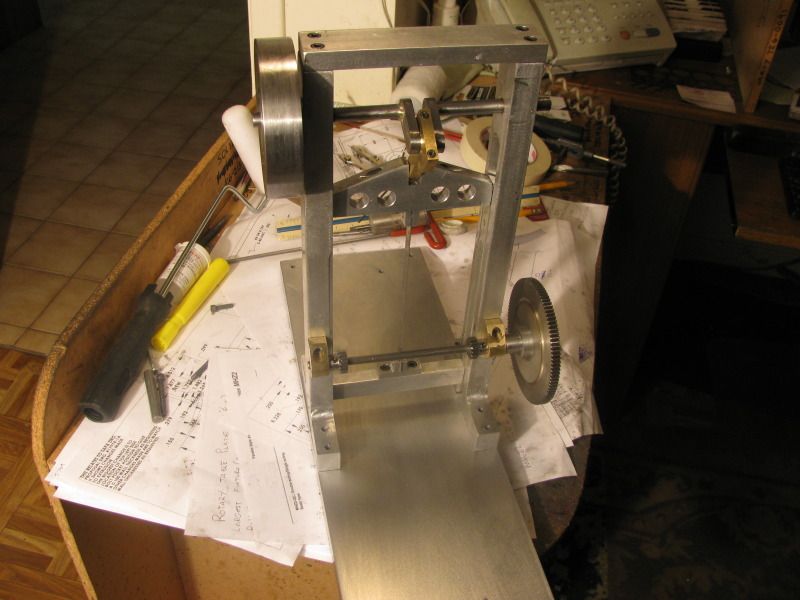
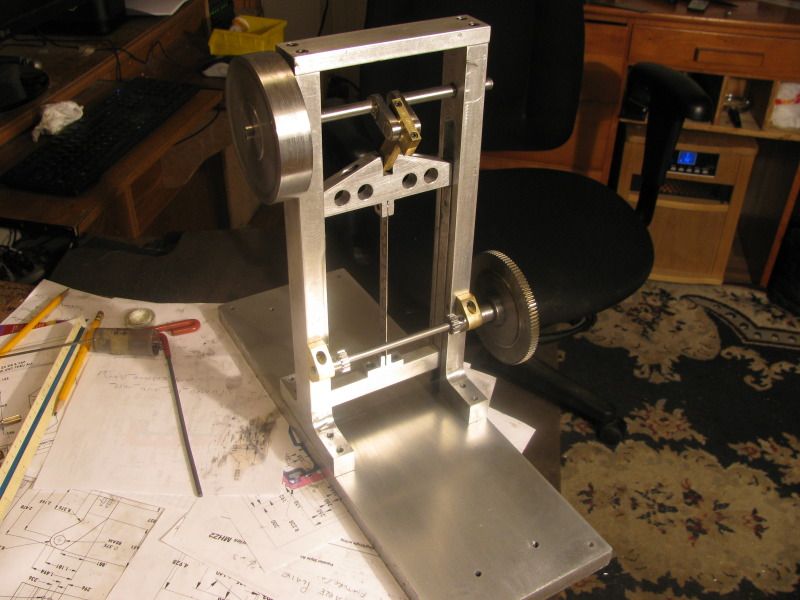
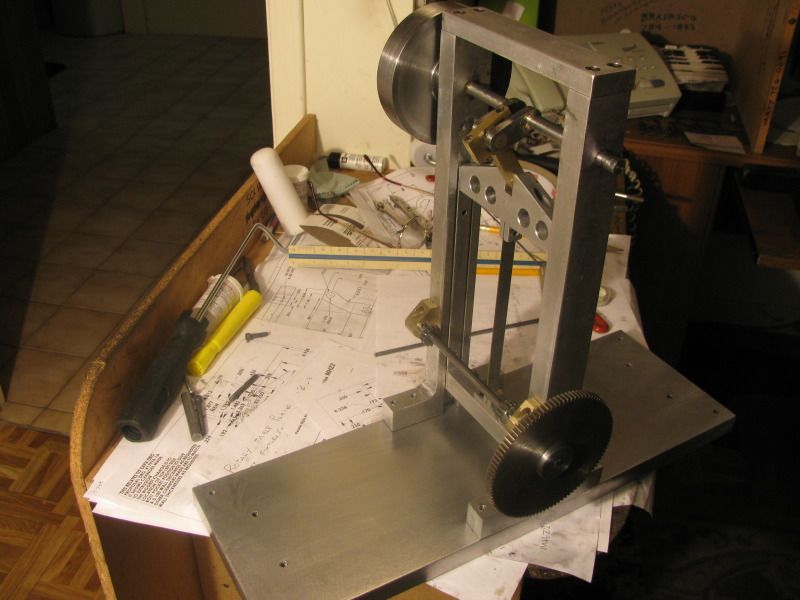
All good suggestions guys.The only limitation on mechanical wizardry is how much energy I am willing to put into the project. The first thing to be determined of course, is "Do I have an engine powerfull enough to run the saw and actually cut a 1" diameter log."---If the answer is yes, then we will move on from pushing the carriage by finger power into the saw, to adding some kind of ratchet/pawl/pinion/rack/whatever. If the answer is no, then I probably won't invest a lot more time or energy. Right now, I can finish almost everything except the carriage drive mechanism with very little more work. Yes, it would be nice to power the rack both ways, stop the saw during the carriage return, etcetera. I hadn't planned on that degree of sophistication when I started this project, but if a project garners enough interested people, sometimes it takes on a life of its own. I am quite confident that after 47 years in the mechanical engineering business, I can design damn near anything. Whether I can muster enough interest and energy to build what I am capable of designing is a whole 'nuther story.
 
skyline1, not only does he live in the shop, he must not sleep, for sure his brain does not and on top of all of that he has a full time job, I would love just to have the drafting skills, love his post, thanks Brain, don't ever go away, now get some sleep, Lathe Nut
 
Brian, I know exactly what you mean. For us following the build its easy to say you can add this or do that, but its the builder who has to put in the time. Hand feeding it in sounds like a good idea for now, power feed and return can come later if desired.
 
Admittedly it would be very slow, but I assume you could just flip the pawl around to the other side of the ratchet wheel to reverse the log.

Great build by the way!
 
My dad worked as a logger in the Bancroft area where I grew up, from the end of world war 2 untill the mid 1960's when logging had began to die out locally. All of my uncles were loggers as well, except one uncle who was a trapper. My father was always away in the logging camps all winter, and one of the loggers who worked with him did a lot of blacksmithing on a part time basis. A few years after my dads last camp shut down because of a bad accident in the bush, the logger/blacksmith showed up at our house with a quart of Canadian Club rye, and these logging tools for my dad. The cant hook is about 11" long, overall. The all metal item is a set of skidding tongs and I can't remember what the name of the other wooden item is. I know where it went, behind a single horse, and the logging chain hooked to the center of it, but Damned if I can remember its name. I want to call it a whipple tree, but that doesn't feel quite right. I had these miniature logging tools around my place for the longest time, setting in a cardboard box in a closet, until last year my wife took them to a professional frame shop and had them done up in the nice display case you see here. I thought that since this is a thread about sawmills, this would be a good place to show these little treasures.
DADSLOGGINGTOOLS001.jpg
 
Tonight I made the 4" diameter flywheel from hotrolled steel.--At least I got a darn good start on it!!! The kid running the saw where I bought the round peice of hotrolled steel thought he would do me a favour and add an extra 1/2" of material to what I asked for. I had already asked for 1/4" longer than what I needed.--As a consequence, I have spent the evening turning 3/4" of 4" diameter material into swarf. I really don't like working with steel very much. I much prefer to machine aluminum or brass. However aluminum is too light and brass is far too expensive, so steel is what I used. This flywheel will have at least two grooves in the outer diameter to accept my 0.100" rubber o-ring drive belts.
FLYWHEEL-SAWMILL001.jpg

FLYWHEEL-SAWMILL002.jpg
 
Brian thanks for the story, life was hard years ago what would he think of us today, down here in Louisiana there is a saw mill town that is now closed but still call by that name Bancroft, interesting the old timers say it was some fellow that came from way up north that move in to saw lumber.

Shoeshop, giving you age away, I remember hooking up to both the single and double tree, with mules that we use by the community.
 
Hi Brian

That's an impressive bucket o' swarf, and judging from the colour of it you weren't hanging about. I agree with you, the "whistle" of a tool scything it's way through brass is is very relaxing.

Regards Mark
 
Every day, I try to make at least one or two parts. Thats the only way I can chew my way through these projects. It's starting to come together. I got this far today, then realized that I don't have any of the correct bolts to attach the outer frames to the baseplate. However, the baseplate is finished, with all the holes drilled and tapped, and the ratchet wheel, pinions, shaft, and bearings are all mounted. Don't be alarmed if my parts don't exactly match the posted drawings. (For example the lack of grooves in the outer diameter of the flywheel.) I do a lot of "Test assembly" as I make these parts. They will get finished as per the drawings as things progress.
ASSEMBLEDMILL003.jpg

ASSEMBLEDMILL002.jpg

ASSEMBLEDMILL001.jpg
 
Last edited:
Thats looking GREAT Brian. Any thoughts on the finish?
Will you be painting it? Can't wait to see it belted up to
an engine & making saw dust!

John
 
John--I don't generally put any kind of finish on these things. There is always a lot of lubricating oil around, and the finish will just lift eventually. I leave everything in its natural state. Brass and aluminum won't rust, and the steel generally has enough oil on it that it won't rust either. I will probably use some kind of stain on the oak I use to make the carriage.
 

Latest posts

Back
Top