Henry Ford Engine

Home Model Engine Machinist Forum

Help Support Home Model Engine Machinist Forum:

This site may earn a commission from merchant affiliate links, including eBay, Amazon, and others.
The fellows above are all correct as you need a narrower seat, angled seat, and a correct spring.
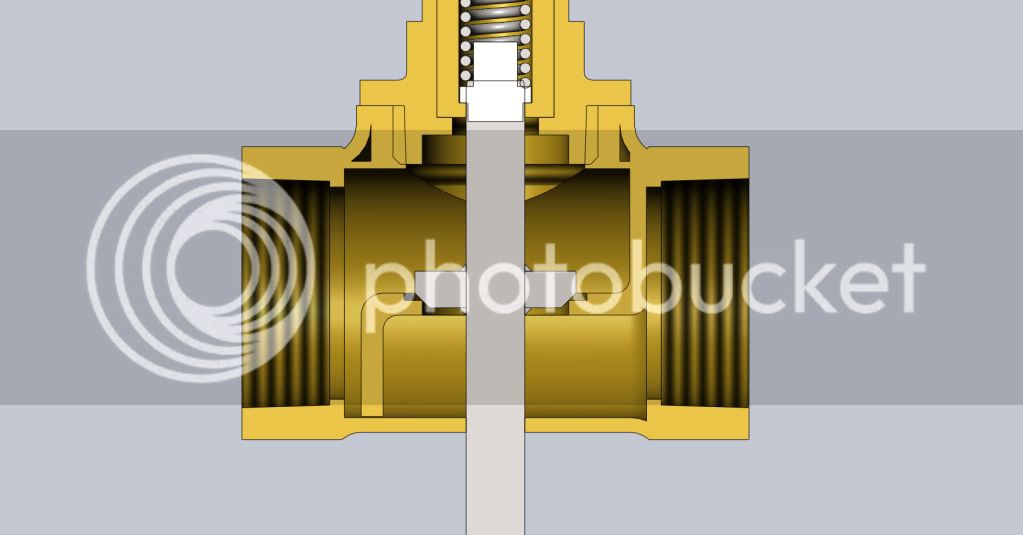
If it helps, here is what works for me in hopefully a simple explanation.

The valve should be cut at 45 degrees and the seat cut at 46 degrees for a mechanical wedge fit of sorts.

Picture.jpg


Picture is over simplified but hopefully you can see the idea. The combustion pressure will actually help seal the valve.
The valve becomes self locating in the seat allowing for looser guide clearances. If you have ever had the head off a Briggs and Stratton, the valves are remarkably loose. But it works fine.
The taper allso allows the valves to be self cleaning keeping carbon out of the seat area.
Make sure the top surface where the valve seat will be is truly flat. Using lapping compound is a hold over from the old days where cheap was good and quality wasn't the best. If the valve is made new with proper machining, then lapping has no place in this application. Using VERY SHARP tooling will make parts to work right the first time. My thoughts and practices,others may not agree, just what works for me. This is allso following full size practice, after all, engine manufacturers don't need to lap their valves.

valve20seat.jpg


You can carry this further by using three angles, 30 on top, 46 for the seat, and 60 leading into the port. The blue line in the second pictureis the 46 degree seat. You can control the depth of the valve and where the valve contacts the face this way.
Hope this may be of some help.
 
Thanks guys...this IS all making a lot more sense now. Having never built an IC engine before I had to go by the plans that I bought. Although the plans got me to the point I'm at now, they were missing some of these fine details.

This is probably an easy question for you to answer but....how do I machine the 46-degree chamfer? I am picturing a C-sink but a 92-degree C-sink? Is the valve body held in a 4-jaw? Is it just by eye?

Please and thank you.

Chris
 
With small stuff you can mount the valve block/head in the 4-jaw and cut the seat with a compount set on the tool post located at 46 degrees to the seat. Then you can use a SHARP tool and real fine cuts to get an allmost perfect seat.
While the valve block/head is set up this way, I usually drill the guide hole first, then the port, then finish the valve seat last so all stays concentric to the guide. As I mentioned before, guide clearance can be looser than one might expect and it will work fine. Hope this helps.
 
vascon2196 said:
This is probably an easy question for you to answer but....how do I machine the 46-degree chamfer? I am picturing a C-sink but a 92-degree C-sink? Is the valve body held in a 4-jaw? Is it just by eye?

You start with a lathe that can accurately repeat the difference between 45 and 46 degrees.

(crickets chirping in background)

Well, I know better to trust my lathe to that specification :) The good news is, its not that critical if the seat is 44.7 degrees and the valve is 46.1, and how inventive do we need to get to measure that anyway?

You can get some drill rod and make a 46 degree C-sink, then bump the cross slide over a degree and make a valve in the same setup. Thats probably the best way to ensure you get nearly a degree difference.

Or, you get a commercial 90 degree C-sink and make the valve 44 degrees. Thats the way I do it, but its problemmatic expecting the 45 mark on my lathe is that accurate.

Either way, the lapping at these scales will probably even them both out somewhere in the middle. It may even be preferrential to go 2-3 degrees difference at our scales to narrow the final results to an acceptable seat width. The big trick is blueing the surfaces to see what your doing.
 
EXHAUSTVALVEASSEMBLY.jpg


EXHAUSTVALVEASSEMBLY-2.jpg


OK!!!

I built a brand new valve (with sharp tools) and built a brand new exhaust valve (with sharp tools). I put the two together and there was a boat load of daylight peeking through. I used some 400-grit lapping compound and proceeded to fix the situation. Same thing was happening, it just would not seat properly. After a few much need curse words and a big fuss I went out for a drive to run some errands.

Something in my brain finally thought about what was happening. When modifying the valve body I used a 5/8" end mill to remove the original valve seat (like the instructional video suggests). This creates a nice straight hole but the area around the hole was uneven. I drove back home, centerd the valve body again, and used a 3/4" end mill to essentially add a spotface...........it sealed perfectly.

I put the engine back together and tested the seal (without fuel) and it was working! It was compressing the air so when the exhaust opened I could hear and feel the air poofing out when it was supposed to. So adding the fuel and giving the wheel a spin, it didn't run. :'( :'( :'( :'( :'(

It did however turn over once or twice under it's own power...but it did not stay running. My fuel resevoir needs to be fixed to better regulate the gas flow. So after all this I have to go back yet again and modify something. At least now I can say this has to be the problem and it is something I can fix. Boy I have learned a lot with this engine build! And I have to say, 95% of all of my success has to do with ALL of the help I have received from ALL of you...thank you.

I will be in touch once it is finally running.

Chris
 
Just read this post from the start. (newbie joining in watch out). Suck, squish,bang, blow it should go. I have bought, found been given alot of motors in my day and this mantra has served me well. If it turned with no scary noises and had compression at the right time, ad fuel and air it should go. This is not always the case. I agree with putting it on the back burner and throw together a simple engine to give yourself a lift. I admire your dedication to thiss thing. A few things that I wondered while reading it was what type of compression ratio does this engine have? I am assuming it would be quite low with the long run to the valves. When I have had trouble with engines not running that should (factory not home made eg car, boat, bike lawnmower etc) I often have used a leak down tester to find the leakage. Another thought would be to try a higher octane fuel. I had a old engine I found at the dump which would not run due to low compression, ended up getting it to run on thinners (don't ask why we tried it, dumbluck). For the record I have only ever taken to one engine with a work boot, foot and multiple applications. Tecumseh vertical shaft lawnmower. Removed said stomped and replaced with a kerbside find B&S now no problem. The stomped engine is in the shed in disgrace. Chin up. Sorry about the rambling.
 
Further to Shedboy's comments, these Henry Ford engines are notorious for not having a high enough compression ratio. People have stuffed all kinds of stuff in the head space to raise the compression ratio.

Chuck
 
ShedBoy said:
Just read this post from the start. (newbie joining in watch out). Suck, squish,bang, blow it should go. I have bought, found been given alot of motors in my day and this mantra has served me well. If it turned with no scary noises and had compression at the right time, ad fuel and air it should go. This is not always the case. I agree with putting it on the back burner and throw together a simple engine to give yourself a lift. I admire your dedication to thiss thing. A few things that I wondered while reading it was what type of compression ratio does this engine have? I am assuming it would be quite low with the long run to the valves. When I have had trouble with engines not running that should (factory not home made eg car, boat, bike lawnmower etc) I often have used a leak down tester to find the leakage. Another thought would be to try a higher octane fuel. I had a old engine I found at the dump which would not run due to low compression, ended up getting it to run on thinners (don't ask why we tried it, dumbluck). For the record I have only ever taken to one engine with a work boot, foot and multiple applications. Tecumseh vertical shaft lawnmower. Removed said stomped and replaced with a kerbside find B&S now no problem. The stomped engine is in the shed in disgrace. Chin up. Sorry about the rambling.

Shedboy....not sure what the ratio is. Not enough according to a lot of folks who have built the engine.

Chris
 
ALMOST!!!

I almost had it running last night. I noticed a lot of air passing by the exhaust valve guide set screw. I sealed it with permatex and that helped a lot.

It kicked over very strong but the damn thing would not combust when it came back around. Now I think it's getting the right amount of fuel into the chamber.

I'll try it again tonight. I'm glad I didn't smash it with a hammer now....

Chris
 
Find a leak down tester, you can pressurize it with nothing else going on and pinpoint the leakage. Another way I have used on a motorbike was a fitting adapted to the sparkplug ole about 10psi and some soapy fluid to show bubbles. But it is sounding promising, maybe post a video of the thing and see if it is obvious to anyone else what is wrong, you know new set of eyes and all that. Heavier flywheel to give it more momentum maybe.
Just my 2 cents, sorry 5 is the lowest I can go, worth.

Brock
 
Thank you Shedboy...I did see some bubbles coming out of the base of the engine? I thought for sure that area was plugged up tight but apparently air found a way...

Chris
 
NOTE TO SELF: Never rest your left hand directly on top of the spark plug when you turn the engine over with your right hand...

Unless you are REALLY tired and need to wake up fast.

Chris
 
A nice job so far. I'm sure you will get it to run soon :) Air leaks are worst on small models and sounds like youre on the way to success :bow:
This is an engine I would like to try but as the guy has no email or paypal type access it makes it hard for us earthlings on the bottom of the planet ;D.
I would be happy to pay for the book and dvd and postage if someone can help by contacting the owner of the plans that end. I reckon postage for a book and dvd would be reasonable enough not to break the bank ;D.
Anyone willing to help out PM me and we can see what we can get happening
Pete
 
After all these fun and games it STILL will NOT run. I took the entire thing apart, shortened the pipe nipples, filled it with as much lead as I could, and even bought high octane fuel. This POS engine is going to kill me.

Hold on tight for a video coming very soon. Maybe something will jump out at you that I'm not seeing.

:mad: :mad: :mad: :mad: :mad: :mad: :mad: :mad: :mad: :mad: :mad: :mad: :mad: :mad: :mad: :mad: :mad: :mad: :mad: :mad: :mad: :mad: :mad: :mad: :mad: :mad:


I had to spin the flywheel and hold the camera at the same time so it's a little shaky.

Now I hate this engine.
 
Some thoughts

Did I hear a buzz coil buzz a fair amount past top center? If using a buzz coil it fires when points first close and not when points open like on a regular ignition.

Seems like either the flywheel is a little light or there is a friction or binding problem or lack of compression. I like it when flywheel is given a little flip and the piston bounces back when it comes against the compression. What are you using for piston ring?

Built one of these and helped a friend with his build. A problem is flooding, once it gets flooded they are hard to get cleared out to get a leaner mixture that will fire.

What I did was drill a small hole in bottom of elbow at low spot so if raw gasoline is in elbow it will run out and also this will let a little fresh air in to lean mixture a little. Friend built his like the plans and then made another elbow with the hole in bottom of elbow. It runs good with the hole in bottom of elbow and with the other elbow like in the plans, without the hole it, will only run a little with help from a shot of ether.

Keep trying, you will get it.
 
This engine has beaten me to a pulp and broken me. I have absolutely no disire to finish this engine ANYMORE. The second exhaust valve I made does not hold air. I have taken this engine apart at least a dozen times and have tried just about everything.

I thought by following the "plans" I purchased and some basic machining I could build this engine.

I am getting in contact with a gentleman in CT who has built this engine multiple times and am giving it to him to finish.

Thank you all for your help with this...

Chris
 

Latest posts

Back
Top