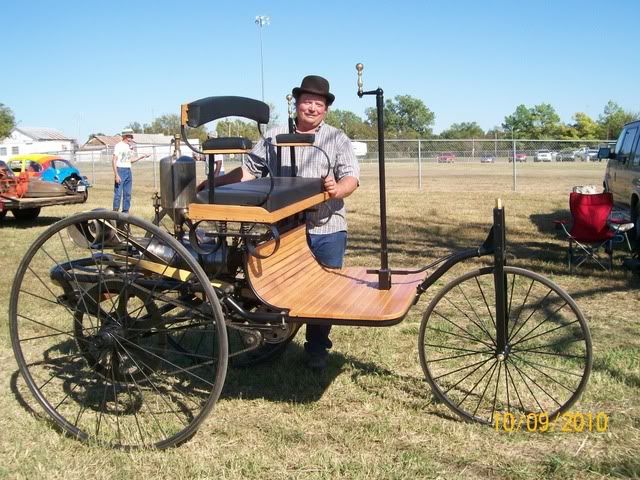
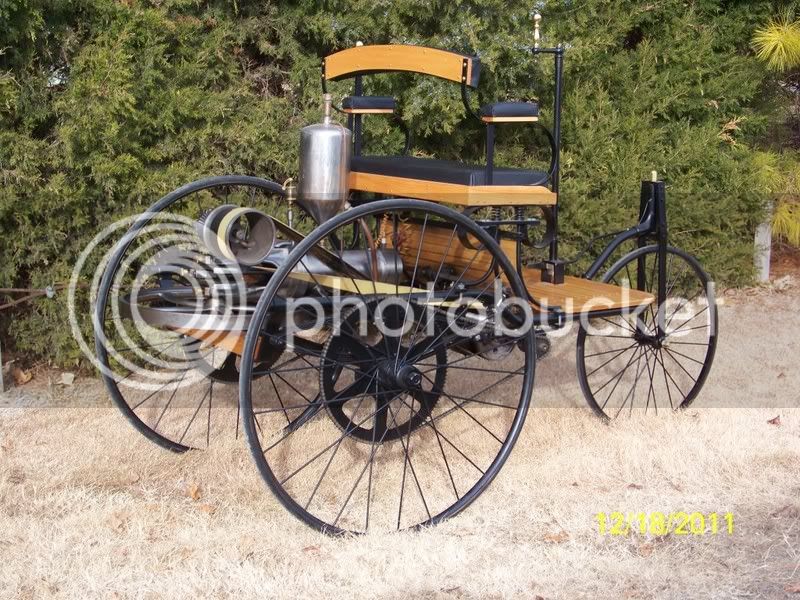
1886 Benz

Home Model Engine Machinist Forum

Help Support Home Model Engine Machinist Forum:

This site may earn a commission from merchant affiliate links, including eBay, Amazon, and others.
Thanks guys
Chuck the top of the cylinder has a flange on it and the head holds it in place the head gasket seals it off. No oring on the top. I have not ran the engine long enough to bring the coolent to a boil so I don't know how well this will hold up. Tom
 
That's awesome.

I bet you could have hours of fun with the DMV and department of transportation with that.

"Yeah, I'm here for my driving test... " :D :D


So does the incoming air pull through the tank and bubble up from the bottom through the gas, to create more vapors? I'm wondering about the valve that controls the amount of air entering the tank. I also was wondering just how or where are the point arranged. I've seen a picture or two that I think I've found the cam it drives off. Also wondering about what kind of weld you did to attach the flange to the DOM tubing that is now the cylinder liner? I'm still amazed at the scope of your talents. Greatly enjoyed the videos. So did you have to change the gearing ratios to get it going. I know you wrote about that might happen. Take care.
 
rustranch my engine uses a simple mixer like used on old hit and miss engines. The points ride directly on the cam lobe and are mounted so the timing can be adjusted while the engine is running. If you look at some of the pictures I posted you can see a little lever sticking out beside the right cam bearing this is used to adjust the timing. The flange was beveled and then mig welded to the liner. I change the front sprocket from 17 to 12 teeth but I think its still to fast when I build new rear wheels I will put bigger sprockets on the back. If you need pictures taken of any parts just let me know. Tom
 
OK I didn’t see much on the crank build up in your picture collection. So I've looked closely at some of your pictures. I'm guessing you welded the journals to the throws on the crank then ground down the welds. How did you grind the welds on the inside of the throws? There gone I can't see anything showing they were there? I think I found the points cam and method you build to adjust the point timing. How far does it move and what method did you use to make a friction fit to keep it in place with all the engine vibration. Another wonder I have is what were the snap rings around the Tabasco bottle used for? What did you do to keep the iron/steel from rusting during the build. It sure is shinny and pruty, I'm impressed. I have other questions but am running out of time tonight.
 
OK I've studied the photo sequence on Photobucket on construction of the head. I remember you posting about hollowing out the head for coolant passages. For the life of me I can't figure out how the coolant gets from the head to the rest of the engine.
 
Rustranch The crankshaft was the fist part I built and I didn't take any pictures of it other than the one of the parts that were welded together. The rod journal was welded on the outside and the main journal welded on the inside, a large grinding disc was used to grind the main journal welds.
I used a snap ring with a wave washer behind it to hold the timing disc in place.
I was trying to cut the end off of the bottle to make drip oilers out of them but they keep cracking and I thought the snap rings might help but it didn't and after about 6 tries I let it rest :mad:
The iron/ steel is kept oiled but is starting to rust . I plan on painting this winter.
There are two holes drilled at the top and bottom of the head to allow the coolent in and out. no picture taken.
Here is a video of my son out for a drive at the Winfield KA. show Tom
 
I was just looking at one or your videos and I noticed that you changed the rear sprockets. Where did you come up with spoked sprockets that size. Most of the larger one I see are solid. Ok course I only hang out at Tractor Supply with a limited selection. The engine seems to like the new gearing listening to its chuf chuf rhythm. So at one of the fall tractor shows you need to look around for a ol buggie step to add to this rig. Might make it easier to get in and out. In studying some of the old pictures and art work of the originals some have them and some don't. Hum maybe it was an option. I don’t' think anyone could have stopped by Western Auto for dress up accessories ha ha. Seems to have been on all the Nr3 models. Although it is a much taller vehicle with 49 inch rear tires and the body above a frame with some springs. I guess the height was stately so the driver could look down on the little folks. So are you planning on painting the engine this winter as you mentioned? If you are open to suggestions I would go with a darker red or maybe maroon but with gold pin stripe details. Once again your talent is outstanding and this rig show it and you look like you are having a lot of fun. I'm envious.
 
Rustranch Thank you. The sprockets were solid I cut the spokes in them. It does need a step and I have a buggy step I got at one of the shows just can't find the time to put it on. I don't know if I am going to paint it or not most people say not to paint it, if i do it will be dark red. I would like to take the engine apart to see how it is holding up. I had to change the valve housing to head gaskets to copper the paper gaskets burnt out other the that it has ran well. Here is a photo and two videos taken at a couple of shows. Tom
101_1787.jpg


Tom

Those are some great video shots there Tom. It is a good thing that you don't have an overdrive gear in it or you would be getting a few speeding tickets. ha ha. You sure look like you are having fun. Keep on enjoying the Benz. :bow: :bow:

Cheers :)

Don


Tom, did you make drawings of the engine ? If so I would love to get a copy. I am willing to pay.

Thanks

Bob
 
:eek: that has got to be the coolest thing I have ever seen that someone made from scratch...

absolutely in shock.

R
 
Tom,

Do you plan on having the car in any shows this spring or summer? If possible, I would like to visit to see the car. Would you allow me to take some measurements from your car? Your car is so awsome, I want to build one I will print all the pics you posted and will study them . I Built a replica car over the past few years with a Briggs engine and a tranny from a riding lawnmower, but it doesn't hold a candle to your beautiful Benz. Your new picture is the best yet.

Bob
 
Hi Tom,

Amazing....simply amazing!

Long story short I plan on building the Ford Quadricycle and am looking for an approximate estimate for raw materials, purchased parts, etc.

Would you be willing to share a cost on building your beauty?

It will give me enough to submit a budget.

Thank you!
 
I had all but forgotten about this build I was really glad to see it surface again I reread the entire post. My hat is off to you Tom simply outstanding work, you are a vary talented individual.
Dave
 
Thanks Dave and vascon,

vascon, I don't have a breakdown of cost or even a total. There is a guy on the yahoo horseless carriage builders group that built a quad and I believe he would gladly help you. He goes by the name stu martyn. you can join the group it is HCRBUILDERSGROUP.

If this does not work for you you could make a parts list and maybe the guys on here and I could help you figure out the cost of them. Or I could figure out a rough estimate of what it cost me. But you can not tell my wife what it cost. :rolleyes: thanks again Tom
 
Hi Tom T I am John Hili from Malta at the moment I am in the process of building the Ford Quadricycle and afterwards I am interested in building the Benz. As for machining I have a fully equipped workshop. The only problem I see is the bevel gears can you please tell me were you bought them? As for your Benz I must say you did a great job!!!
 

Latest posts

Back
Top