Rupnow i.c. Engine with governor

Home Model Engine Machinist Forum

Help Support Home Model Engine Machinist Forum:

This site may earn a commission from merchant affiliate links, including eBay, Amazon, and others.
Remember the hole that the center shaft on the governor had drilled partway through the brass lever? Well, I scrounged around in my parts bin until I found a .235" dia. bearing ball (okay, it was probably 6mm). I opened the hole in the brass lever until the bearing ball would just drop into place, and silver soldered it into the hole. Bet ya that's not going to be worn away anytime soon!!! Why isn't the hole for the bearing exactly on the center of the radius in the end of the brass bar? That's a real good question. I don't know myself. Put it down to accumulated tolerances, poor machining practice, or just diabolical misfortune. If I have to, I can grind a bit off the end of the center shaft to accommodate the fact that the bearing ball "humps up" a bit above the brass lever.
 
Well--So far, so good. All the new parts of the governor and latch mechanism are built and mostly in place. I have set things up so that when the cam follower is riding at the highest point on the cam there is approximately 1/16" between the new L shaped piece and the aluminum track that guides the 3/16" square lifter rod, and about .020" between the end of the "catch lever" and the L shaped piece. This means that when the latch is in the position shown, the valve can't close all the way, so the engine stays in "miss" mode until the governor slows down and the "catch lever" no longer is forced up into the position shown. The next revolution of the cam moves the 3/16" square rod all the way to fully open, and there is no pressure from the valve spring acting on that "catch lever" so it revolves down out of the way and lets the valve close so the engine can fire again. Jeez, its hard to explain what is happening here. I hope you can understand me.---Brian
 
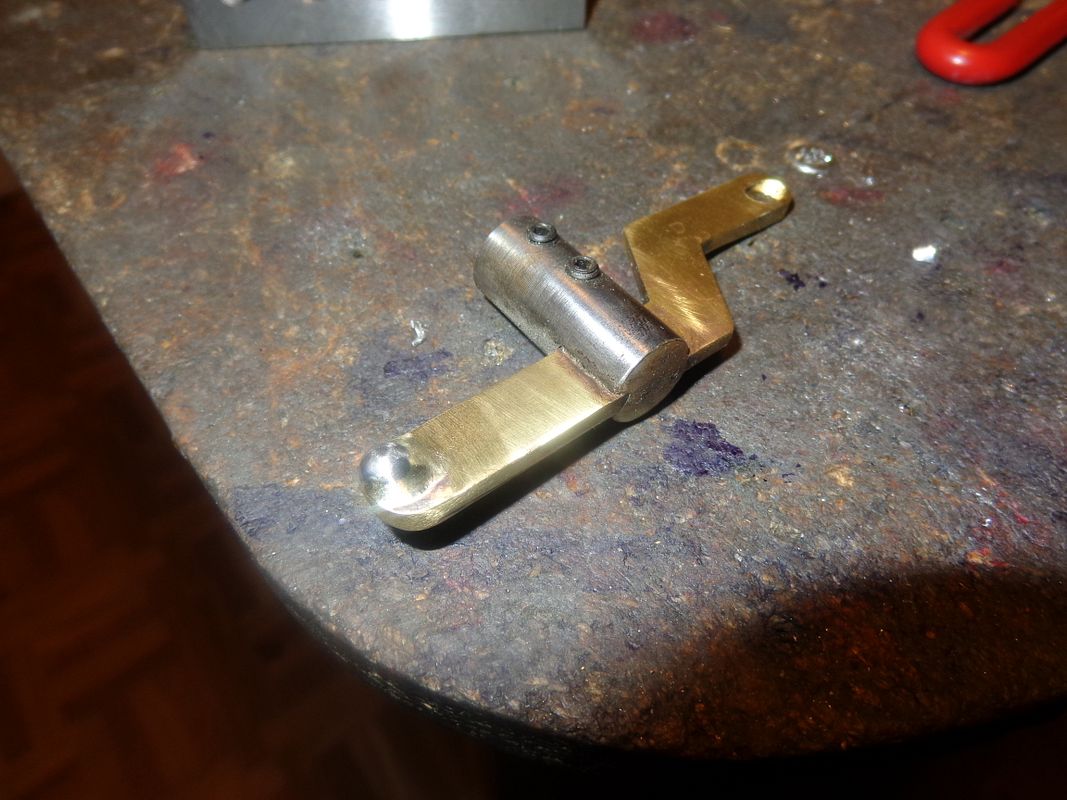
Yes, the lighter balls were the answer. I will try and describe why the heavy brass balls didn't work in this case. For a given amount of speed, a heavy ball will exert more centrifugal force than a lighter ball. You can liken this to swinging a small pebble around on a 24" string, and swinging a large rock around on a 24" string. The large rock, when swung at the same speed as the small pebble, will pull the string much harder. In my situation, the brass balls were trying so hard to fly out away from the stempost at low to medium speeds, that I had to really crank down on the adjuster spring to counteract this force----Because---If the balls fly out too soon, the engine won't develop enough rpm to keep running. I had to put so much pressure on the spring to keep the heavy balls from flying into hit and miss mode as soon as the engine started to turn over, that there was tremendous friction between the end of the vertical rod inside the stempost and the brass lever. The friction was so great that it actually drilled a 3/16" diameter hole half way through the brass lever. This friction fed back directly to the engine and put so much load on the engine that it wouldn't keep running. Now with the much lighter aluminum "balls", all of the friction issues are lessened by a factor of 3, because the aluminum balls are 3 times lighter than the brass balls. I still have some carburetor tricks that I want to try, but I feel that the engine is a success. Although I was certain that the overall design was correct, I had a real underlying worry that maybe I was leading a bunch of good folks down a bad road. I feel very relieved now that I have seen the engine run as in the video, and from here on in, it will be a matter of fine tuning.---Brian
 
Well done! Congrats on your success Brian, you must feel like a champ!
 
Now that the engine runs, the next stage of course, is to get it to run better. This engine seems to require far too much manual choking (old finger over the air horn trick).--and then it floods very easily. Conventional wisdom dictates that if the bore of a carburetor is too large for the engine, then air passing thru the carburetor body will not have enough velocity to create the venturi effect and lift fuel from the tank properly. I am going to build a smaller bore carb today and see what the results are.
 
Hi Gurus,
My Antique HT Ignition Coil just died of old age. Very doubtful the next antique will last .Just ordered a CDi from cncengines.com. Incidentlty looks identically to the CDI that comes with OS Petrol Engines.
CDI will take a week or so to arrive. Plus I will away in Thailand for a week.CDI will take on contact points.
Its housekeeping tomorrow.

Hi Brian,
Looking forward to d/l the PDF prints of your engine.
 
Today I have built a carburetor with a smaller bore, to see if it will make the Rupnow engine a little smoother and not require so much choke. I will install it and make some tests, and if it improves things I will post drawings so you can fabricate it.---Brian
 
Today, for the first time in 6 weeks I have got out of bed wondering "What will I do today".--Actually, it feels surprisingly good!! I don't really have anything left to do on the engine until the electronic ignition kit I ordered from S&S Engineering arrives. That should be an experience, as I have never used one before. The small bore carb I built yesterday didn't make any stunning performance difference, so I have set it aside for now. This engine seems to starve for fuel, then flood easily if choked, and I simply don't know at this point whether it is a carburation issue or a spark issue. I have a tendency to suspect the spark. When I first built the ignition system, consisting of a 12 volt automotive coil, points, and condenser, I had a big fat blue spark at the sparkplug. Now I have a rather anemic looking white spark which still jumps the gap in the plug when the plug is laying out on the engine block, but it looks weak to my eyes. I will post more when I get the electronic ignition sorted out and installed.----Brian
 
Last edited:
Why do you Always working with "contact points" and not with a magnet & a hall sensor?? is it for the looks??

I know that contact points give errors when there is a little oil or grease on them.

Also , when the oil burns not good away , there will be some carbon in the sparkplug. So you will have not a good spark - or a spark on the wrong place.

I know that really good , because I have still my Aprillia 250 RS!! Wrong or bad oil & the engine will stop. Sparkplugs are very....?? Don't know the word in English. Sorry.

Barry
 
Lawjit--Best answer--Because I'm old, and I know old style ignitions. I have purchased a new electronic ignition package and will be trying it out on this engine as soon as I get it.--Actually, I have just started a new thread over on the "Questions and Answers" section of the forum about this very subject.---Brian
 
Last edited:
Indeed Brian , I know they also very good. I have in my collection & very old ROGERS spark engine. But the pressure in the carter push some fuell with oil out the crankshaft. With that old engine there is some wear & there come a little more out. That come on the contact points & that is really burning in. That go really fast.Here a video with the Rogers with a self build electronic ignition system:

[ame]http://www.youtube.com/watch?v=s5cP2TfKMjA&feature=share&list=UU1BXeMnWzIagQAC7fKYx0_g[/ame]

Just after that I see my brand new car full of oil!! Not a happy Barry.
 
Hi Brian,
Congrats. "Doubting Gussy" now has no more doubts to plunge in to build this engine. Three years ago Australian Model Engineering Magazine had prints for a version too big for my mini lathe and mill.
Your Hit & Miss engine size fits in.
With the watercooled version,engine could run for hours w/o boiling over.
 

Latest posts

Back
Top