Oscillating I.C. Engine

Home Model Engine Machinist Forum

Help Support Home Model Engine Machinist Forum:

This site may earn a commission from merchant affiliate links, including eBay, Amazon, and others.
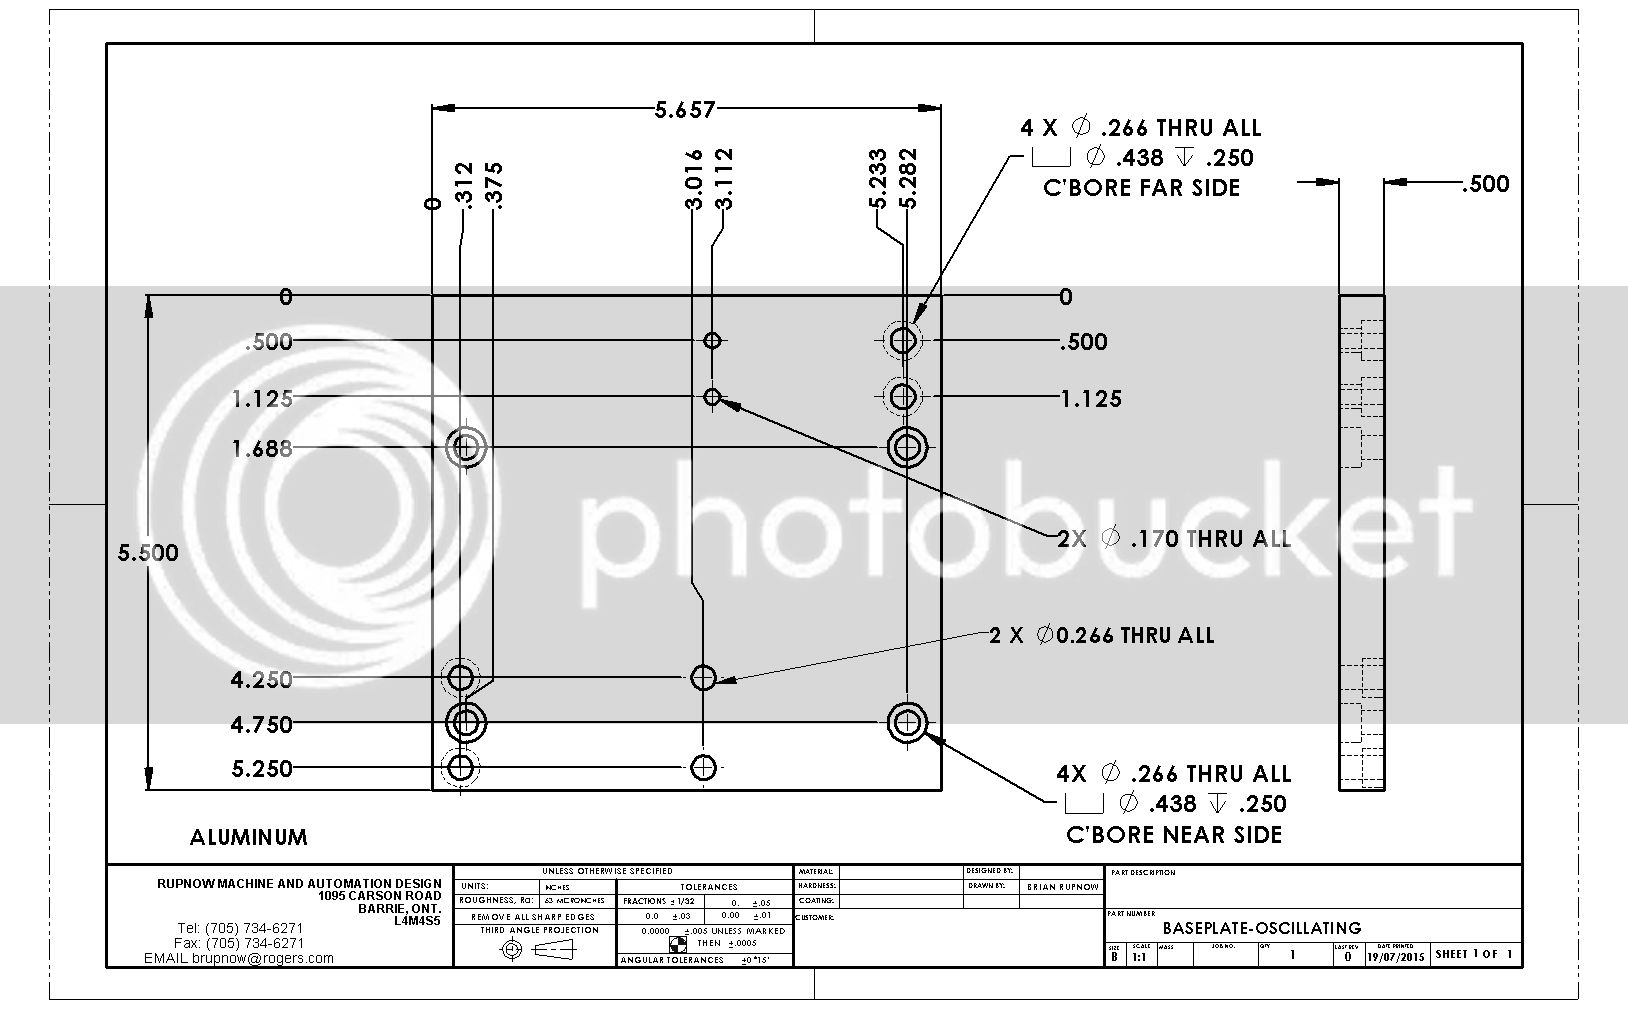
Now, where the heck was I when the lights went out two months ago---I have a big tin can full of parts, and I'm certain that I would be much happier if they were all bolted to something to kind of make sense. I will now try and get some fun out of my new mill, and whittle out a baseplate.---Brian
 
Holy cow. Brian I’d almost forgotten about this build. I’n going to have to go back to the start and read it over.
 
Well, it doesn't look THAT much more impressive with all the pieces assembled on the baseplate.--In the background you can see the slice of 1" x 5 1/2" diameter bronze that is destined to become a flywheel. And yes, I do have the gearblanks turned to diameter to cut gears from. Also, in the background, you can see the 3/4" x 1 1/2" aluminum "riser bars" that will lift the baseplate up high enough that the flywheel doesn't touch the tabletop.
 
There--I think that is a definite improvement with the risers in place under the base!!---And yes, those are the points and condenser I will use on the engine, displayed along with their part numbers. I purchase them from PartSource, an automotive supply house here in Barrie. The parent company is BWD automotive in Long Island, New York.--They are originally intended for use on some Chrysler automobile.
 
Hi Brian. This is one wild looking engine. I was wondering are you going to mount the condenser there or hide it under the base?
 
Hi Brian. This is one wild looking engine. I was wondering are you going to mount the condenser there or hide it under the base?
Bmac--That is one of those "I'll figure it out when I get to it" things. The condenser is shown there for display purposes only.---Brian
 
I'm about to head off into gear cutting territory, but I have a question wiggling around in the back of my mind about the aluminum cylinder. I like it. It's beautiful----but I don't know if it will stand up to the combustion process or not. If not, I will put in a cast iron liner, to take the bore down from 1" to 7/8". My question is, can cast iron be turned to have a 1/16" wall, or is that too thin to machine comfortably? The liner would only be 2" long. I have turned a few cast iron cylinders, but have very little experience with liners.---Brian
 
If you use a good grade of cast iron, I cannot see any problem with the thin wall. In use it will be supported by the cylinder around it. You may find it better to finish the ID first, then mount it on a mandrel to finish the OD.

Paul.
 
It's been a very "Geared up" morning hear!! I cut the two gears I require for the oscillating engine, and the four gears required for the flathead engine I built. Some fellow out in central USA built the Rupnow side valve/flathead engine and then realized he had no way to make the gears for it. I still have some parting off to do, and some clean up, but these are the first gears I have cut with my new mill.
 
Brian.
I can imagig turning the handle/counting turns and indexholes:rolleyes:
Nice work Brian.

CS.
 
Actually, the 30 tooth and 15 tooth gears are easy to make on my set-up. The 30 tooth requires 3 full turns (always end up back in the same hole on the divider plate) and the 15 tooth required 6 complete turns, again ending up back in the same hole in the divider plate each time.
 
Last edited:
I just cut my first cam using the "Chuck Fellows Method"---(Google chuck fellows cam cutting youtube) and I must say, it works a treat!!! Thank you Chuck!!!--and---Since I haven't had time to rig a permanent depth stop on this new mill, I thought you might like to see the "Hokiest Depth Stop Ever"---But it worked very well. By the way--there are two gears on that piece of steel. I just haven't parted them off yet.

 
We've got gears. Lots and lots of gears. In fact, we've got a whole freakin days worth of gears!!! I have 8 hours in these gears!! I know that the two on my oscillating engine mesh properly---I've tried them. I haven't made up a test jig to check the mesh on my other four gears that are going to a guy in USA. I will make a test jig to check them tomorrow. The 3 jaw chuck on my lathe is about .0015 out of true center. The 3 jaw chuck on my rotary table tends to have a wondering true center. I know there is some "forgiveness' built into the design of these small spur gears, but I never feel really good about them until I have drilled a piece of scrap and inserted 4 short pieces of shaft to mount the gears on and actually turn them to see what is going to happen. Sometimes they are perfect. Sometimes they need an application of 600 grit carborundum paste and spun for 15 minutes with the electric drill to get rid of any bind caused by eccentricity in my set-ups.
 
This post has nothing to do with the current engine build.---However--It does show 4 gears I made today mounted on a test jig, to see if they mesh properly without any binding. This time I was lucky--Smooth as silk!!!
 
This morning I made up the big and for the con rod, and the con rod itself, though as yet I don't have a piston on the other end of the rod. I also took the time to read the manuals and figure out how to find the center of a hole using my new DRO system. I might finish a piston today, but then I might not---It"s getting awfully nice outside, and I was in the shop for 10 hours yesterday----
.
 
As with all newly assembled engines, this one was very stiff when all the bolts were tightened down. I have come to expect that, so part of this afternoon was spent trimming a bit here, stretching bolt holes a bit there, until finally it would turn over by hand. Of course a large part of the issue is that there is no convenient "handle" to turn the engine over with. I'm down to the point where most of the large pieces are finished, but I think I will make a start on the flywheel tomorrow, more to have something to actually grab onto to turn the engine with than anything. I have decided not to put the cooling vanes in the flywheel---at least for now---.
 
I just about got ahead of myself here.--I need a piston before I move on to the flywheel.---And man, what a big piston it is!!! I used bronze because it has good lubricity characteristics, and because that is what I had. I am not concerned about the mass, as it is a slow revving engine anyways.
 
Back
Top