Indicator Holders and Such...

Home Model Engine Machinist Forum

Help Support Home Model Engine Machinist Forum:

This site may earn a commission from merchant affiliate links, including eBay, Amazon, and others.
zeeprogrammer said:
2nd run at the stop. (That sounds odd.)

I always stop like that Ahfasir!!!

So there it is. A stop. Hardly a 'woo hoo' but maybe a 'wee hee'.

Oh! I want one

Now I can get started on the indicator holder half joints that Foozer has been kind enough to design.

Oh No, Ok if it works then . . . if not it was a different foozer :)

Good job on the stops. Funny how the supposed simple things can be such a PIA

Robert
 
Toss me on the "Happier" bandwagon, too. Nice work. ;D
 
Thanks Marv, Robert, and Vernon.

Now that you know the color...don't keep it to yourself. ;D
Oh right..it's blue isn't it? The 'blue bird of happiness'?
That just doesn't seem right. (For whatever reason, an image of a nose comes to mind.) Rubber hose? Smothers Brothers? Laugh-In! That's it isn't it? Sorry...I was following tradition...i.e. how to celebrate success. It's red tonight.

Robert...simple things are just tough when you're learning.
As simple as this 'should have been'...I learned a lot and grateful for it.

Ha. On one hand I want to say "Sheesh. It's just a stop."...but as a programmer...I know the feeling a newbie gets when he/she writes their first "Hello World.' program in whatever language they're learning.
 
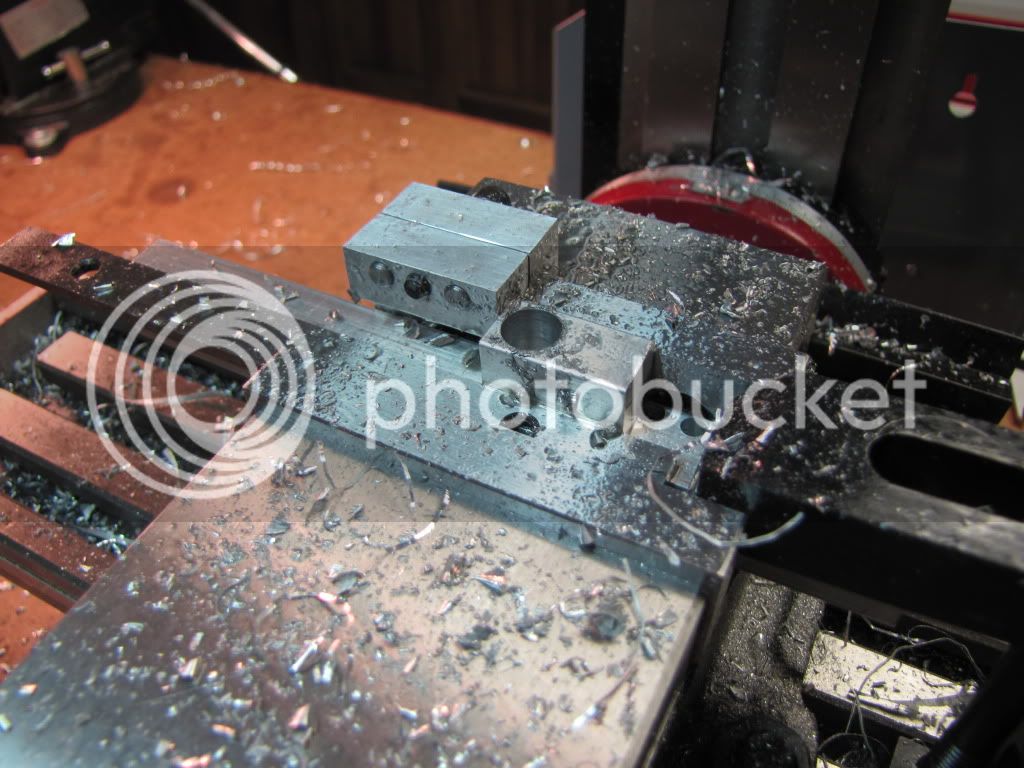
Now that I have a stop...

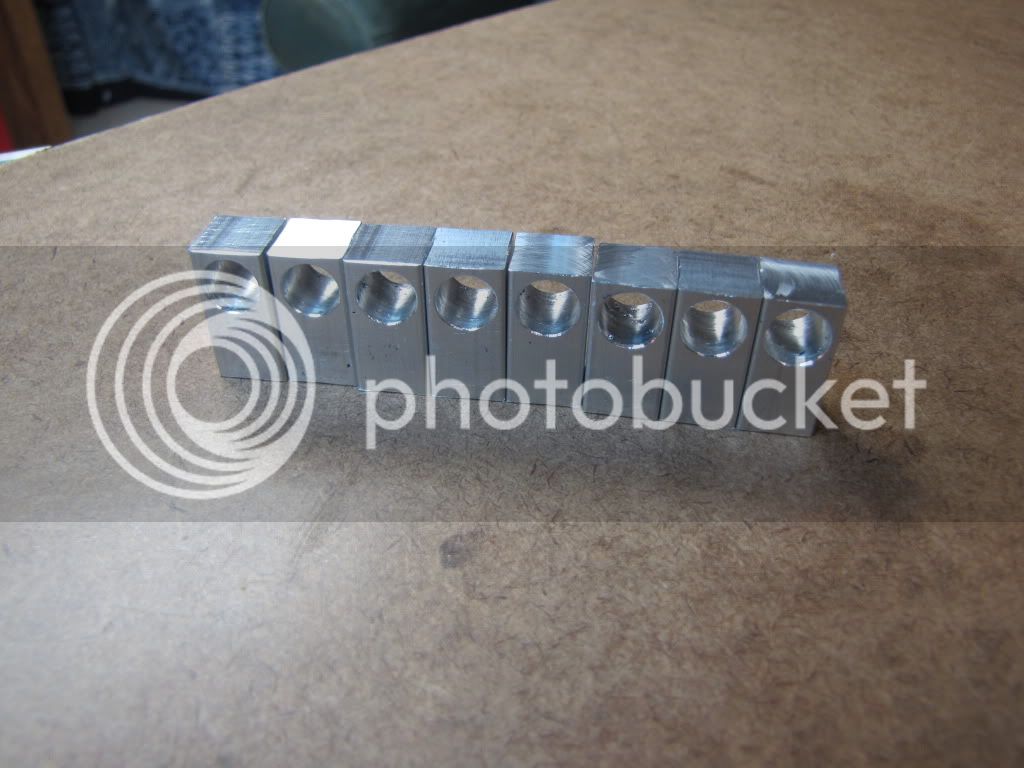
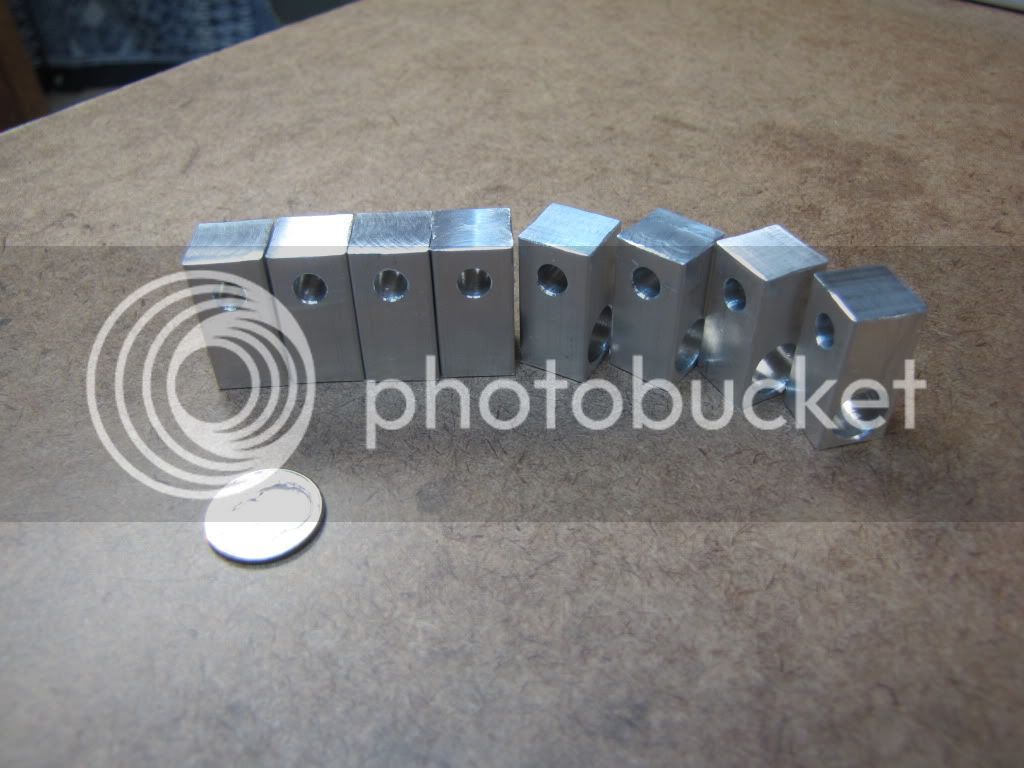
I'm going to make 8 of these half joints. I need 6 + 2 for spares (yeah...spares).

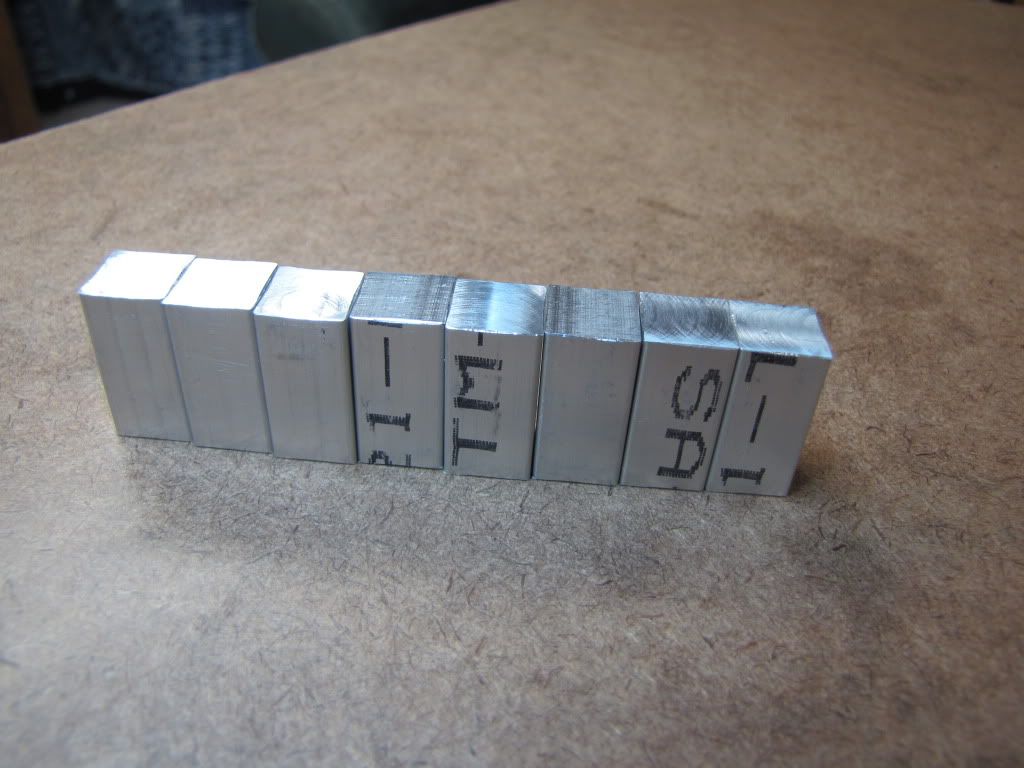
Assume for the moment that at some point I have 8 1/2x1/2x1 pieces of aluminum.

Remember Foozer's drawing?

I'll drill at 23/64 and ream at 3/8, one at a time. (The stop will be handy.) This is for the 3/8 drill rod. This is probably the only critical thing.

Then I'll drill the other hole at 13/64, one at a time. (Again using the stop.) This is for the 10-32 bolts. Comment? Is 13/64 enough to let the bolt pass through? The diameter of the bolt is 3/16.

Then I'll mill the countersink, one at a time. (Using the stop.) Not too worried about depth. Enough to keep the bolt from turning. Would be nice for top of bolt to be flush with surface but it's not necessary. I initially thought to do this on both sides so I wouldn't have to 'worry' about finding the correct side. I don't think it's worth the work.

Then I'll slit each at 1/16, one at a time. (Yep...there's that stop.)

Now...maybe I can slit more than one at a time. But...even though most of the machining is not critical...I'd like all the pieces to look as identical as possible. So I'm thinking one at a time...using the stop.

That leaves making the initial 1/2x1/2x1 blocks. Couple of questions...

1) Is it worth machining the sides?
2) Any suggestions to ensure all 8 are 1" long? I suppose I could bandsaw close, then mill using the stop?
3) Any ganging possibilities?

Just trying to let people by pro-active rather than reactive. No I'm not. I'm just trying to avoid the ..."you dolt! why didn't you do it this way or that way".

Oh, I won't be rounding the ends as in Foozer's drawing...pretty as it is. Just squared off.

Thanks.

 
Zee

Just remember that your drill rod might not be the stated dimension, it is often a little bit over.... (Learned that one the hard way.... :big:)

Joe
 
joe d said:
Just remember that your drill rod might not be the stated dimension, it is often a little bit over.... (Learned that one the hard way.... :big:)

Doesn't matter if he's going to split the clamp. The 3/8" hole will open as soon as the slit is machined.
 
Nice job on the vice stop Zee , something i will have to get round to making
Rob
 
Thanks Joe, Marv, and Rob.

So here's the eight little soldiers ready to be drilled...

IMG_0272.jpg


Yep. That's all there is. Have some patience...this tool will allow me to build the most fantastic engine. Okay a great engine. Would you believe an engine? Small pieces of metal?

Right or wrong...I put four on either side of the vise, laying down, and milled the ends. Then stood them up, on either side of the vise, milled one side to length (height) then did the other side without moving the Z. Ends are probably not square to sides...but it's not critical for this.

Suggestions for a better method are certainly appreciated.
 
Eight little soldiers having gone through their first drill...

The setup...

IMG_0273.jpg


The result...

IMG_0274.jpg


I like that stop.
I had originally intended to drill at 23/64 then ream to 3/8...but I can't get the reamer in without moving the head. So I drilled at 3/8. Probably okay. Test fitted with some 3/8 aluminum rod. No problem. Joe...maybe I should be more worried that the rod I get will be under a little under?

Now I have to wait for the bolts to come in so I can be sure of measurements. I don't trust myself. I suggest you don't either (that is...trust me). May get them tomorrow.

...oops...noticed a little dribble on the side of my mouth...thinking about the next engine...patience...patience...must get equipment in tram...

'gosh' this is exciting (that one's for you Vernon...just to see if you're watching ;D)
 
zeeprogrammer said:
Thanks Joe, Marv, and Rob.

So here's the eight little soldiers ready to be drilled...

You are just having WAY too much fun :)

edit: Sure you dont want to 'round' over the ends? Will reduce the stress being placed at the thin spot. Figure out how to do it so you can tell me, I'm a-waiting
 
zeeprogrammer said:
Eight little soldiers having gone through their first drill...
Funny! ;D
You should build a table-mounted stop after this, I'll send you a drawing... including the T-slot size and spacing of MY mill. ;D


zeeprogrammer said:
'gosh' this is exciting (that one's for you Vernon...just to see if you're watching ;D)

Yes, I'm watching! I'd actually replied to your previous post, but then thought better of it, and deleted it. Here it is again:

zeeprogrammer said:
Suggestions for a better method are certainly appreciated.
More "Milly, Milly", less "Typey, Typey"
 
Foozer said:
You are just having WAY too much fun

That had me Rof} for a while.
Okay. Too much fun is not a good thing. :big:
Not to worry...soon as I start the next engine...the fun will be tempered. You've seen me go off before. ;D

Vernon said:
You should build a table-mounted stop after this, I'll send you a drawing... including the T-slot size and spacing of MY mill.

Please do. Course..you understand I don't care about YOUR mill. ;D
I care about you though. I do! I really do! Okay...I don't. But I could!

Vernon said:
More "Milly, Milly", less "Typey, Typey"

Kettle? Pot?
 
zeeprogrammer said:
Kettle? Pot?

;D Yeah, yeah... you got me there. I even signed off for a bit after posting it, and tried to get some planning done...but it's just not happening today.
 
zeeprogrammer said:
That had me Rof} for a while.
Okay. Too much fun is not a good thing. :big:

Could of sworn the piece was an inch long!

Thought I'd try to make up one of your Zee-Brackets. Yours look way better than mine. small hole is 0.250, doesn't look so bad

So that's why the saw couldn't cut all the way. HMM measure once, cut twice ya that's it.

So when you figure out the rounding over, let me know. Oh ya about 45 minutes lathe time (had to mill down some stock on the lathe) Eight of them huh? that's a few hours :)


z-bracket.jpg


z-bracket.jpg
 
Foozer said:
edit: Sure you dont want to 'round' over the ends? Will reduce the stress being placed at the thin spot. Figure out how to do it so you can tell me, I'm a-waiting

Not any more (sure, that is). Drat.

zeeprogrammer said:
...oops...noticed a little dribble on the side of my mouth...thinking about the next engine...patience...patience...must get equipment in tram...

Oh right...that pool of drool is going to be a problem. The 'round-over' tool may have to wait. It's on the list though.
 
The 'round-over' tool may have to wait. It's on the list though.

Hi Zee,
don't forget that cheap router bit set you may have laying around (or nip out and get one).
They are good for aluminium and soft metals. Lots of nice shapes as well.

Cheers
Phil

P1070038.jpg


P1070038.jpg
 
Majorstrain said:
Don't forget that cheap router bit set you may have laying around (or nip out and get one).
They are good for aluminium and soft metals. Lots of nice shapes as well.

They sure are, I've even used one in a hand-held router, to chamfer one side of some oddly-shaped parts I was cutting out at work. It was a non-critical chamfer to start with, but it looked good when it was finished.
 
Thanks Phil and Vernon. I may get a router and table out of this yet.

So the clamps...a lesson...when doing repeated operations...measure that first one and make sure it's what you want. It turns out the hole is 0.01 off to one side. Not enough to worry about in this case...other than it speaks to my poor practice.

On the other hand...every one of the parts that followed are identical.

That's right...the little soldiers were exactly in step. Pretty good drill routine!
 
Still in step...

IMG_0275.jpg


I got the bolts today. At first I thought I might be able to leave the bolt heads alone...use them as is. But looking at them...the tolerances would have to be pretty tight to ensure they don't turn in the clamp. So I think I'm going to have to mill down the sides of the bolt head as shown in Robert's diagram.

But how? If I'm not careful (and I'm not) the bolt will turn/twist on me while milling.

Use the split nut trick? Fine for the lathe...but doesn't seem good for the mill.

How about this?...take some chunk of aluminum...say 1" square...drill/tap 10-32 through. Slit along the side. Use it as a long split nut. Set up in vise. Mill one side of all eight. Then move the cutter and mill the other side of all eight.

Doesn't have to be exact...just want to make sure the bolt doesn't turn when the clamp is used.

Other suggestions?

 
zeeprogrammer said:
Thanks Phil and Vernon. I may get a router and table out of this yet.

It turns out the hole is 0.01 off to one side.

Mill off 0.010 off the wide sides and all the soldiers will be in perfect harmony,
That's right...the little soldiers were exactly in step. Pretty good drill routine!


Aint no sense in looking round, Zee's gonna mill your fat feet down, am I right or wrong . . .

So I think I'm going to have to mill down the sides of the bolt head

run a nut up to the bolt head, double nut on other end, lock nuts together and get all the flats aligned. In the vise and mill in direction that places force against bolt so that it wants to tighten it.

Put bolt in vise and hand file? Then 2 shots of tequila :)
 
Back
Top