Indicator Holders and Such...

Home Model Engine Machinist Forum

Help Support Home Model Engine Machinist Forum:

This site may earn a commission from merchant affiliate links, including eBay, Amazon, and others.
Thanks Robert.

No not a total loss...as I'd said...I learned a lot. But the tool is just no good.

I think the design concept is still good too. Your idea of the slot for one. But I wonder if we're too small.
 
Carl,

This has been a great thread. It inspired me to tram my mill. When you go to tram your mill use your tramming tool first to get the play out of all of the axis. I had my gibbs tight and I was amazed at the amount of play I still had. Z axis has to be tight or your just peeing into the wind. Z is affected in three ways the gibb screws, the big nut at the back of the column, and the three mounting bolts at the base. Any / all of these can be source for play in the Z axis on the mini mill.

I am attaching a photo of my setup and two of the holders I used. I am fortunate in that I bought a back plunger indicator years ago which made things very easy. If I didn't have it, I would have set up with my test indicator. The holders are commercial ones but since your in a remake phase I thought I would post them up.

Bob

DSC02395.JPG


DSC02395.JPG


DSC02408.JPG


DSC02409.JPG
 
zeeprogrammer said:
Thanks Robert.

No not a total loss...as I'd said...I learned a lot. But the tool is just no good.

I think the design concept is still good too. Your idea of the slot for one. But I wonder if we're too small.

Aint touching that one :)

Dum De Dum OK that thought is gone,

Hole in clamp is too big, just a simple sketch that illustrates, I know! The hole in the clamp has to be as close to the rod size as feasable. Going oversize reduces the points of contact so much that with a, say 0.390 hole its probably just the burrs on the hole surface doing the gripping. Hard to really tell from sketch but one at 0.390 when closed down shows little if any contact with rod, one at 0.375 has full contact.

Have you tightened down one of those 10-32's yet to snapping point?

Ill show you later the bonehead move I did on my cylinder yesterday. had the sketch right in front of me and still, well, would make the bride laugh if she knew :)


z-bracket-a7.jpg
 
Hi Bob (90XL_Notch): Thanks for the compliment! And thanks for the pics. Most especially...thanks for the tips. That will be very useful.

Robert (Foozer): Yeah I paused over 'enter' but sent it anyway. ;D

The problem is that the hole is tapered...not just out of round. The only grip is at one end. The rod just flops at the other end. (There...another opportunity for you.)

No...the half joints are just no good. Going to have to redo and figure out a way to use the reamer. (Not that I'm going to do anything right away...but eventually.)
 
zeeprogrammer said:
Hi Bob (90XL_Notch): Thanks for the compliment! And thanks for the pics. Most especially...thanks for the tips. That will be very useful.

Robert (Foozer): Yeah I paused over 'enter' but sent it anyway. ;D

The problem is that the hole is tapered...not just out of round. The only grip is at one end. The rod just flops at the other end. (There...another opportunity for you.)

No...the half joints are just no good. Going to have to redo and figure out a way to use the reamer. (Not that I'm going to do anything right away...but eventually.)

I know what you mean about the reamer, get things set up and WHOA, the reamer is too long, why didnt I check that first? Do I cut this 15 buck reamer down so it will fit or just drill the hole. Yup, know that one, worse is I still do it!

I'll go bang head on wall for a while, flopping around just makes her laugh :)

EDIT Added:
So after the physical abuse time to make a little gizmo, took lots of photos but rather than bore shall just keep to the end.

Dont have a mill so use the lathe with an attachment for the cross slide to do some mill task. Limited but . . . So normally I just chuck up something in the little vise and square it off to the chuck jaws. Works, but with this thread going got to do more than draw perty pictures.

End result, the parts. Hunk of round stock drilled and reamed for a DI with a spud made from old busted up end mill. So as not to mar the DI with the set screw I fashioned a little brass plug, one side flat the other with a 0.375 radius cut to match the hole size.

At the DI end I used a Heli-Coil thread insert, serves two purposes. First as this set screw will see more usage the thread insert will keep the threads intact for much longer than just plain threaded AL. Second it acts as a trap for the little brass bit that will apply the actual clamping force to the DI shaft. No little ding marks :)

Not a big deal but for my usage it should work fine. Principal is the same, vertical or horizontal usage.

And of course its not done till it has a home

tram-a7.jpg


tram-a10.jpg


tram-a11.jpg


tram-a11.jpg
 
Just a tidbit on how I made the little brass plug to squeeze against the DI shaft.

The thread insert called for a 0.320 hole to allow for the heli-coil tap so I turned a piece of brass to 0.320, tad under. Frilled a 0.320 hole into some scrap stock, set the brass plug into this hole and cross drilled thru the stock and plug.

As the cross drilled hole was 0.375 the process chopped the plug in two nice and clean leaving me with a perty little radius bit that i just slit sawed off the stub. Couple wipes with sand paper and she was good to go.

Threaded the hole, set in the plug, set the insert and called it good. Plug can be removed thru the DI mount hole but its a real PIA to get it back in.

Robert

Was fully clamped in the home made jig, removed for photo op :)

tram-a3a.jpg


tram-a3a.jpg


tram-a3b.jpg
 
zeeprogrammer said:
The problem is that the hole is tapered...not just out of round. The only grip is at one end. The rod just flops at the other end. (There...another opportunity for you.)

Carl,

A rescue may be possible. If there is enough material to drill and tap holes for setscrews to lock the rods, even though the holes ended up with a taper, setscrews will jam them tight. I made something similar once but used 10-32 SHCS to lock the rods. Obviously even smaller screws should work similarly, perhaps 6-32. To protect the rods, I drilled slightly into the end of each screw and soldered (Locktite should work) little brass plugs into each.

In your case, just drop a small aluminum plug in beneath the screws to gain some protection for the rods.

Of course if there is not enough metal to drill and tap for setscrews this idea becomes a non-starter.

Alan
 
Hey Robert and Alan...thanks.

I've seen a couple or more tools used to tram the mill...that's the way I'll (try to) go.
As for the 'tool' we were working on...not quitting it...but not at top of list.

I only started this hobby (or any kind of machining) a few months ago. It's very much a challenge and if I get hung up too much...I'll stagnate...and who knows when I'll continue. I know my history. I don't want that to happen. I have enough risk over the next few months with some upcoming life-changing events and there's already been some recent intrusions from 'life'.

So...let's see what I can do...hmm...this forum is about engines...
 
zeeprogrammer said:
... if I get hung up too much...I'll stagnate...and who knows when I'll continue. I know my history. I don't want that to happen.

I'm the same way, as soon as I lose momentum, I'm sunk.

I'm working on getting past it, but I'll set a project aside when it gets to a point where I need materials that I can't find, or afford. There's so much stuff I want to build...
 
zeeprogrammer said:
Hey Robert and Alan...thanks.

I've seen a couple or more tools used to tram the mill...that's the way I'll (try to) go.
As for the 'tool' we were working on...not quitting it...but not at top of list.

I only started this hobby (or any kind of machining) a few months ago. It's very much a challenge and if I get hung up too much...I'll stagnate...and who knows when I'll continue. I know my history. I don't want that to happen. I have enough risk over the next few months with some upcoming life-changing events and there's already been some recent intrusions from 'life'.

So...let's see what I can do...hmm...this forum is about engines...

Starting to wonder if you went out and sat on the railroad tracks you been so quiet. Good to see your return.

Stagnate? never, and Ive got the barn full of unfinished projects to prove it Ha!

Square up tour mill, you could make a simple tool ,cough cough, like the one I popped out for my lathe/mill/drill press/boat anchor above, and get to building that next engine. You seem to really enjoy the challenge and it shows. You get others to thinking and participate in the conversations. Dont stop now.

Robert
 
zeeprogrammer said:
I'll be a happy guy if I can get to half your skill level Robert.
Thanks.

Dont knock yourself, you followed a plan and carried it to completion, all I do is avoid cutting my fingers off, then stand in the kitchen so tall and proud, saying "Look honey at what I made!" cant repeat her comments.

Robert
 
Foozer said:
then stand in the kitchen so tall and proud, saying "Look honey at what I made!" cant repeat her comments.

Yeah, always a mistake to think the better half is interested in 'everything' you do. I'm happy that she's interested in 'anything' I do. Real happy.

I mean 'my' better half. I'm not saying your better half is interested in what I do...or that I'm not happy she's interested in what you do.....I'll shut up now. You know what I mean.
 
For grins I rigged up a couple of 1-2-3 blocks on the mill. One on top of the other and clamped to the table. Then a DTI in the spindle.

Moved the spindle up and down and clocked the top block. Can't reach the bottom block but that's okay.

As someone else said on the forum...breath on it and it changes. I don't see how I'll ever get this adjusted well enough.

Anyway...over the 1st top half of the block, the DTI changes by about +/-2 to 3 thou. As I go further down, the DTI 'suddenly' moves by nearly 15 thou.

That tells me there's something in the way in the dovetail/gib that is pushing the head to the side.

Will I ever be happy with this?

Anyway...someone somewhere talked about using brass strips for gibs. Also, shims to tram in Y. Anybody know where I can get more detailed information? How to make the gibs? Where to put the shims?

And then there's the lathe. The compound slide...if you push on it, the near side will lift up. I've tried adjusting the gib screws but anymore and the slide won't move. Thoughts? Another new gib?

I think I'm going to break the machines down completely and try another clean up. Any suggestions?

How often do you break a machine down? The only thing I seem to see people doing is tramming the mill.

I sometimes think that when people say they get a machine adjusted to .001, that's when they're standing 10 feet away, doors and windows closed, no wind, novibrations. Otherwise, on these (granted, little) machines...there just ain't no way.

When I was in robotics...repeatability was more desirable than accuracy. Once you were repeatable, you could compensate more easily for accuracy. What's the story here?

Ah well...
 
zeeprogrammer said:
the DTI changes by about +/-2 to 3 thou. As I go further down, the DTI 'suddenly' moves by nearly 15 thou.

I don't belong on this forum. That, or I need to see the eye doctor.
Rechecked the DTI. It's in tenths of a thou.

I was a whole decade off. That's pretty significant.

10 years ago I could do things I can't do today.
10 years ago my body had things it doesn't have anymore.
10 years ago my body didn't have things it now has.
but...10 years ago I had 10 years less knowledge and life.

On the upside...this has renewed my excitement.
On the downside...if anyone wants to tell me to 'get off'...I wouldn't blame them...but I won't get off. They'll have to deal with it...or get a moderator/administrator to knock me off.

For Vernon...drat, darn it, fooey, rats, crap, and gee whiz.
 
zeeprogrammer said:
Rechecked the DTI. It's in tenths of a thou.
For Vernon...drat, darn it, fooey, rats, crap, and gee whiz.
All I'm gonna say is "Congrats on buying a great DTI."
Tenths indicators are all I use, at work or at home... great for making (the appearance of) a mountain out of a molehill.


One one hand, they're fussy, fidgety things, and half the shop asks me why I use them. On the other hand... the other half of the shop comes to me to borrow one. ;D
 
zeeprogrammer said:
I don't belong on this forum. That, or I need to see the eye doctor.
Rechecked the DTI. It's in tenths of a thou.

I was a whole decade off. That's pretty significant.

10 years ago I could do things I can't do today.
10 years ago my body had things it doesn't have anymore.
10 years ago my body didn't have things it now has.
but...10 years ago I had 10 years less knowledge and life.

On the upside...this has renewed my excitement.
On the downside...if anyone wants to tell me to 'get off'...I wouldn't blame them...but I won't get off. They'll have to deal with it...or get a moderator/administrator to knock me off.

For Vernon...drat, darn it, fooey, rats, crap, and gee whiz.

Whats a decimal point anyway? The bride moves it over to the right every time she wants a "Ten Spot"


So what did this tell you about your machine, a ten of a thou movement is but a fly poop. Tap the spindle with your finger, see it it changes. And if you got but a thou and a half max change, the question is "Can you live with it?"

I'd be tickled pink if those numbers were mine on the lathe, there not, I aint, boohoo me :)

You can chase that thousands of an inch all over the shop, find it, kill it, and his cousin will awake, and then his cousin, and then . . . Does it really have an effect upon what your doing today?

As with all equipment their is a margin of error to be dealt with, the operator knowing the machine can workaround those deviations.

Me ranting, turning itty bitty pieces, even a thou seems to be too much off ARRG!

Robert
 
Vernon said:
SO... what engine are you building?

Darn you.

The main project is the Elderberry Mill. That will be a thread similar to (but hopefully better than) the Launch Engine thread.

At the same time...I've gotten hooked on that Rockin' Engine. Primarily because I've been looking for something that I can blow ;D. It's small and I must heed Marv's warnings. I'll be watching Foozer.

Also, going to take another run at the indicator holders. I don't like giving up on things unless I'm paid to or realize no one else cares anymore.

It's slow going right now...life's intrusions. It may not be until September when things loosen up.


Ah....Robert...speak of the Newbie. Just saw your post. Yeah exactly. I've been a bit paralyzed lately but getting past it. (And, as I mentioned, life's intrusions aren't helping.)

Thanks all.
 
Time to clip a loose thread...

While waiting for some stuff to continue on the mill engine...I thought I'd 'finish' this...

As some of you may recall...I went about trying to make some half-joints.
A lot of help from Robert (Foozer) got me a good design...but a good execution eluded me. Mistakes included using aluminum (despite Marv's warnings) and using drill bits rather than reamers (cause my mill didn't have enough Z).

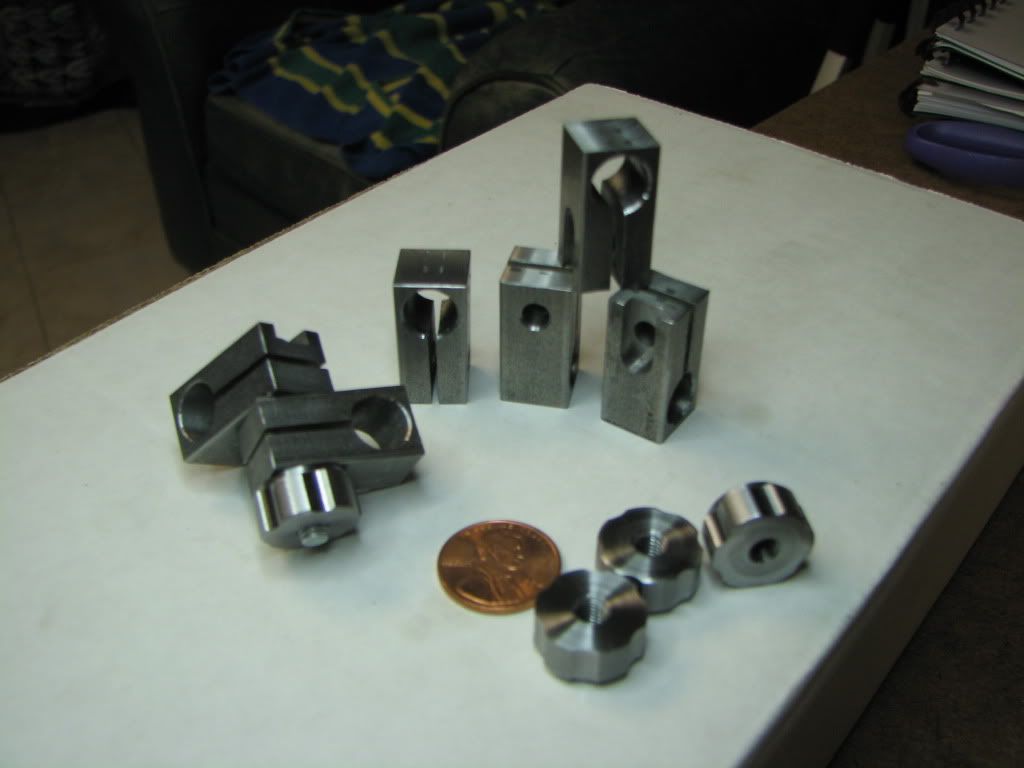
So here's another go. This time I used 12L14. I still had a problem with Z on the mill so I put them in the 4-jaw on the lathe and did my best to indicate them in. Difficult since I had nothing that would fit in the hole nicely to indicate on. But I got close enough and reamed them. Reamed them good.

I also made the nuts from 12L14. Chopped two pieces and used each one to make two nuts. Put them on the rotary table of the mill to cut the indents (two nuts at a time). I don't know what I did wrong (although Marv will be quick to remind me of poor skill at measuring) but the cuts didn't result in the distance between cuts as I had figured. Then parted the nuts off. That went really well now that I had re-adjusted the lathe. (See lessons below.)

They came out pretty good...

IMG_4361.jpg


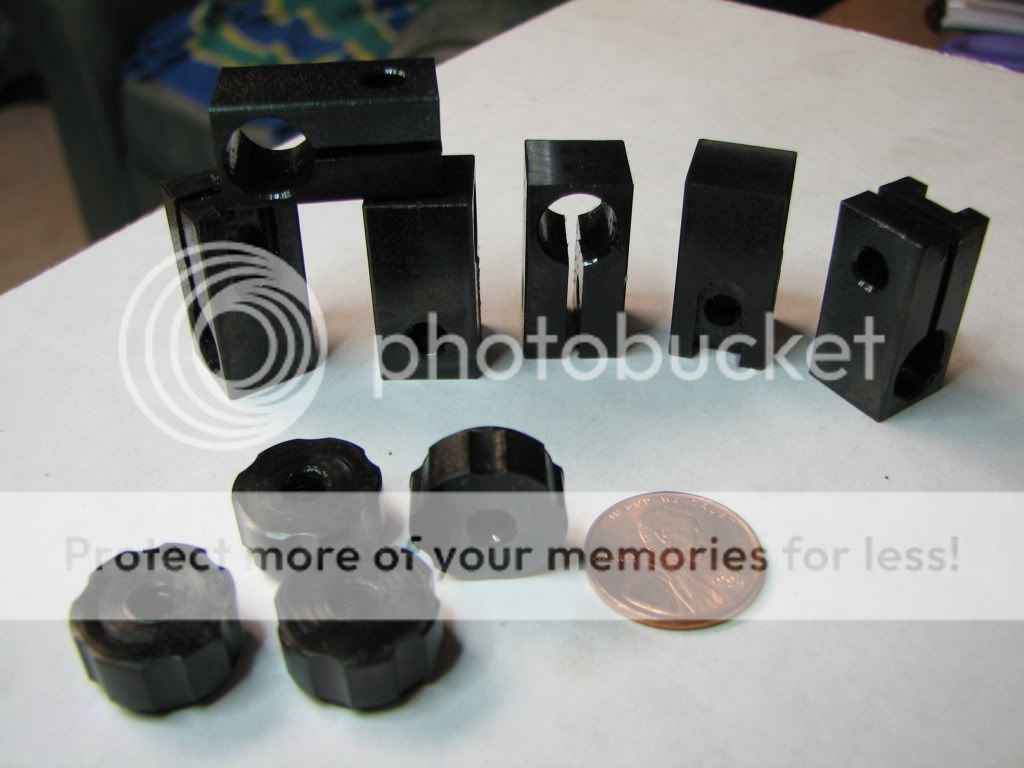
So...since I was experimenting...I thought I'd try blackening them.
I poured some oil in a ceramic planter I had (don't tell wife!).
Used stiff wire to hold a part and used a propane torch to get it bright red.
Then dropped it in. (See more lessons below.)

Wow! I'd never done this.

IMG_4364.jpg


Well...that was cool. Now I'm going to have to do the machinist clamps and jacks I made a few months ago!

IMG_4365.jpg


Some new lessons, some lessons relearned, some lessons reinforced…

1: Find the sweet spot on lathe speed when parting off. When it’s found…parting is less of a sweet sorrow. Often is slower than you think.
2: Don’t loosen draw bar completely and then use mallet to bash it and release the collet. Instead, loosen it a little…then bash it…then loosen it completely. Less damage to threads.
3: Don't use a ceramic pot. The oil gets hot because of the hot parts being dropped in. It could crack on you.
4: When first starting out (i.e. no machining experience like me) it is very worthwhile to break-down and readjust the lathe/mill between projects. I've gotten a lot happier with the lathe and am looking forward to doing the mill over.
5: Keep rethinking the process...I missed some opportunities to knock off sharp edges...not a problem this time...but need to remember in the future.

[EDIT: I used clean oil by the way. Thanks VM for asking.]

We now return to our irregularly scheduled programming...
 

Latest posts

Back
Top