Goin' Crackers.

Home Model Engine Machinist Forum

Help Support Home Model Engine Machinist Forum:

This site may earn a commission from merchant affiliate links, including eBay, Amazon, and others.
bearcar1 said:
Say Vern', if I recall correctly the acid bath should be held at a relatively constant temperature range of 70-75*F, as the temperature increases the coating becomes more porous. 14-18 V and a current density of 10-25A/ sqft. This is based upon a 15% acid solution at 12floz/gal. 15-30 minute bath exposure time. What are you using for a Cathode? (as far as surface area?) I'm pretty certain these figures are correct albeit it has been several years since I had an opportunity to do this type of work. Good luck and your engines are way cool, the 'cowcatcher' is a novel idea as is the faux spark arrester.

BC1
Jim
Thanks for the info! Right now I'm running 30% acid , what should be a 14v battery charger, but drops under load to around 10v, acid temperature is only somewhat controlled, with a surrounding water bath and added ice. Right now the acid is climbing to 80 degrees, but I'm about to pull out my parts after a 45min run-time. I only have two charger settings, 2A or 10A, so I try to match the area to 14A/ft2 by adding more parts.
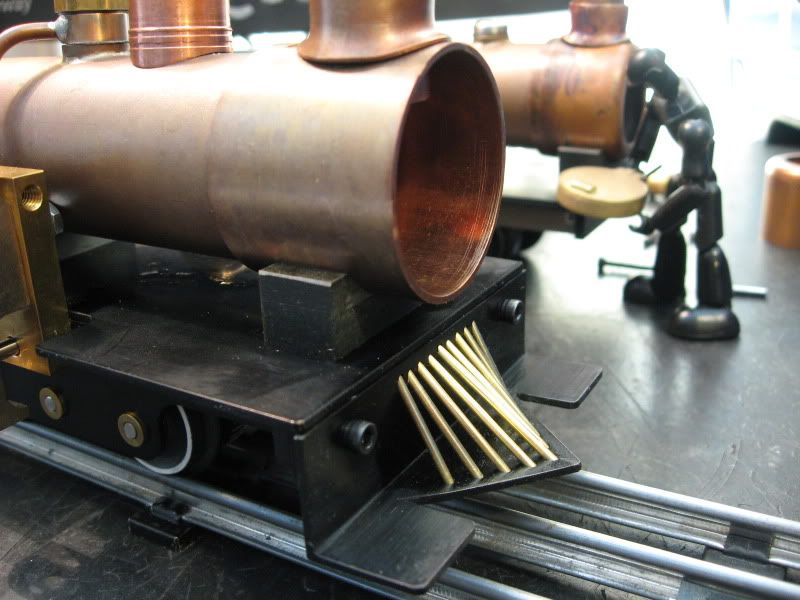
Last night's run was 30 minutes at 10amps, the cowcatcher was in the bath for 45 mins with an 8in2 part, at 2 amps, with great results.
Eventually I'll add air agitation and a better current controller and power supply.
Thanks again for the help... my results are still all over the place, because I've got too many variables. Don't say it, Zeep!
 
One can *never* have too many variables. It would make life very dull. :big: It sounds like you have a decent handle on your situation Vern', at least you understand the principles involved. Of course the usage of distilled water is a must as well. As you say, too many variables and not enough control. Have fun and be careful, I know you'll "git 'er done' ;D

BC1
Jim
 
Vern,
start watching ebay for a constant current power supply
 
Yes, distilled water everywhere, except for the cooling bath.

BMyers, yes, I will... either buy or build one.
Well, I've just taken (taked? what kind of typo was THAT?) this batch out of the dye, and they look great. The footplate is for Loco #1, and the end pieces are Loco #2's, from the last batch.
I filed off the anodizing on the faces that show, expecting only those to clean up, but re-anodizing the part made ALL of the faces look great. I thought I'd have to strip the anodizing off chemically.
black005.jpg


These parts actually look a lot worse on camera. ;D
 
Looking good Vernon :)

These parts actually look a lot worse on camera.
So you've got one of those "defective" cameras as well ? :big:
Regards, Arnold
 
arnoldb said:
So you've got one of those "defective" cameras as well ?

;D Yeah, the lens must be scratched! They show up on all my parts! ;)

Loco #1 is reassembled, except for the rear frame stretcher, which had a spot i didn't like.
The footplate for Loco #2, that came out ugly yesterday, has been re-anodized and looks good.

Edit: Cowcatcher's mounted. Work progresses slowly. I'm not adding a new post just to say that. ;D

Here's a different photo.
I guess I'll either add a pair of buffers, or change these bolt heads for something different, eventually.
Fixed003.jpg
 
Not much progress lately, but, to keep Zeep happy, I'll post an update. I remade the crank disks because the crankpin kept coming loose from the bigger of these two engines.
Maybe the added mass will also add more flywheel effect.

crankdisk001.jpg


Yes, that's a tiny chuck, not a 3-foot set of parallels. ;D
 
Vernon said:
but, to keep Zeep happy

Well...if you want to make Zeep happy...I'd have some suggestions... :big:
We can start with the beer... :big: My memory may be crap...but not when it comes to things important. At least...as far as I can remember.

Good! Everyone wants to see those Crackers running.


Vernon,
Are you going to put couplers front and rear so you can run the two in a consist?
Tony
 
cobra428 said:
Vernon,
Are you going to put couplers front and rear so you can run the two in a consist?
Tony
No, the one with the "cowcatcher" is going to my dad, where it'll see only occasional use as anything other than a display. It's being built to more of a "toy-scale" than the other loco, which I'm keeping with the intent of running until it's worn out many many replacement parts. Mine will have couplers front-and-rear, and the first time I repower it, it'll have a reverser valve and perform shunting tasks.

That doesn't mean the two won't get together from time to time for a doubleheader, I'll just make his the pilot engine. ;D
 
It looks great so far, I kind of showed up in the middle of this build.

Your anodize process sounds good, I use 1:1 battery acid solution from the batteries pluss store to distilled water.
I have a 2,5,10.40,100,200 amp snap on battery charger and it seems like I either have too much or not enough amperage every time I set up something so I have to find more things to anodize.

My dad is a big kid with railroad, from n to g scale, I have been wanting to build him a g scale steamer.
seeing your build gives me motivation and ideas thanks
-B-
 
Krown Kustoms said:
It looks great so far, I kind of showed up in the middle of this build.

Your anodize process sounds good, I use 1:1 battery acid solution from the batteries pluss store to distilled water.
I have a 2,5,10.40,100,200 amp snap on battery charger and it seems like I either have too much or not enough amperage every time I set up something so I have to find more things to anodize.

My dad is a big kid with railroad, from n to g scale, I have been wanting to build him a g scale steamer.
seeing your build gives me motivation and ideas thanks
-B-

Thanks! Your battery charger sounds like the one I used to own, back when I first tried anodizing.

The nice thing about these Crackers is that they're an easy introduction to 16mm scale, running on O-gauge track representing 2-foot, narrow-gauge railways. Build one! :D

Today I spent a lot of time making a door for Loco #1's smokebox. Zeep calls it "cheating" because I'm using CNC. No matter, I'm already "cheating", doing my lathe work at work!

It could have gone better, twice I knocked the thing loose from it's superglue mounting. It seems that Tap Magic might dissolve cyanoacrylate. :-\ Also, I adjusted my mill's backlash before running the job, and forgot to change the settings on the controller, effectively dialing in some "unbacklash". Oops.

At any rate, here's a few pictures of the nearly finished door. I still need to deburr the thing, clean up the ugly spots, drill the center hole for a locking handle, and finish the hinge. Maybe tomorrow, or later today, or whatever. I need sleep. :D

Door013.jpg

 
Nice work Vernon. Are you making another like it for the other loco or a different design? How was it milling copper?

Cheating? Did I say it was cheating? I don't want anyone to get the wrong idea about me. We should understand the context. The context included you. That should be sufficient understanding. :) On the other hand...the context included me. Ah...we'll stop there.

I bought both the lathe and mill with the idea of converting them to CNC someday.

Great progress. Keep going. A lot of people are interested.
 
wow this is great. got me inspired to hunt all the parts down to make me one. great build thank u for the detailed posts. this is great. im following along.
 
zeeprogrammer said:
Nice work Vernon. Are you making another like it for the other loco or a different design? How was it milling copper?
Cheating? Did I say it was cheating? I don't want anyone to get the wrong idea about me. We should understand the context. The context included you. That should be sufficient understanding. :) On the other hand...the context included me. Ah...we'll stop there.
I bought both the lathe and mill with the idea of converting them to CNC someday.
Great progress. Keep going. A lot of people are interested.
Thanks Zeep! The other loco will get another door design, one that more completely covers the front of the smokebox. The idea was to use a smaller door on Loco#1, to make the whole thing look bigger in comparison. I hope it works.

Edit: Oh yeah, milling copper... the stuff is gummy. Two-flute endmills are a must.

Cheating, wellll.... I did say at the beginning of this thread that I was "cheating" in using CNC. There are people on here that can do more with a hacksaw and a hammer than I can with a machine shop.
Yes, convert to CNC. Starting with manual is the only way to go, in my opinion. People that have never turned a crank have no idea what they're asking a machine to accomplish, and usually end up blaming the mill, the cutter, the vise, the computer, the stepper motors, the influence from a sleeping undersea elder being from beyond the stars...


itowbig said:
wow this is great. got me inspired to hunt all the parts down to make me one. great build thank u for the detailed posts. this is great. im following along.
Awesome. Shred started it, but I'm glad to spread Cracker-itis to more people. I really enjoy seeing all of the variations on these things. Post lots of pictures. ;D Thanks for the kind words!
 
Vernon
I definately am looking into a loco build, I was brought up around railroading.
My dad is a big fan of on30, a little smaller than the cracker, but he has G scale also, I think that size is more suitable for a first loco build. (for me)
thanks for the motivation and the detail I see that can be achieved.
-B-

p.s. I too "cheat" with CNC, I catch myself trying not to use it on simple things, I guess so I dont feel like Im cheating
(not sure what im trying to say here)
 
Knocked out another part last night, the front of the smokebox for Loco #1. This part will probably get some detail work on the outside, and it still needs the hinge block added to the small hole.

[ame]http://www.youtube.com/watch?v=dWD3zk6zf58[/ame]

pic024.jpg


Nice Vernon.
Nice video too...I liked the changeover to slides.
How did you finish the door? It looks real smooth.
 
Vernon,

Really liking this thread. Keep the photos and videos coming.

Dennis
 
Looks really nice, Vernon. What did you use to hold it to the fixture plate? Super glue?

Dean
 

Latest posts

Back
Top