Snow Tandem Engine

Home Model Engine Machinist Forum

Help Support Home Model Engine Machinist Forum:

This site may earn a commission from merchant affiliate links, including eBay, Amazon, and others.
Joe,
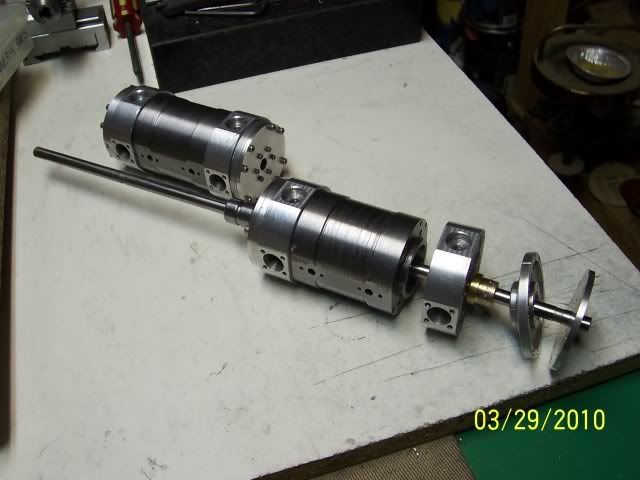
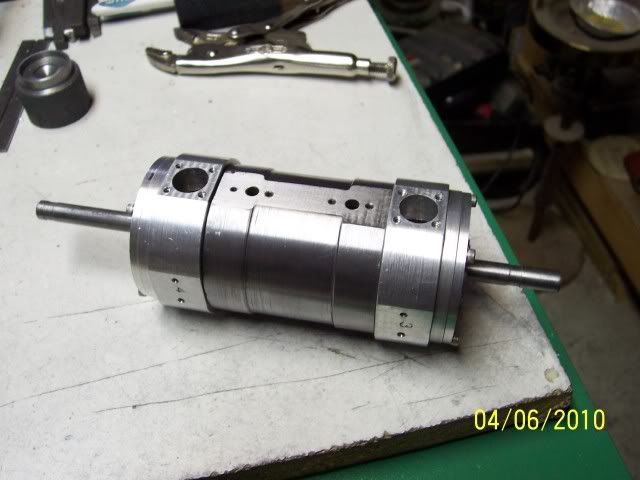
I was hoping you could just pin hone out the remainder, but .065" is a lot. That's too bad you have to go through the line boring setup to finish boring, but I guess you don't have much choice since you have all the bolt holes drilled and tapped. Maintaining concentricity and squareness of the cylinder components is important on the Snow, as you no doubt know.

Jeff
 
Hi Jeff

yeah, don't really want to go that far undersize. I had also left the hole in the head undersized, and the hole in the piston rod bushing undersized, figured that once I've finished the cylinder bore, without disturbing the workpiece I would mount the heads, finish that bore, install the bushing, finish that bore, and ream them, giving me my best shot at concentricity. May regret it before I'm done, we'll see!

Joe
 
Hi Joe,
Sounds like a good plan. Your progress is impressive. Great job!

Jeff
 
Hi Joe
fantastic job
looking forward to seeing it run
cheers Pete
 
Jeff and Pete

Thanks to both of you, much appreciated!

Joe
 
Well, I'm at one of those points where I need to make tooling to continue with the build. In order to make the tubing bends for intake, exhaust, and coolant, I need a tubing bender...so I need a ball & radius turner to make the tool bits to cut the forming wheels for the bender... so I've built one, posted it over in the "tools" section.

One short and sweet bit of work to enable line-boring the cylinders: needed a centre for the headstock so I can drive the boring bar between centres (sticking the driven end in the 4-jaw uses up too much real estate)

Trued up a chunk of drill rod in the chuck, faced it off, drilled and tapped 1/4-20, as that is the size of the all-thread that I had in stock, tapered it to match the spindle taper, turned a little aluminum bushing for the other end of the spindle to keep the all-thread draw bar centred, installed it and cut the 60 degree point on it:
100_2759.jpg


Here's all the bits:
100_2761.jpg


and here it is ready for action:
100_2760.jpg


Just got to make up a driving dog and Robert's my Mum's brother.

Cheers, Joe
 
Thanks, Dean.

The fact that it is essentially identical to the one on your projects page is no doubt mere co-incidence..... :hDe:

Keep on posting stuff there, I need more projects. No. Really. I need more projects.

Thanks, Joe
 
joe d said:
Thanks, Dean.
The fact that it is essentially identical to the one on your projects page is no doubt mere co-incidence.....
Thanks, Joe

Heck, that's why they're there, Joe.

joe d said:
I need more projects. No. Really. I need more projects.

Can I interest you in a mill vise...?
:)
No. Really. You'd like it.

Dean
 
Well, finished up various tooling side-tracks, and got back to the main event.

Spent a bit of time to make up a boring bar to line-bore the cylinders:
100_2769-1.jpg


and a driving dog
100_2770-1.jpg


and damned near ruined a cylinder assembly as the part shifted during boring... came out with a bore slanting off to the side...I'd bolted a bit of angle to the cross slide, and bolted the cylinder to that, and it was not up to the job.

soooooo after a longish pause for recriminations and practising bad words, went back to the 4 jaw, indicated the thing to pretty much zero runout and finished the job that way. Fixing the boo-boo has left me with a bore that is .0025 bigger than the plans call out, I'll adjust the piston size to fit.

Once the bore was done, bolted on the head without moving the cylinder and bored the head for the piston rod bushing
100_2778.jpg


Installed the bushing, and the head cover and reamed them to final dimension
100_2779.jpg


And here's the stack-up:
100_2780.jpg


This one got me worried for a little while!

Cheers, Joe
 
Whew! Good save on that cylinder, Joe. Nice to see a new post.

Dean
 
Moving along... time for pistons & rings

Chucked up a piece of cast iron, turned it to the required diameter, bored to the required ID, and here I'm about to start parting them off
100_2781.jpg


and here's a pile of rings (I need 4, so I should be good even after breaking some in the installation)
100_2782.jpg


The pistons are held on their rods with two set screws at 90* so I turned them oversized, drilled and tapped for the set screws, and then mounted them on the piston rods to act as an arbor to turn to final size and cut the grooves for the rings
100_2784.jpg


And here you need your x-ray vision to see the all where they belong inside the cylinder. (It's all in there. Trust me.)
100_2785.jpg


Cheers, Joe
 
I trust you!
Nice work, Joe. What method did you use to break your rings?

Dean
 
Hi Dean

Glad to know that somebody out there trusts me... (cue the sappy music...) Luckily, Sally Fields I'm not!

Broke the rings with some diagonal cutting pliers. The instructions I was following said to use a set of flat-end nippers... after 45 minutes of not finding the one pair I own :wall:, went with plan B! It did raise a slight burr, quickly dealt with.

Query: any advice regarding the heat treating? One plan calls for a fixture and soaking at 450* f for a while, Bob Shores' theory is to just heat the side opposite the break to red and you're done. The only oven available to me is the Mrs' kitchen appliance, so this would require some careful timing ;D

Cheers, Joe
 
joe d said:
any advice regarding the heat treating? One plan calls for a fixture and soaking at 450* f for a while, Bob Shores' theory is to just heat the side opposite the break to red and you're done. The only oven available to me is the Mrs' kitchen appliance, so this would require some careful timing

I believe it's 475 - 525 Celcius. I cook my rings at 950F for 1 hour and they seem to take a set very well. I did the Bob Shores method for the Peewee and I am not happy with them at all.
 
Steve:

Thanks for the info. I guess I'll have to do some shopping around to find a little oven for the shop, no way the kitchen appliance is hitting 400 - 500 Celsius. Haven't tried Shores' method either, might do a couple just for giggles, without firsthand knowledge, it would seem to me that there would be some warping by just heating one spot?

As to breaking them, if there is a way to bust them putting them on, I'll find it!

Thanks again, Joe
 
I've only done the ring heating process using a torch, but unlike the Shores method, you heat the whole ring. Simple, but it works well, for the few I've made.

Put a square rod in the split of the ring. The rod should be between 1/8 to 3/16" thick, and a few inches long. Position the ring so there is a small space between the edges of the split and one edge of the rod, and clamp it together with a piece of sheet steel or flat bar behind it. There needs to be a small space between the ring and the steel, evenly spaced all the way around. Point the propane torch flame right in the center of the circle of the ring, and watch it until the ring turns red all around. Turn off the torch and let it cool.

I've never had any problems with rings doing it this way. It's something I read in one of the machining magazines years ago, and is the only way I've ever tried.

Dean
 
Dean

This is sounding much more affordable than a heat treating oven...any chance you could whip up a crap-o-cad as I'm not clear on what you are describing... scratch.gif

Thanks, Joe
 
See if this makes sense, Joe. I never went to school for this stuff, so..

COC001.jpg
 

Latest posts

Back
Top