Prusa XL 3D Printer

Home Model Engine Machinist Forum

Help Support Home Model Engine Machinist Forum:

This site may earn a commission from merchant affiliate links, including eBay, Amazon, and others.
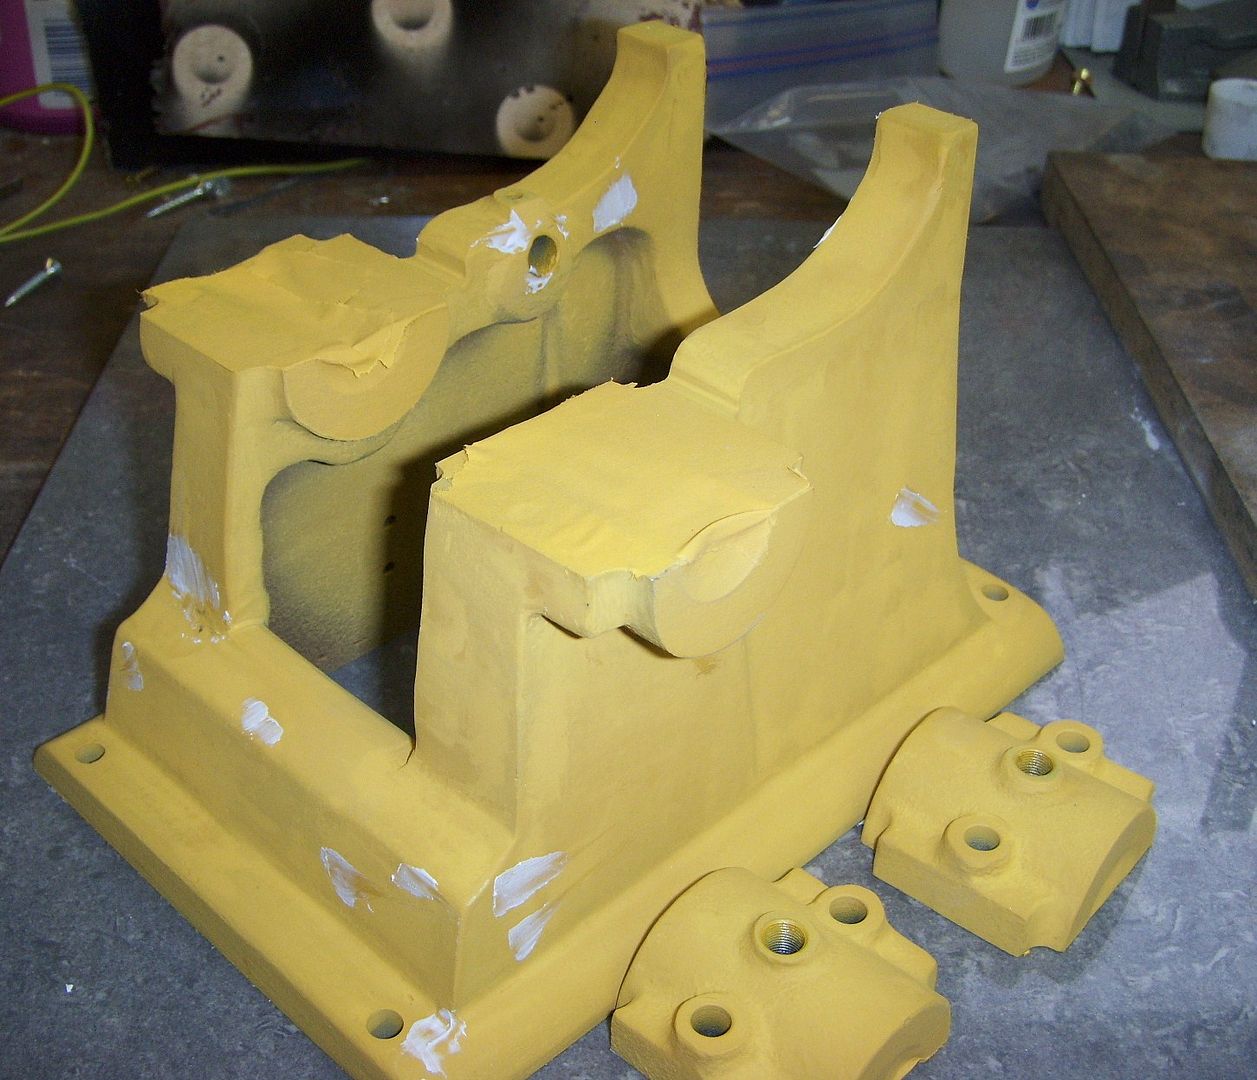
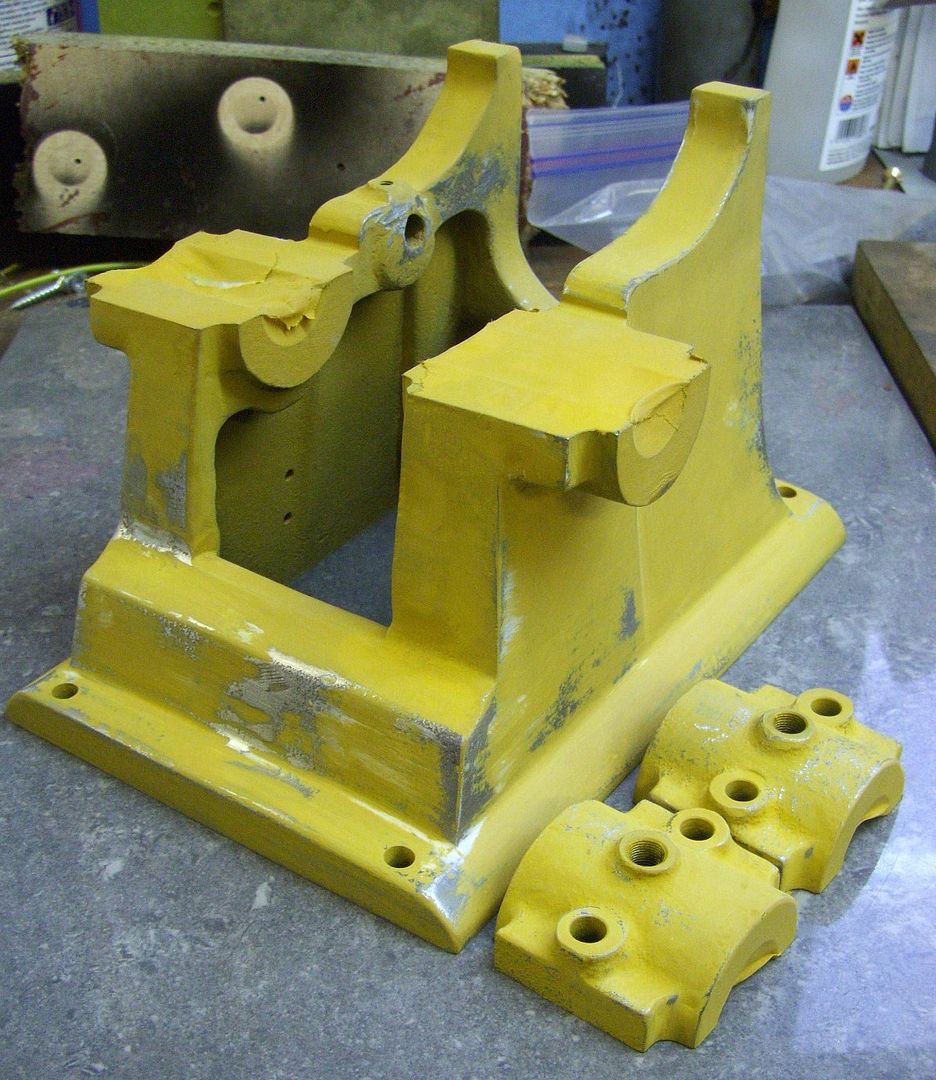
The method for smoothing a surface that works for me is this.

Scrape the high points down. I have a PLA that responds very well to scraping, others might not.
Spray the surface with automotive primer/filler. One coat.
Sand the paint to only leave paint in the low spots. Spray another coat. Sand again.
Check the surface to see if it needs filling. If it does, I use a car body filler that sets hard, but not rock hard.
Scrape and sand until smooth.
Spray with automotive primer. It shouldn't need primer/filler by now. Just a mist coat.
Spray with automotive gloss paint. Any colour. It should look smooth. Mettalic paint seems to go on thicker, and even out better.
I have watched many videos about surface filling and smoothing. One suggested using automotive body "putty" in a tube. The man mixed some of the putty with acetone (I think) to make the putty thinner, and then brushed it on the surface. When it had dried, he sanded it. It worked well, but again, I think it's down to the PLA.
I thought my sanding/filling days were behind me when I bought a resin printer. They weren't! Even resin prints need some sanding and filling.
 
That is a surprise to me too.
I thought resin printers resolved the lines.

.
Sadly they don't. 0.05 layer heights in 4K, some or all of the 8K are 0.028 to around 0.034mm. So the top of a bald cartoon characters head still is a topo map, just a quite fine one. Filler and sanding or at least sanding still required. In some cases it doesn't matter, the model is going inside a structure towards the back or a diorama or railroad layout and you just add a couple layers of paint and it's OK for it's use.
Cheers,
Stan
 
Last edited:
Greetings again fellow plaster quirters!

This video might be interesting as this is migrating towards a print finishing thread. Don't let the guy throw you, he's actually one of the few youtubers who works hard at understanding exactly how all the slicer and material combos work and focuses on print quality above speed of printing. Technically excellent, a bit squirrely in other ways. Like quite a few of us I think :)


Just as in drywall, the goal is to fill imperfections without creating a huge pile of stuff to sand back off. Using something like joint compound or other water based filler material can allow you to thin the material and work it in with flexible tooling, like fingers. While still wet you can readily remove excess material with whatever tool seems right. You can do a final light pass with a damp sponge to level minor imperfections then leave it to dry. Once dry, a firm damp sponge used with care will remove most of the excess with minimal disturbance to the underlying plastic. My concern is that it might be plenty strong to take a paint or clear coat, but night be fragile to use as a working pattern for more than a few castings. I'm thinking along the lines of one off patterns can be pine, but long term ones better be a good hard stable wood.

Automotive filling primer will eliminate fine layer lines in one coat quite often, but it doesn't work well in some cases as my prints often have fine details.

Here's a maybe silly thought - add an extra ten lines or layers to all outer surfaces. I'm assuming if you're casting the flywheels you have a lathe to handle the resulting parts. Try turning the PLA part on a lathe. Fine cuts needed, or just sanding, never tried turning a printed part, but it might work. You're only going to take off a few thou. The flat tops and bottoms will be quite smooth if you are using combing. I'd experiment with some small round test object or a failed print first.

Lacquer dissolves PLA a little bit, I've experimented with dipping PLA prints in lacquer and found it does smooth and the lacquer tends to wick into the grooves. Like acetone on ASA/ABS it just sort of melts small details faster than large flat areas though. Might work well for larger items or objects with simple surfaces, something I rarely print. It's something on my pile of things to play with using failed or small test prints.

There are excellent fillers in the modelling world such as Squadron or Tamiya fillers, but they are only sold in small tubes and are expensive if used in quantity. One of these days I'll figure out just what they are, they are something close to spot / glazing putty, but work just a bit better.

I probably sound lazy, and in fact I am when it comes to sanding because I dislike dust all over the place, hate the process itself because it's removing stuff I should have applied in a thinner tighter coat quite often, and have arthritis in my fingers so more than 20 minutes of detail sanding in one session makes them hurt. If I'm going to have aching hands, it better be from enjoying playing guitar or doing some fiddly satisfying task, not just the drudgery of sanding!
 
When printing alignment holes for pins in patterns, with PLA I allow an extra dia of .3mm to .4mm for a 4mm or 6mm hole. With resin, it's .1mm. The visible layer lines are very easy to remove or sand. Resin prints also take filler or paint OK too. I have only used water washable resin. Even with resin prints there is still some squish. Just not as much as PLA etc. It seems unfair to call it squish, minute layer steps is better.

Stan. You posted as I was writing mine. Did you see my post some time ago about using an old electric toothbrush as a sander?. It works.
I've seen the toothbrush mentioned in a few places, it's something I really have to go play around with, just don't have one available and IIRC only a few models adapt to the job well.
 
Here in the UK it is called knifing putty. Once car bodywork has been filled and sprayed with primer, small blemishes show up in the paint. Scratches from sanding etc. Too small for body filler, so knifing filler, or "spot putty" is used. My tube instructions say to allow 30 mins between layers, and sand down when hard. That could be an hour or so depending on thickness. I try not to use it because of the unknown hardening time, but it is very fine. I bought a tube made by Tamiya for my model car. It will fill scratches of 1/4mm wide, or less. Much finer than the knifing putty, and dearer.
 
I've used it on castings for fine blemishes that show up only after priming, it can be spread out really thin eg actually no trace on teh main surface and will stick at those sort of thicknesses where 2 part tends not to set well when there is little mass to get the reaction going. Only downside for me is if you are not using it regularly it can start to go off in the tube being one part.

This casting was prepared with bondo and then the first High Build filler primer applied, this showed up small blemishes which have been filled with the putty you really only want it for small items (hence spot putty) as it will take a longer time to set if used for things that should have been done at the bondo stage

HPIM1391_zpsfname7yg.jpg


After hand sanding and ready for regular primer

HPIM1393_zps9mdbuxj8.jpg


Full description of the prep and paint process I go through, I would imagine 3D prints would be similar, don't rush it and as you can see from the first bondo application that dog had way to much applied which means a lot more sanding.
https://www.modelenginemaker.com/index.php/topic,4863.msg97803.html#msg97803
 
Has anybody tried automotive spot putty? Usually comes in a tube like toothpaste, red. No mixing and sands very well.
I'm sorry to just be adding on here, I'm waiting for back surgery and they have me on a drug that causes all sorts of weird side effects. Lots of typos, memory gaps, lost time, missed connections, easily distracted. Very frustrating, now I have some appreciation for how a person in the early stages of dementia feels, very similar effects to what I saw with my mother. One week to surgery and I can leave Gabapentin in the rear view mirror and get back to being my usual snarky self!

Spot putty works well, particularly on those gentle smooth curved surfaces that always end up with topo map look. Hardens fast and sands well. With small sculpting tools you can get it into snug spots as well. It isn't as good as Tamiya filler, but it is a very close second and perfectly suitable for most of my needs. I often use a fingertip to rub it into an area until the top of the layer lines just show. This does a good job of filling in the surface without having a thick layer of filler left on top, very minimal sanding needed. I started using it just a bit ago, I'd forgotten all about how nicely glazing / spot putty works. Guess it's been too long since I repainted an old machine, it isn't like I'd never used it before.
 
  • Like
Reactions: Zeb
That is a

.
I have a question in various forums and threads the use of drain holes is noted for example cylindrical objects . I can see this. So if I model a cylindrical object it may be a tube or a capped tube so if I set the model in isometric a tilt it so it naturally drains is that ok ? This then prompts for supports so ok that’s fine

Second question can I specify wall thickness without a web of interior supports . Say a piston for example then in the assembly model I can insert a mating cylinder properly tolerance constructed these should fit together. The wall thickness of each is modeled as .062 wall thickness. Obvious a considerable amount of resin is used . I could live with this . This being additive modeling or printing. Resin would be something like a nylon

I’ve got a lot to learn so I’m asking for guidance before I jump . LOL
 
As long as resin doesn't "pool" in the part, it should be ok. If the tube is capped on the end that will enter the resin tray first, it will act as a plunger would, and possibly cause disruption to the print, or sometimes, damage to the LCD screen. A hole in it would stop that happening.
Others can describe it better than me!
 
I have a question in various forums and threads the use of drain holes is noted for example cylindrical objects . I can see this. So if I model a cylindrical object it may be a tube or a capped tube so if I set the model in isometric a tilt it so it naturally drains is that ok ? This then prompts for supports so ok that’s fine

Second question can I specify wall thickness without a web of interior supports . Say a piston for example then in the assembly model I can insert a mating cylinder properly tolerance constructed these should fit together. The wall thickness of each is modeled as .062 wall thickness. Obvious a considerable amount of resin is used . I could live with this . This being additive modeling or printing. Resin would be something like a nylon

I’ve got a lot to learn so I’m asking for guidance before I jump . LOL
In the case of a piston with the open end facing towards the vat and away from the build plate, at an angle, you would still perhaps need a suction hole at the "top" of the piston. It can be pretty small, but that oval contact ring with the FEP in the bottom of the vat will create suction when the lift occurs. If the amount of trapped air above the resin contained within the part is enough to cushion the pull you might get away without a suction vent. If you are willing to do more work sanding and filling the side that the supports will connect with you can use stronger supports and suction becomes less of an issue. Like just about everything we do, it's about trading off one thing for another. The big thing is that the supports only have a certain amount of strength, and the FEP sheet clings to the cured layer just printed pretty well. As long as the supports are stronger the print will release. If the suction and film cling force is great, the supports fail. Or worse yet, the FEP tears, resin dumps into your printer, and you day goes in the toilet.

People get concerned about poking holes in prints for suction and drain, but it's not usually a big deal to clean them up when you are done. You need a source of UV. For blemish and hole work I like a small UV flashlight. Put a little resin around the interior of the the hole with a toothpick, harden it with the flashlight. Now it's a divot, maybe with a tiny hole in the center. Another drop of resin from the toothpick, another bit of flashlight work, and it's done or at least very close. Most of the time I use 3 mm suction holes, maybe 2 mm if I am concerned with detail and just can't avoid poking a hole where I wish I didn't have to. In the case of making larger objects where you hollow the print you may need to cure the inside as well, so having an opening somewhere so you can shine UV through is a good call. Some folks rig up UV LEDs on leads so they can slip the LED inside the model to cure the interior.

You can specify a minimum wall thickness to avoid requiring infill. Too thick and it's hard to get a full cure through the wall, too thin and the model will be weak. Infill and resin printing are sort of enemies of each other. Any trapped uncured resin will eventually weep through or split the model and dump uncured resin on whatever the model is sitting on. People who try to print large solid models find this out a few months after completing all the painting.

It's worth noting that using cubes for calibration is a great way to get your exposure dialed in for dimensional accuracy. Perfect exposure should deliver a model that is as close to exactly the size of the model fed to the slicer as the machine can deliver. Remember these machines are made with the lowest cost parts, so while they are great machines for the price in most cases, the for the price does effect results.

Understand that if you purchase pre-supported models that the supports are configured for some typical printer / resin combination. In some cases, you will see support failures using these models with a printer that has "perfect" exposure calibration and produced accurately sized prints. You will need to increase your exposure time in this case to get the supports stronger, or support the model yourself. This is why you will see cases where the calibration cubes are telling you all is well, but the Cones of Confusion test fails to join all the success side cones. When that happens, you know at least some pre supported models, or your models auto supported with light weight supports are almost certain to fail. It's worth running both tests for any resin(s) you use, I tend to write exposure data on the bottle and saved as a profile too.
 
As long as resin doesn't "pool" in the part, it should be ok. If the tube is capped on the end that will enter the resin tray first, it will act as a plunger would, and possibly cause disruption to the print, or sometimes, damage to the LCD screen. A hole in it would stop that happening.
Others can describe it better than me!
That particular part could have a hole in it. Thanks . I’m just trying to learn about this process as there are a number of things my son and I could get into .we do giant scale as it is called Rc warbirds or WW 2 aircraft. Printing will making details much easier. I’ve found several resins that will bear out testing in search of knowledge . It will be several months before we actually get ready but learning is in the wind .
 
That particular part could have a hole in it. Thanks . I’m just trying to learn about this process as there are a number of things my son and I could get into .we do giant scale as it is called Rc warbirds or WW 2 aircraft. Printing will making details much easier. I’ve found several resins that will bear out testing in search of knowledge . It will be several months before we actually get ready but learning is in the wind .
For RC aircraft you may want to use an "ABS Like" resin, or add 5% to 10% Siraya Tech Tenacious Obsidian Black to your other conventional (non water clean up) resin. It makes the prints just a bit more flexible and tougher. Plain run of the mill resin is fairly brittle and smaller parts break easily. Some miniature printers get a good mix of detail and toughness with Phrozen 4K Aqua Grey plus 5% of the Siraya Tech Tenacious. They claim the Obsidian Black resin is stronger than other Tenacious resins. I can't say that's a fact, but it does improve the ability to handle shock. I've added 10% Tenacious resin in boring grey to plain old boring $23/bottle Elegoo grey resin and gotten good results. Given the the Tenacious resin is $52 bottle that brings the total cost per liter of the blended resin up to around $28 VS $37 if you use Phrozen 4K. Small details that would often get damaged while cleaning and curing without the added Tenacious resin do just fine with it in the mix.

FWIW, I like grey resin, it's easy to get a good single layer prime with Vallejo white or black primer, and if paint gets shipped it's less obvious or easier to touch up.
Thanks much fo the information thes monster planescan vibrate bout any thing loose socially twin engine ones these are not closet irds My big Corsair flew for 13 years my flight log book was nearly 2” thick . The canopy was replaced a number of time the cowl as fiber glass and lasted about a year. Wheels and tires were another wear item .they were a low pressure air tire. You used to be able to purchase the tire valve but I haven’t seen them of late .
 
Thanks much fo the information thes monster planescan vibrate bout any thing loose socially twin engine ones these are not closet irds My big Corsair flew for 13 years my flight log book was nearly 2” thick . The canopy was replaced a number of time the cowl as fiber glass and lasted about a year. Wheels and tires were another wear item .they were a low pressure air tire. You used to be able to purchase the tire valve but I haven’t seen them of late .
I did look for “ rubber like resins” in hope that it might be possible to print the more scale waffle or checker board tread as these are not readily available . I can fore see a bit of issue modeling this. I YHINK concentrating on creating one diamond or square the use a rotational sweep . I had created this years ago but the file no longer exists. Printing a tire might be a minor issue of drainage . I may have to come up with a tire valve unless I can find a couple from the old days . These were a semi wiggle around force fit thing. Made of brass . They were never very good. I could probably come up with a modified s grader valve but making it will be tough as I am not supposed to be around rotating machines. I take a football apart and see if I can either use the fill valve or print something built in when printing the tire . S this is getting a bit forward so I think I’ll just make some sketches and set them in the items to consider file. Comments appreciated. Thanks
 
Prusa XL, solid choice for pattern making with its 14"x14"x14" print area. Competitive pricing and notable improvements make it a worthwhile consideration. I want to suggest you to use enclosure for Prusa XL to get expected results.
Prusa XL enclosure.jpg
 
Welcome John, glad to have you.

I have not had time to make too many prints on the Prusa XL, but the prints I have made did not use the draft shield, and much to my surprise, there were no problems at all with the prints, and no signs of bed lifting.

The XL does have a sophisticated multi-area bed heating system, and so I am not sure if that is the reason it works without a draft shield, or what.

.
 

Latest posts

Back
Top