Building a 120mm rotary table

Home Model Engine Machinist Forum

Help Support Home Model Engine Machinist Forum:

This site may earn a commission from merchant affiliate links, including eBay, Amazon, and others.
Arnold
That sir, is one impressive bit of work. I've followed along, with interest, from the beginning and I must say the whole project has been an education in and of itself.
Regards
Ernie J
 
I'd be happy to do business with AMESS.
I wish it wasn't so far away. Postage is a killer.

Very nice job. An inspiration really to people like me. I wouldn't have considered the idea that someone could make something like that. To the point that I ask myself sometimes why I bought some of these tools...I could've made them. You make it look do-able.

Again...very nice. Thanks for taking the time to post the road and let us travel with you.
 
Great looking RT Arnold. You have to be proud of that project. :bow: :bow:

Time kind of slips by. I lost track of this post after I questioned the T-slot cutter. Thanks Dean, Tel, Marv, & Arnold for your answers. The reason I asked is I have a good assortment of Woodruf cutters that I thought could be used for cutting T-slots. I wasn't aware that there were special cutters for T-slots. I see they have deeper chip clearances and side clearance as well.

Dean, I haven't got any special project for these cutters at this time. Just curious.
 
Thank you for showing us a great build,you should be proud of your excelent work.
If I could build something like that ,I would chrome it and put it in a show case, LOL. :bow: :bow:

Ian seagar)
 
Everything came up roses, Arnold! Those slots look just like the factory boys do it, and the worm
eccentric is a really neat thing. Such a good job. I really like it!

That little AMESS outfit does alright, too. They should go into business.

Thanks for another great post.

Dean
 
Congratulations Arnold. Thanks for the great thread. I inspired me to get going on mine. Don't take this the wrong way it also discouraged a little due to your patients on getting a super fit and finish, something I need to work on.
 
Arnold,

What a great accessory you are making. :bow:

It's almost a pity to get it dirty from use..........................................ALMOST ::)

I am sure you will have many rotational successes from this little beauty.

Best Regards
Bob
 
Mike, Ernie, thanks very much guys ;D

Carl, thank you :D. As to making something like this, it's been done a lot in years gone by. A lot of the theory that I apply I gained from reading books by past masters; now I'm starting to put that theory into practise. It's sort of a dying craft to make one's own tools, but I'm willing to try and help preserve the craft for as long as I can.

Arv, Ian; Thank you ;D Yes, I am well pleased with the result; but this one is not going to get shoved on a shelf ;) - It now has to start returning on the investment.

Thanks Dean ;D - The T-slots are not quite as well made as my old Myford's, but, dare I say it.... came out to a much better finish than my mill's.

Hamstn, thank you ;D. I won't take it wrong. A year ago I could never dream of getting fits and finishes like these. Then, like you now, I also felt somewhat discouraged and in awe to see people producing good work. There is only one way to improve, and that is to try and do as good a job one can on even the simplest of projects; rather than buy things like toolmakers clamps, die holders and so on just take some time and make them - the little extra touches needed start to become second nature and the more one machines, the better things get ;) So hang in there and just give it your best shot, and over time it will all come together for you! Oh - and another little lesson I learnt; When - not if - things go wrong, just stop a bit and think about it, and figure out a positive way to attack the problem - a positive attitude is already half the job done Thm:

Bob, thank you very much ;D - believe me, its going to get dirty though - I have a lot of builds in the pipeline ;)

Kind regards, Arnold
 
Arnold,

AMESS looks to me to be a rising star in the Model Engineering field.

Keep up the good work.

Your table makes my cheap import table look, well, cheap.

SAM
 
Hi Arnold


Top job mate :bow: :bow: :bow: :bow: now what you going to make next ? stickpoke stickpoke stickpoke:big: :big: :big:


Regards Rob
 
Arnold,
Fantastic job. I've truly enjoyed following along. Thanks for documenting this great project. :bow: :bow:

Cheers,
Phil
 
Arnold,

Even though I haven't commented before now, I have been following along, and I have to agree with all the good comments that have been made.

Very well done indeed. You have made a major piece of tooling all by your own hard work and perseverance.

Sit back for a bit, have a brew, and get used to that big grin you must have, because surely, you will have a lot more in the future if you carry on the way you are going.

A great post all round.


John
 
Sam, thank you very much ;D

Rob, thanks mate ;D. I'll finish the lathe chuck adapter for the table first. Next project will be a bit smaller and a bit less demanding ;D

Thanks Phil ;D I don't know about "great", but it sure was a lot of fun!

John, that is high praise coming from you - thank you very much indeed. You have the grin and brew spot-on; exactly what I'm doing tonight. As to following along, I happened to notice at one point. I must say though, I am pleasantly surprised at how many reads this thread received!

Kind regards, Arnold
 
Superb! Just Superb! :bow:

Whats going to be your next project?
Selfmade Boring and facing tool? ;D

Cheers Florian ;)
 
Looks Great Arnold.
Thanks again for sharing.
Rich
 
Arnold:

That sure turned out great :bow: :bow: I enjoyed following along, and look forward to your next project!

Cheers, Joe
 
I was with you all the way Arnold great bit of work and well shown.

Stew
 
Congratulations Arnold.

Very well done and great documentation of the process. Now I just have to get off my duff and start my own.

That is truly an inspiration to anyone wanting to build their own tools.
 
Florian, thanks ;D - my next project is an engine - I haven't decided which one yet though. Something simple to take a bit of a break ;) Steve Campbell's boring tool is a definite on my list though :) - You can have a look at Dean's version and get the plans here

Rich, Joe, Stew - Thank you guys ;D

Dad - Thank you very very much indeed! Means a lot to me. Chat to you on Sunday evening ;D

Thanks Kevin ;D - I think I have a larger collection of home brew tooling than engines by now ::) - maybe I'm fortunate that even the "cheap & cheerful Asian tooling" is sometimes difficult to get and expensive by the time it ends up with me - so I'm forced to make do and have fun in the process :big:


While the RT is pretty much finished (just needs a tear-down for cleaning, a quick lap of the table to the base with some grinding paste, and (maybe) some paint), I do need an adapter to mount my lathe chucks on it. This is not much of a build; it must just be made accurately, and easy to mount on center on the RT (where I'll most likely use it most of the time), but also off-center if need be, as I have some ideas of machining operations where this might be very beneficial.

My raw materials are running a bit low, but I have ~5 meters of 60x10mm flat bar left (I had to buy 6m for the RT base ::)) - so a bit of that is fine for the chuck adapter base. I'm pretty much out of ideal round bar for making the nose for my screw-on chucks; the only bit I could find is not quite as large in diameter as I would have liked, but it will have to do for now. If it is a problem in future, I'll make a new adapter.

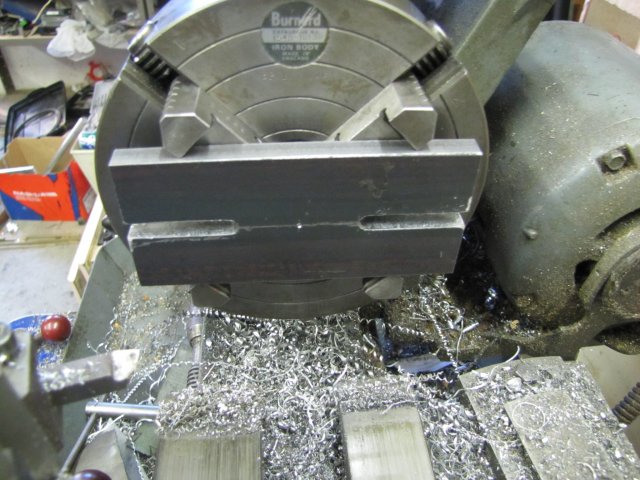
The bit of flat bar with 6mm slots milled in it for clamping to the RT, centered in the 4-jaw for facing and boring a hole in it:
normal_IMG_1397.JPG

It's chucked with the jaw edges - not because the slots would interfere, but to be able to use the lower parts of the jaws to keep it flat on the surface of the steps on the jaws.

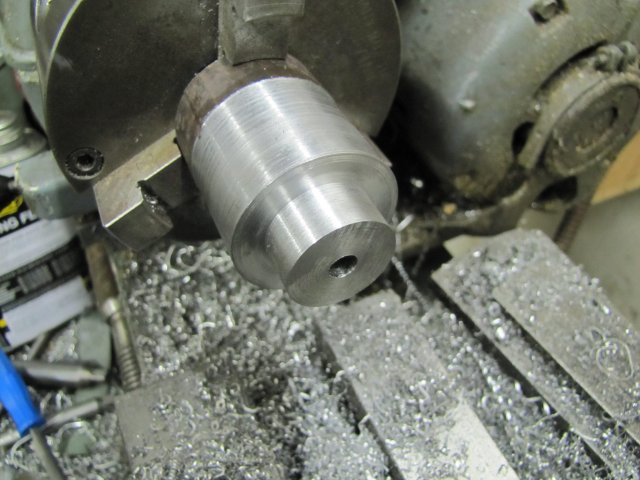
I then faced the plate, and drilled and bored a 25mm hole in it, with a good chamfer on the face edge of the hole. Then I turned the bit of rod I have to _just_ clean off the crud on the OD, and then turned a section on the front down to match the hole bored in the plate with a fairly close under-size fit (0.02mm / 0.0005" smaller) I could have gone for a press fit, but rather chose to silver solder this joint - hence the bit of "looseness":
normal_IMG_1398.JPG

I didn't go for nice finishes on this; the visible parts will be turned down further and the rough finish at the plate end will help wick the silver solder through the joint.

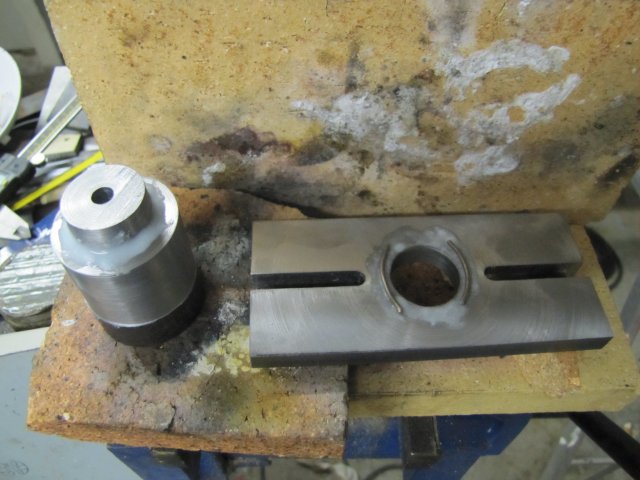
Then I fluxed up both pieces, and placed two bits of silver solder on the plate. The plate is suspended on two bits of fire brick, so that I can heat the joint from the bottom with the oxy-butane torch; with the solder on top and the heat coming from the bottom, the solder would want to flow down into the joint - towards the flame:
normal_IMG_1399.JPG


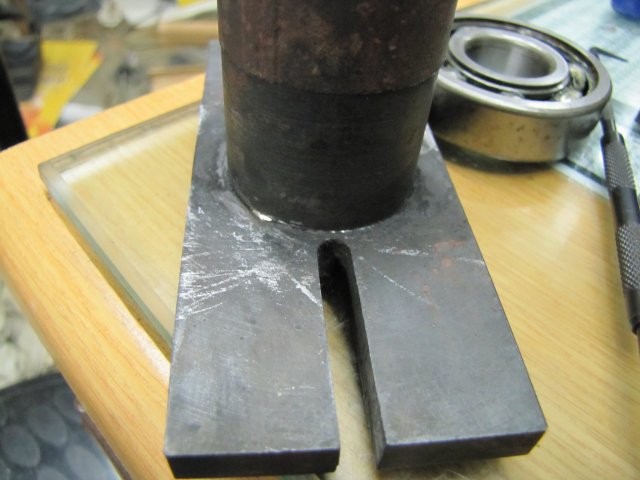
These are big bits of metal for my small torch, so I set my little butane "plumber's" torch to heat the top bit of rod to get some heat into it without the flame directly playing on the flux, and played the oxy-butane torch with a good blue flame on the bottom. It still took about 3 minutes for the flux to start to flow, and another minute after that for things to reach enough heat for the solder to melt and flow. The rod bit dropped down when the solder melted, with nearly no solder appearing at any of the edges of the joints, so I used just about the right amount ;D :
normal_IMG_1400.JPG

I couldn't be bothered to pickle that lot after soldering; when it cooled down to black, I just shoved it under a running garden tap to cool down. Very little to clean up, and most surfaces will be machined again...

Hopefully I can finish this tomorrow :)

Regards, Arnold
 
Back
Top