Arnold's take on Elmer's Grasshopper

Home Model Engine Machinist Forum

Help Support Home Model Engine Machinist Forum:

This site may earn a commission from merchant affiliate links, including eBay, Amazon, and others.
I started my reply nearly out of breath and wanting to ask you to slow down a bit so I could catch up.

But now having read your post...I'm anxious to see it running too. Go go Arnold!

I liked the bit about the binding wire. I always struggle thinking of new/different ways to do things.
 
I thought the binding wire part was a good tip too, Arnold. Also, using the bearing race for a parallel. Everything seems so simple after someone else shows you!

"Soon" won't come soon enough for some of us. I think I'm in good company in saying many of us are excited to see this one running.

Good work... again!

Dean
 
Arnold:

Wot 'e said... (all those above :big:) it's looking good, and lots of useful tips too. Who could ask for more?

cheers, Joe
 
Thank you John ;D ; This is the first flywheel I'm making in terms of milling out spokes and so on from solid stock. I was surprised at how much thinking it required! I've seen at least one of your "re-shaped" flywheels as well, and it was both amazing and inspiring what you came up with to recover from an "oops"!

Hurry up and Wait Carl, you're in the army now :big:. Thank you, but I cannot take credit for the tip on using the wire; I came across references to using it multiple times while doing researches and reading on home/model engineering.

Thanks Dean ;D. Like I said above to Zee; the races for parallels is an old machining practice. I get mine for free; Make friends with your local auto workshops and auto electricians; they replace and then throw away a lot of them!. Just takes a punch and hammer to get two parallels and a handful of ball bearing balls from an old bearing. And in a squeeze, you can make toolbits from those races; it's hard steel ;D

Joe, Thanks ;D

I had a chance to get some more done after work today ;D

The flywheel still needed a hole drilled and threaded in it for a grub screw (I think set screw for those from the USA ???) to tighten it to the main shaft.
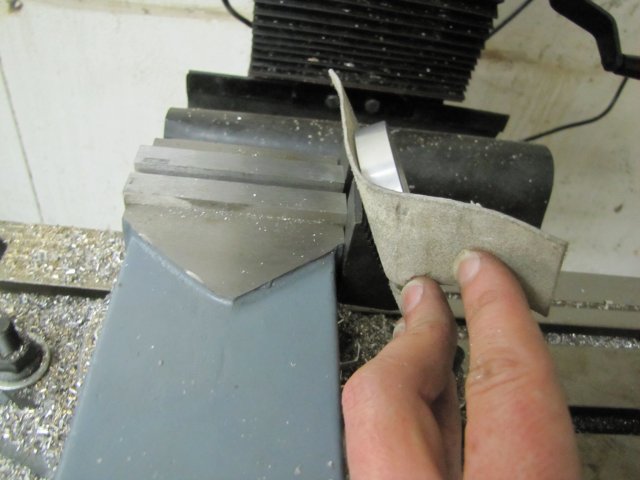
This added a whole new angle to things; the hole had to be at an angle... After a lot of thinking about spacers and protractors and such, I looked at at the clamping kit, and those step-blocks had about the right angle to them - across the steps. The flywheel would need protection from the edges on the steps of the step blocks; a strip of leather would take care of that. Long story short, here is what I did, with the arbour I made earlier set so I could tighten the flywheel against the step blocks:
normal_IMG_1086.JPG

This setup will not do for milling, but for drilling, it is fine.

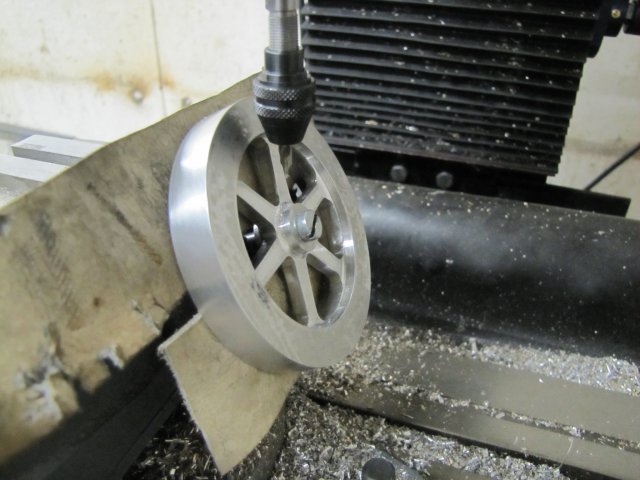
Then center drilled the flywheel hub; the chuck barely misses the flywheel rim. :
normal_IMG_1088.JPG

A 2.5mm drill easily followed into the center hole; I could "feel" when it broke through before it hit the screw in the arbour. Then a VERY careful tapping operation followed; earlier on in the build I said I'm not afraid of those big M3 taps anymore; well, I'm not, but this is at an awkward angle. My taps were barely long enough to do the tapping without resorting to things like extensions and so on...

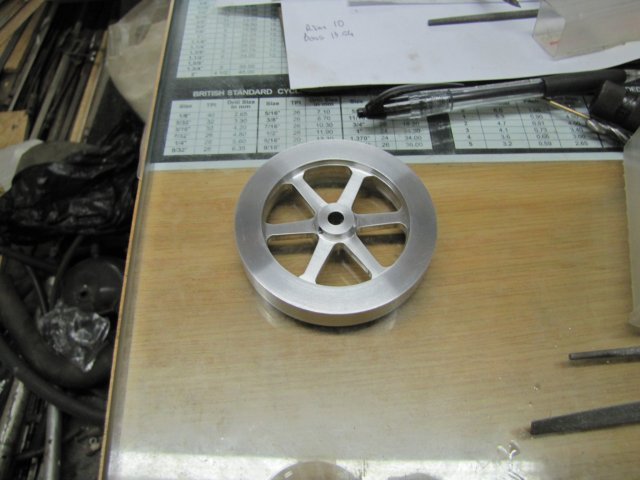
After 2 hours of filing and sanding - some sanding in the lathe and a lot of filing and sanding in the vise, I decided it will have to do:
normal_IMG_1089.JPG


Then I fed the swarf magnets - they were clunking around their food bowls, and got right back to the shop.

A lot of fiddling with small bits of wire and needle-nose pliers happened. VERY carefully; I didn't want scratches from the pliers running onto the build parts.

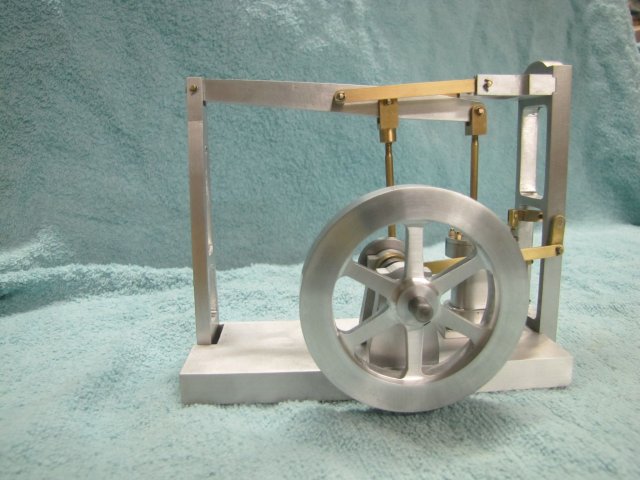
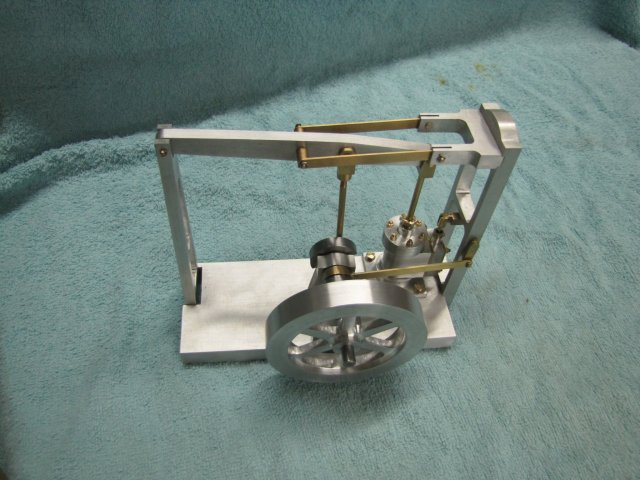
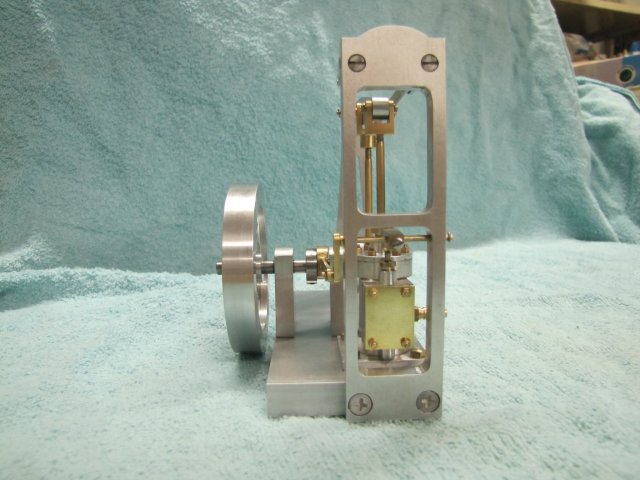
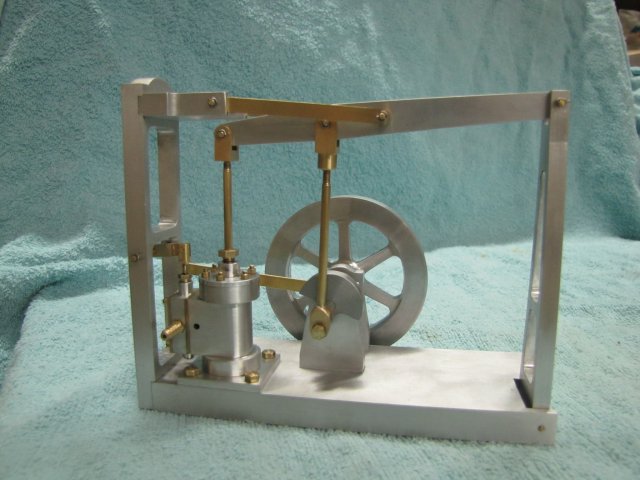
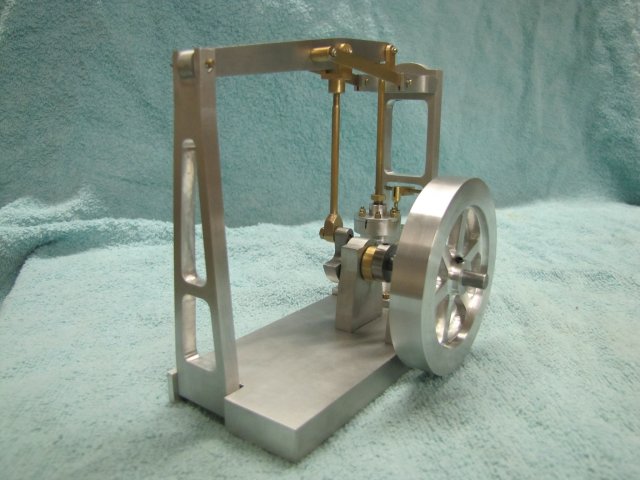
I ended up with this:

normal_IMG_1090.JPG


normal_IMG_1091.JPG


normal_IMG_1092.JPG


normal_IMG_1096.JPG


normal_IMG_1099.JPG


The last photo above shows an inexcusable blemish; when I trial fit all the parts, the top cylinder head would only go on properly in one specific orientation - not because of the bolts, but the ridge on the cylinder head is a very close match to the bore, and I marked that orientation with a permanent marker. I forgot to wipe off the ink!.

And even worse, even though it is not referenced in the plans, I suspect that there are lock-nuts needed where both the connecting rod joins it's fork, and the piston rod joins it's fork; especially for last named; the piston could easily rotate while running and screw the rod in or out on the fork, resulting in a jam-up.

Does it run ??? - ;D ;D ;D ;D ;D YES! - I gave it a quick test-run on 20psi of air and it runs!. No video yet though. I need to make up a small adapter fitting first; the steam connector is too small for my piping, and I had to keep the air hose jammed against the valve block face with both hands. And it was late; I could only run the compressor quickly for the test; my neighbours are asleep already. Hopefully I can make the video tomorrow afternoon after work.

Alas... The Bling Fairy didn't visit, so I had to do a bit of a manual cleanup; mostly on the brass parts. As a test, I applied one of these "new-fangled" high tech polymer car waxes to all the parts to see if it would help in retaining the finishes. I'll report back on the results of that in a couple of months.

Regards, Arnold ;D ;D ;D
 
Arnold,
She's a beauty! Very well done.

Waiting impatiently for the video ;D
 
Yeagh!!! You've seen it run and you haven't let us!
That's a great looking engine Arnold.

You know of course that a simple video of it running will not be sufficient. Please provide appropriate music, flags, confetti etc. ;D
 
Looks GREAT, Arnold!
Yeah, that flywheel will just have to do... Sure looks like it should from here.

Looking forward to the video. Not to disagree with friend Zee, but you can leave the music out of it. A running engine makes its own music!
We want a happy dance, though.

Dean
 
"Then I fed the swarf magnets - they were clunking around their food bowls"

Those must be some ornery critters...magnets attracted to aluminum. Wouldn't want to corner one of them.

This build has been "most excellent" When the video goes up and a bit of follow-up is posted, then the PDF fairy will get this into the upload/download section. (provided the fairy doesn't get attracted by one of them magnetic beasts)

Truly a quality build from where I'm sitting. This is a keeper. :bow:

Ed
 
Great work Arnold I enjoyed following your build.

Stew
 
Same here Arnold, a very tidy result - an engine to be proud of!
 
:bow: :bow: :bow: :bow: :bow: :bow: :bow: great looking engine Arnold , very nice brushed finish on all the parts :bow: :bow:


Regards Rob
 
Arnold,

What a good looking engine. I like the finish you chose.

I have enjoyed following your build and am looking forward to seeing it run.

SAM
 
That engine looks flipping fantastic....and the methods used during the build were very informative.
Great job with that engine!
 
Kevin, Thank you!

Thank you Marv, I have seen your tap extender; I was on the verge of having to make one, but put it on the tuit list.

Carl, thanks, and yes - I saw it run first :p :big: ;D - Mesmerizing. I nearly didn't take the video tonight - too much fun to see it tick over! No fancy video though; I tried to keep it simple and to the point. No fussing around with the camera; some members get seasick, and I'm not good at video recording!

Thank you Dean. No music. But no happy dance either; but you should have seen me yesterday evening when it just started up and ran though!

Thanks Ed. I hope you don't have too many editing nightmares though! The dogs swarf magnets are quite good normally, just woolly critters keeping a watch on feeding time. But excellent at attracting swarf; especially longish aluminium spirals from drilling!

Stew, Tel thank you both very much.

Rob, thanks mate - not just for the compliments, but for your personal input as well :bow:

Thank you Sam.

Chris, thanks, and it is a bonus to know that the build was informative as well; that more than doubles the satisfaction of ending up with a running engine.

Well, I made the video; as I said I kept it simple. It does not run on breath power, but does run slowly at about 10 psi; my compressor's pressure gauge does not read well at low pressures. I think after some running in, it should be even better:
[youtube=425,350]<object width="425" height="344"><param name="movie" value="http://www.youtube.com/v/Zj3C_rPn3W4&hl=en&fs=1"></param><param name="allowFullScreen" value="true"></param><param name="allowscriptaccess" value="always"></param><embed src="http://www.youtube.com/v/Zj3C_rPn3W4&hl=en&fs=1" type="application/x-shockwave-flash" allowscriptaccess="always" allowfullscreen="true" width="425" height="344"></embed></object>[/youtube]

This was a fun build, but, I'm tempted to say, in many respects more challenging than the Fred loco build. Besides ending up with another engine and some more useful home-made tools, I ended up with a long list of more little and big tooling projects to attend to.
And best of all, I learned some lessons and new skills in the process!

What's next ? - a very good clean up and service on all the machines, and then a rotary table, with some tooling and machine modifications thrown in. The next engine I have not decided on; there's a couple of candidates!

Once again a big THANK YOU to everyone who followed along; those who actively responded to the thread, as well as the members who quietly observed.

Kind regards, Arnold
 
Arnold,
A beautiful build and great operation. :bow: Thm: :bow:

I have enjoyed following your journey.

I built one many years ago and it is still one of my favorite engines. Great to demo for visitors as it will just tick over and there is enough monkey-motion to hold their interest. I am sure you will have as much fun with yours as I have had with mine.

Gail in NM
 
Arnold, I was one of the quiet observers and enjoyed the build very much. I'm deciding which engine to build for my third go at it. This is a top candidate now thanks to your thread.

-Trout
 

Latest posts

Back
Top