A "Wallaby" of my own

Home Model Engine Machinist Forum

Help Support Home Model Engine Machinist Forum:

This site may earn a commission from merchant affiliate links, including eBay, Amazon, and others.
Mine is vice mounted Ron, I guess the easiest thing to do is make a new spindle. I've gotten away without it because I usually use a subplate and they bump around on a faceplate pretty easy with loose straps.

I'll snap a shot or two of my 1 1/2-8 one....I need to check the register diameter and compare it to my SB register anyway.

Dave
 
Dave: Have a question. I have a Monarch Model K with a faceplate. Was wondering how you balanced the parts. Do you weight the parts with the hold downs and bolts then use equal weight on the opposite side of the faceplate. Or will you're lathe freewheel enough when not engaged to balance that way. Mine's a gear dive head and even out of gear it would have to be really heavy to move the faceplate in freewheel. I'm new to metalworking and have never even put the faceplate on. I believe you're going to show me why I should be using it. Will be following your build. Hope you don't mind the questions. Roger
 
I don't know Rodger. My Logan free wheels easy.
I would go with Rollies method, that might
not be so easy if the lathe has a D1-4 or L00 spindle
though. If the brain trust here has a way to do this, speak
up. Otherwise i would apply some common sense and way reduced speed and balance it experimentally
If you can feel vibration in the ways of a monarch you need to balance it

Additionally, horses for courses...I would be very concerned with balance of a F350 truck spindle weighing 200 pounds....in a monarch.......with a Wallaby timing cover...not so much
Like a lot of things....go slow and think about what your doing.

Comments anyone?

Dave

PS Looks like a 13" Monarch "K" has a D1-6 spindle...
 
Hi Dave - just signing on for the ride.

wrt ballancing the faceplate I normally try to set it up (much like you have done) symetrically so only one ballancing weight it required then take a MkI eyball guess - if it vibrates move the weight out or in / add / remove weight.
A bit hit and miss but generally quick. Rollies method is better.

Ken
 
Hi Ken,
Thanks for the interest!
Yes the Mk1 eyeball is good to start with,,,but definitely keep the speed down......and tighten the furniture!

Dave
 
Thanks Dave, :bow:

The faceplate is probably the least used and least understood by many, (including me), machinists. I will always carry the memory of being chased by half a faceplate when the operator forgot to tighten the counterweight, which came around, flew out, hit the lathe bed, broke the faceplate. One half went who knows where; and the other was of particular interest as it headed in my direction, complete with 6" angle plate and a 2" bronze valve body.

Best Regards
Bob
 
As promised....mine looks different...but

Also the register doesn't fit a SB.....something I'll need to deal with I suppose...but not for now.

2012-06-10_20-31-53_285.jpg


With the faceplate and mag stand...
2012-06-10_20-32-28_899.jpg


OK....next is the holes for the sump, but I need to make a #5 spot facing drill first....

Dave
 
Maryak said:
Thanks Dave, :bow:

The faceplate is probably the least used and least understood by many, (including me), machinists. I will always carry the memory of being chased by half a faceplate when the operator forgot to tighten the counterweight, which came around, flew out, hit the lathe bed, broke the faceplate. One half went who knows where; and the other was of particular interest as it headed in my direction, complete with 6" angle plate and a 2" bronze valve body.

Best Regards
Bob

Rof}
There's something to be said for running faceplates slowly. Funny now...bet it wasn't then! :big:
 
steamer said:
Hey Bez and Pete,
Snip>
Here's an example of a set up with balance weights.
P1010167.jpg

In this case, the two bores needed to be parallel.
<snip
Dave

There's a whole lesson for me in that picture - I know about balancing the face plate ( helps to keep the lathe from trying to walk away - I learned about that and bolting lathe to the floor in the same lesson ) ;D


Now using a drive dog to to reduce the torque pressure on the drill chuck jaws. That's pure Gold.

Thanks Dave

Bez
 
Maryak said:
Thanks Dave, :bow:

The faceplate is probably the least used and least understood by many, (including me), machinists. I will always carry the memory of being chased by half a faceplate when the operator forgot to tighten the counterweight, which came around, flew out, hit the lathe bed, broke the faceplate. One half went who knows where; and the other was of particular interest as it headed in my direction, complete with 6" angle plate and a 2" bronze valve body.

Best Regards
Bob

That's right - tell 'arf the story! Did it catch you or not?????
 
Bezalel said:
Dave

It Sounds like Rollie's fixture is very similar in concept to Harold Halls Balancing fixture.
I hope so I have a copy of Harald's design.

http://www.homews.co.uk/page151.html

LrgFaceplateBalFix01.jpg


LrgFaceplateBalFix02.jpg


Bez

That would be it! I saw Rollies about 15 years ago or so...but that's it.

Oh and the driver dog on the drill is to take the pressure off the #2 MT shank. A 10" Atlas is a light lathe.
I believe it was Fred Colvin who taught me that one.
Dave
 
Good start Dave, and nice tips :bow:

;D I love my faceplate; though it does not get used all that often, it's indispensable for some jobs.

Kind regards, Arnold
 
tel said:
That's right - tell 'arf the story! Did it catch you or not?????

I'm still here, complete with all the relevant bits, so no, it missed. Mind you it did cost me some new underwear. :eek:

Best Regards
Bob
 
Well.........I made the spot facing tool and I rough machined the timing gear case tonight while mounted to the faceplate for the intial operation, and then flipped the part and mounted it in a collet to face the mounting surface....no mishaps...all went WELL!
Bez....the castings machine nice with some appropriate top rake on the tool and some light oil! Plenty of stock for machining to size so far! :bow: :bow:

The spot face tool works nicely too and is really easy to make....and I'll post photo's of that process too.

I took lots of pictures....but it's far too late to download and organize....tomorrow!......

Dave
 
OK....here we go first the spot facing tool....no drama here
Starting with annealled 0-1 tool steel 3/8" diameter.

The pilot is .125" The spot face diameter is .250...there is a relief between the diameters made by my parting tool.
2012-06-12_20-29-46_639.jpg


Next I mounted the part in the mill vice and milled the one side down until I just touched the pilot diameter...no measurement here...just keep adding to the depth until you see the side of the pilot get touched.
Now we want to cut the side opposite the same way. To do this I loosened the vice and rotated the part by hand approximately 180 degrees. Then I layed a 6" scale against the side I just machined and rotated the part until the scale was visually parallel with the mill table....precision eyeball only here, and then made the same cut at the same depth. The result is as below
2012-06-12_20-49-14_923.jpg


Next I took a half round file and put a back rake on the two cutting lips about 15 degrees....eyeball-a-metric.

2012-06-12_20-57-00_66.jpg


Note the direction of rotation! don't cut the wrong side!

Next I put the embrionic spot facing tool into the drill press and started it. I then heated the cutting end with a torch until it was bright red...while the spindle was turning. Once I got to bright cherry red...I plunged red hot rotating tool into oil with the rotating quill. The result is a very hard tool!

I decided that this tool did not need tempering and decided to try it as is.....and it cut very nicely.
2012-06-12_21-19-34_528.jpg


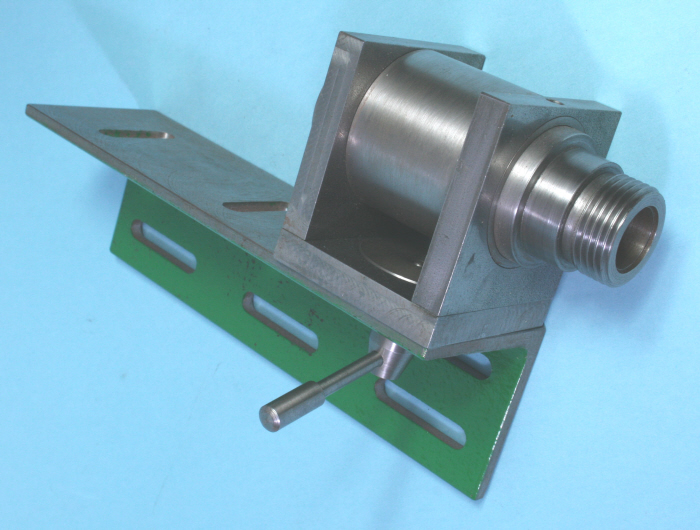
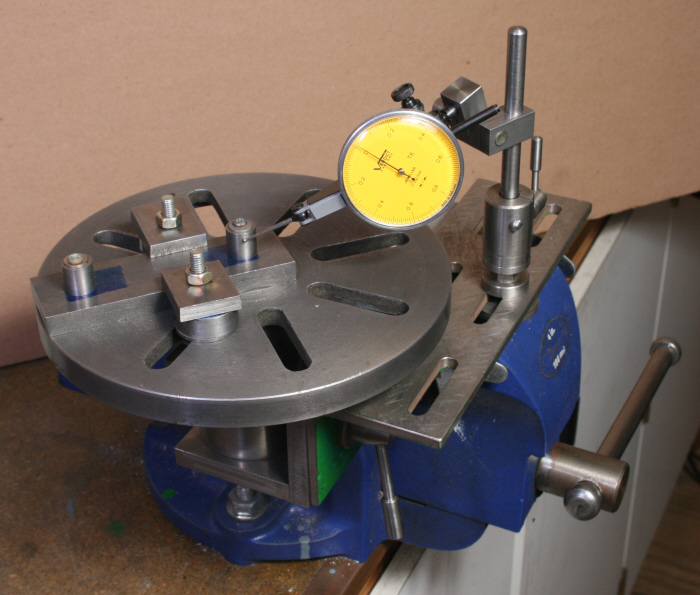
OK that done, I decided that I would work the timing gear case....here it is mounted and into the first operation.
2012-06-12_21-59-39_738.jpg


I then drilled undersize and bored the center to 0.438"
2012-06-12_22-25-25_490.jpg


OK....next is to clean up the inside next to the gear....there was a little core corner crumble....so I figuired I would just flip the part and hold it on the 3/4" diameter in a collet. time to change the faceplate for the collet chuck.

You have a piece of plywood to cover the ways on your lathe when you change chucks........RIGHT!? ;D
2012-06-12_22-30-35_198.jpg


Next it was a simple job to face the part back to the .4375 dimension and lightly bore the center to clean it up....
2012-06-12_22-51-06_692.jpg

If you don't have a collet chuck, A 4 jaw will do here....if you use a 4 jaw....put some pop can aluminum around the finished part to keep the jaws from marring the work.
Nice nights work!
2012-06-12_22-55-03_771.jpg


Dave


Dave I am here still watching and like want I have been seeing so far. Very nice setups thanks for the lessons.

Don
 
Thanks Don! but there are other ways!

Go ahead and speak up!....how would you do it differently?

Dave
 
Oh yeah kisses and hugs from me too! :-* :big:


come on....show me a better way......

How would you do it?


Latest posts

Back
Top