Tandem Compound Poppet Valve Steam Engine Build, ala Cedge

Home Model Engine Machinist Forum

Help Support Home Model Engine Machinist Forum:

This site may earn a commission from merchant affiliate links, including eBay, Amazon, and others.
It's freaking beautiful...even if it does look like a part for some sort of crazed Victorian saxophone.

Just kidding, Steve. :) Your work is awe inspiring. If you could bottle and sell your artistry, skill and patience you could retire to some tropic isle and spend the rest of your life making (more) exquisite engines.
 
My forehead just grew two inches from raising my eyebrows.

Excellent work on the 1/72 threaded rods, they look perfect

Well Done Thm:

Kel
 
Marv...
Thanks for the kind words. Make an offer and I'll send you a bottle or two.....LOL. The island sounds good, but I'd never get a tan building engines like these. I had already thought about it looking like part of a steam powered oboe....LOL

Steve
 
Alright... fess up. You found someplace to buy these beautiful castings, and all the construction pics are simply Photoshop fakery!

They're too good to be real.

Dean "I'll have what Chuck's drinking..." Williams
 
Steve,
What can we mere mortals say th_confused0052 ?

As usual, thanks for the progress report.

Cheers,
Phil
 
Ah, you are just killing me here!! Steve, I thought your last creation was outstanding but Gees Louise give us a break! Truly, truly, fine detail work. I LIKE IT Thm:


BC1
Jim
 
Steve,

:bow: :bow: :bow: :bow:

(words fail me)

Best Regards
Bob
 
I don't post anything in this period because I'm a bit busy and don't want to hurt anybody (I think that if I write only in one thread, the others could feel offended... a strange way to think, I know it ;D )

anyway, I must do an exception here Cedge
words fail me too, I'll only say GREAT GREAT WORK :bow: :bow: :bow:

many thanks for sharing it Steve
 
You guys are way too generous with the praise....LOL. Thanks to all for the flow of encouragement. Half the fun is sharing an experience that also still amazes me with each new step it takes. I'll have to admit it is turning out far better than I'd imagined it would.

Ariz...
I know the problem. There are so many good threads and builds going on that I can't get to all of them, like I used to, and I don't want to leave anyone out. This place has grown to be an amazing resource for learning new things, finding the hard to find and for just hanging out with like minded friends. It has also become a monster for reading every post, if one is ever to get any work done....(grin)

I can't imagine that Rick could have had any thought this place would become what it has. IMHO.....THE premier model engineering site on the net today. Thanks for inviting us!!

Steve

 
Steve this is shaping up to be one beautiful build. It is so over the top (in a good way!), it reminds me of something that should have been on Captain Nemo's Nautilus. It just has that old/modern Jules Verne look to me. Super good work here.
 
Steve,

I have been hand filing some of the brass parts for my Beam engine. How are you removing the file marks from your parts?

Thanks,

SAM
 
Sam
I'm using fine needle files, relatively heavy strokes to start and go lighter as I get close to the final elevation. Then I switch to 320 or 400 grit sand paper. The paper rapidly removes the tool marks and works out the small imperfections of the contours. I then polish it on a buffing wheel using a product called MAAS metal polish to get it to shine. (good stuff)

You'll be surprised how little metal you'll need to remove from an edge to get the "casting" look everyone seems to notice.

Chris
That is about as good a compliment as one can give me. I'm a huge fan of things Jules Vern.

Steve
 
Steve,

Thanks.

There is so much to learn sometimes I think my head will explode.

It wouldn't make much of a mess though since sometimes it seems to be pretty empty. :big:

SAM
 
Posted while dodging bits and pieces of Sam's head.....LOL

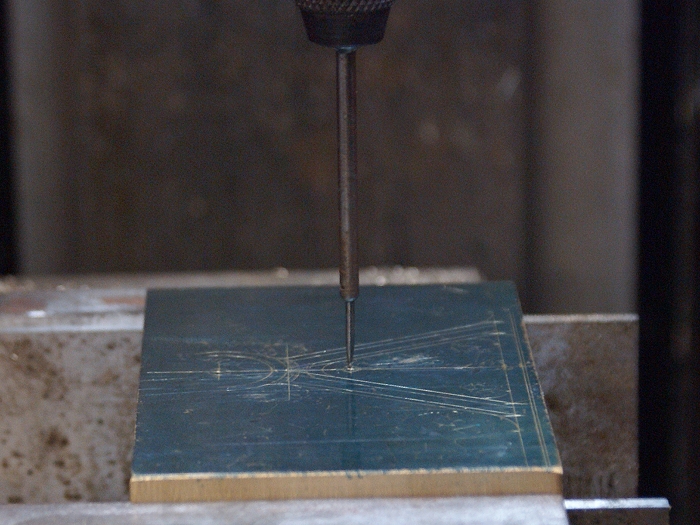
Still taking it easy, but I did manage a little time on the mill.... for which I duly paid the toll. I'm ready to begin establishing the elevation for the crank and flywheel which will soon need to be made and fitted. The project for the day became making the first of two stands that support the cylinders. As the photo below shows, things began with a bit of layout work. The design was scribed into the brass as a guide, although some adjustment would naturally occur during machining, as needed to please the eye.

stand-1.jpg

http://cedesign.net/steam/images/misc/multi-valve/build/stand-1.jpg

The first step was to drill a couple of pivot points. The marks were center drilled after the wiggler was used to locate them.

stand-2.jpg

http://cedesign.net/steam/images/misc/multi-valve/build/stand-2.jpg

This piece does not have but a couple of critical dimensions, height and the radius that will support the cylinder, The other radii were cut using an end mill and were simply aligned according to the marks. This allowed me to sneak up on the lines before milling the holes. These holes serve a dual function by creating a nice curve at various places on the part while giving me escape points for the straight cuts.

Here you see the web being milled, using a small 1/16 ball end mill. This is where the visual adjustment came into play. The original layout was for 1/16 flanges, but this proved to look a little clunky so they quickly became 1/32 wide.

The small table in the photo is a modification of the Rounding Table Marv Klotz introduced to the forum in days gone by. Mine has a round top making it perfect for not only rounding ends and cutting arcs, but for things like these web cuts on angles. The stops make it easy to align the cut and hold in in place.

stand-3.jpg

http://cedesign.net/steam/images/misc/multi-valve/build/stand-3.jpg

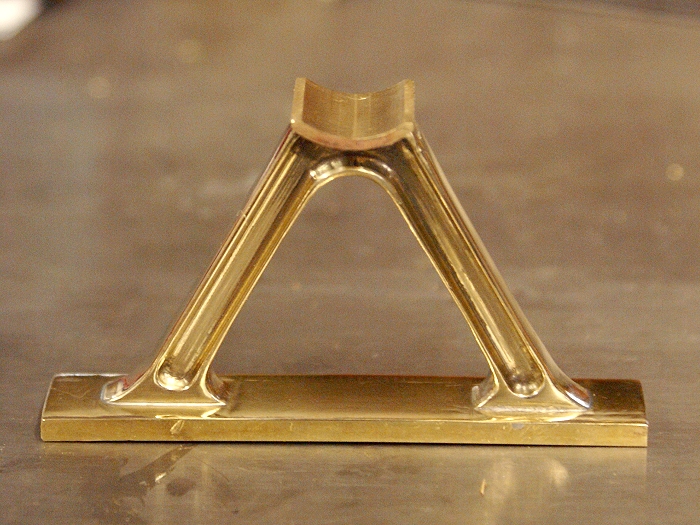
Here is the "finished" stand, needing only a little more tool mark removal and a couple of holes to secure it to the collar of the cylinder assembly. The flat base and The edges of the flanges were rounded a bit and the feet were blended into the base.

stand-4.jpg

http://cedesign.net/steam/images/misc/multi-valve/build/stand-4.jpg

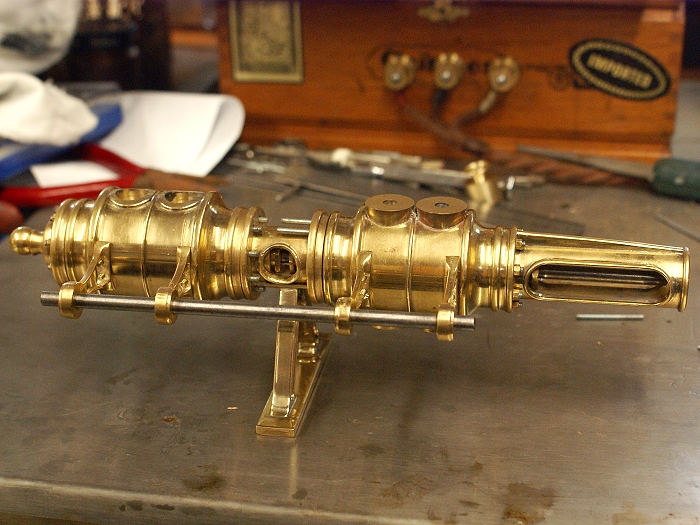
Amazingly, the cylinder assembly is almost perfectly balanced and will sit atop the stand with no assistance. I'll still need to add a second support under the cross head guide to compete this phase. I'm quickly running out of things to do that don't require working on the machines, so lets hope some significant healing begins real soon.

stand-5.jpg

http://cedesign.net/steam/images/misc/multi-valve/build/stand-5.jpg

Steve
 
Incredible work Steve. You never cease to amaze me. I hope you feel better soon, cant wait to see more.

Kel
 
Steve,

No need to worry about an explosion, my powder got wet. :big:

The stand you made is really nice.

How do you get a smooth finish inside of the webs?

Get well soon, I'm ready to learn more.

SAM
 
A thing of beauty, Steve. We're coming to expect this kind of work from you.
Maybe we should!

Dean
 
Sam
Polishing is a no holds barred exercise here. Nothing is out of bounds, from files, sandpaper (100 - 2500 grit), steel wool (up to 0000), valve lapping compound, lapping paper ( 10 - .5 microns), cotton polishing mops and wheels, metal polish, automotive rubbing compound, toothpaste....the dremel tool... even down to cotton swabs.

The webs got a little working over with the Dremel and rubberized polishing tips before I took the 320 grit paper to them. The sandpaper was folded to give me a nice stiff corner to work with and refolded as it wore away. The last step was to use the wooden stick cotton swab and Maas metal polish.

One tip when using the Dremel tool.... Keep the touch light and never let it stop in one spot. Keep it moving or you'll find small dimples appearing as you work. Once the are there, its darned near impossible to sand them out. Some small amount of irregularity to the surface of things like the webs is not going to take away from the effect and sometimes even enhances it, as long as you can keep it to a minimum.

Steve
 
This is the kind of work that inspired me to get in to model machining. If I could only but aspire. :bow:

Hope your well soon.

Cheers,
Chazz
 

Latest posts

Back
Top