Tandem Compound Poppet Valve Steam Engine Build, ala Cedge

Home Model Engine Machinist Forum

Help Support Home Model Engine Machinist Forum:

This site may earn a commission from merchant affiliate links, including eBay, Amazon, and others.
Steve,

Thanks for sharing the polishing tips.

You mentioned rubberized polishing tools for your Dremel.

I'm not sure what those are. Are they an actual Dremel accessory or are they available from other suppliers.

SAM
 
Chazz...
Perhaps the most elegant compliment of all times.... thank you. I got the same inspiration from surfing the German builder sites. They had what I wanted but couldn't justify spending the money it required to get them. Hobosn's choice... I began learning to build my own with an eye toward one day being able to match what they were doing. I'm not quite there yet, but I'm working on it....(grin).

Sam.... Dremel doenst offer a wide variety of polishing tips and those the do are sometimes expensive for my tastes. Check out the catalog at www.dedeco.com . You can sometimes find these at Harbor Freight for a few bucks for 6 pieces.

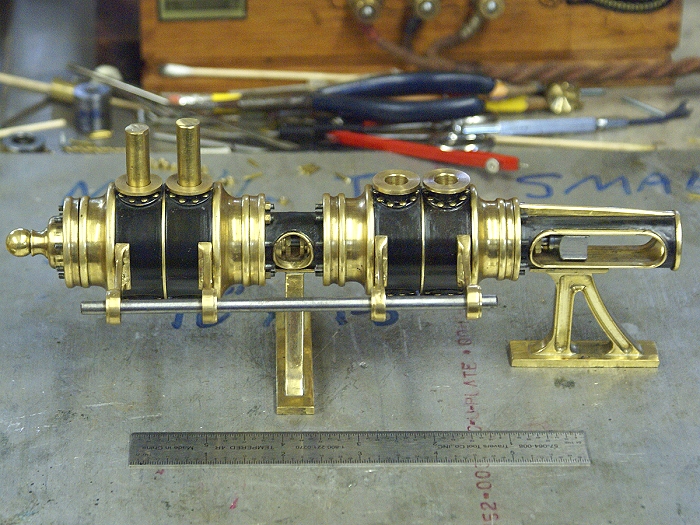
Still getting bits and pieces done here. The cross head guide support is done, but hardly warranted a post after the last support was already documented. It came out nicely and fits well enough that I'm hoping no shimming will be required for final assembly.

stand-7.jpg

http://cedesign.net/steam/images/misc/multi-valve/build/stand-7.jpg

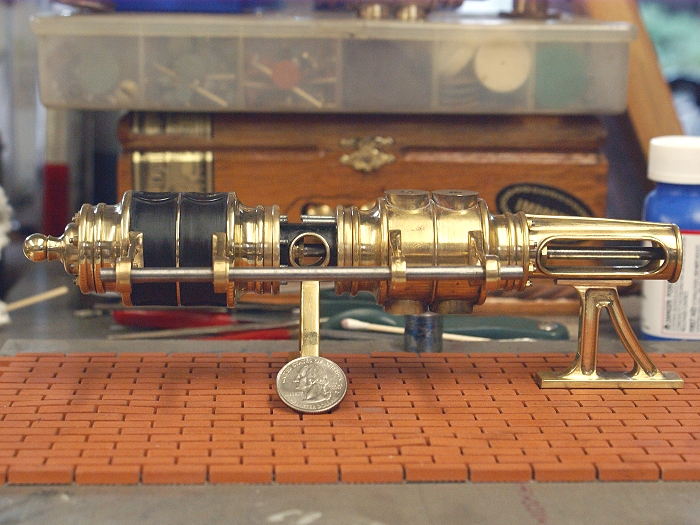
The next photo is somewhat of a teaser, as it shows a bit of the thought process going on about things in the future of the build. I've been waiting for Birchwood Casey to ship me the Brass Black I'd recently ordered. This stuff is basically a tarnishing agent that will produce a deep black finish without changing any dimensions. Paint could have been used, but it doesn't adhere to brass very well.I had considered Japanning the surfaces, but that technique is hard to control and getting it off unwanted surfaces is a challenge. The Brass Black was the next best solution. Why not use natures own process?. We al know how stubborn that surface finish can be....LOL

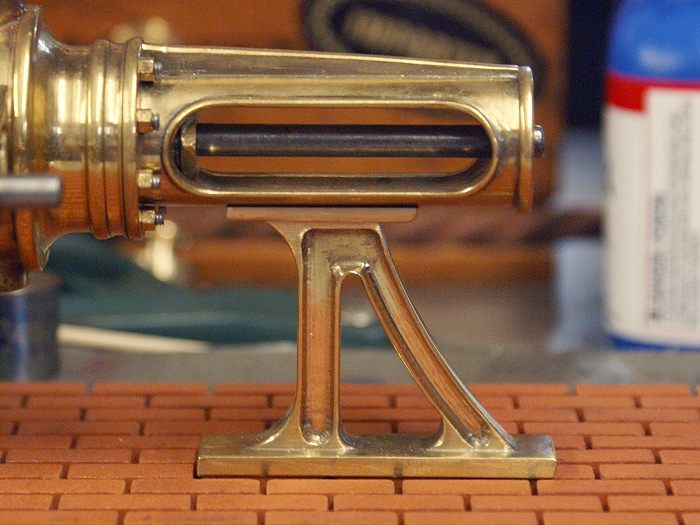
Oh yeah... you noticed the bricks.....(grin). This engine will be displayed as if it were on a factory floor. The bricks are from the doll house department of a local hobby shop. Doll house guys are quite demanding, where materials are concerned, and these bricks are no exception. They are made to 1:12 scale and are actually made from real clay. they come in sheets and can be cut to fit the need. More on this subject when it comes time to use them in anger.

stand-6.jpg

http://cedesign.net/steam/images/misc/multi-valve/build/stand-6.jpg

Steve
 
Looking really,really good.

I can see it now. A teeny-weeny brass trowel with a suitably decorative solid walnut handle and an equally beautiful pointing tool.
 
Marv....
You forgot the teeny weeny little illegal... the only skilled masons left in the US....LOL Speaking of teeny weeny...I'm about to begin drilling the first of 96 holes with a #54 drill bit.... sound like fun?

Steve


Beautiful, It looks like a cannon off of Nemo's Nautilas.

Ron
 
Steve,


SUPERKALAFRAGALISTICEXPIALIDOCIOUS

Best Regards
Bob
 
I too, stand in awe at this build - something really special.
 
Maryak said:
Steve,


SUPERKALAFRAGALISTICEXPIALIDOCIOUS

Best Regards
Bob

Bob, I still can sing that song. Mary Poppins was the first record album that my parents gave me.
DOCIOUSALAEXPIDECIOUFRAGAKALARUPUS
sam
 
Jeeze guys.... LOL.

Didn't get a lot done tonight, but a little progress beats none at all. I spent most of the day at a local tractor and engine show and met lots of miniature engineering fans and even a local hobby machinist or two.

The valve bases on one cylinder are now ready to receive their bosses, so that I can move on to the other cylinder for some catch up. Once all the new bosses are installed and I have fresh indexing points, I'll switch over and catch up on the third cylinder, before moving on to the cranks and flywheels.

Not sure if the rivets will stay brass or if i will wind up blacking them. They are actually escutcheon pins (small brass dome head nails) that were trimmed and then red loctite was used to secure them. 40 down, 80 more to go.

rivets.jpg


Steve
 
My vote is to leave the rivets au natural. Simply beautiful Steve, Capt. Nemo is proud of your achievements and efforts thus far.

BC1
Jim
 
Thanks Bear. I had to agree with you... the rivets are gonna be a bear to keep polished, but I like the look too.

Not much in the way of new tricks or tips of late since everything has been pretty much reapeating things already posted. Lots of holes drilled and filled to get where things are now. the pistons and cross head are now in place, the bosses have been turned and loctited into place to receive the valves and the brass black has crept onto some other parts. I'm well pleased with the finish this stuff rendered and will definitely make use of it on other projects.

The vertical stubs on cylinder #2 are only there to give me some idea of elevations and angles for the push rods and eccentrics that will control the valves. From here it's time to attack the other engine and bring it up to the same point in the build, before beginning the cranks, con-rods and flywheels. Other items like governors, shut off valves and mechanical and cup oilers are also beginning to creep into the master plan, so there is a lot left to do.

Steve

guide-fita.jpg

http://cedesign.net/steam/images/misc/multi-valve/build/guide-fita.jpg
 
It' an impressive assembly, Steve, even at this early point. Looks really good!

How's the rib mending? Hope it's not giving you so much trouble.

Dean
 
Thanks Dean... I find myself sitting and staring at the darned thing and wondering how its going to turn out in the end. The rib is healing pretty well. turns out it was a separation of the cartledge which apparently takes a bit longer to heal then a broken bone. A few more weeks should have me back in shape. It's not really slowing me down all that much now.

Steve
 
Incredibly awesome work Steve. Thanks for sharing your work. Wow :bow: :bow:

Cheers,
Phil
 
Daaaaaannnnnnggggggg, missed a LOT in my time off from here !!!

:bow::bow::bow::bow::bow::bow::bow:
 
Thanks Mike.... I was just about to post an apology for the delay in updating this thread. Two weeks back, the Medicos informed me that I am now a type II Diabetic. I've spent the time since adjusting to the new meds and getting the sugar levels balanced out. So far it's been a very easy transition and my numbers are settling into a respectable range that is pleasing to the sawbones.

It's amazing, the new level of energy I'm experiencing. I'm actually enjoying being able to vigorously tackle physical labor once again. Now that a couple of long delayed real world projects are out of the way, I should be back in the saddle and moving this project forward over the next few days.

Steve
 
That "gettin' old" stuff ain't for wimps, is it, Steve?

Glad the docs were able to get you tuned up proper.
Now if mine would just get it in gear...
 
Glad you found out about your condition so you can treat it, Steve. It's not exactly a club you want to
join, but many of us find ourselves in it.

I remember being shocked when the doc gave me the same news. Must have been about 9-10 years
ago. Heck, I hardly think of it now days. Just take my meds, get the blood work done regularly, and
keep an eye on the BP.

Watching for your next project update. Stay well!

Dean
 

Latest posts

Back
Top