Small Locomotive & Boiler (ME Northumbrian)

Home Model Engine Machinist Forum

Help Support Home Model Engine Machinist Forum:

This site may earn a commission from merchant affiliate links, including eBay, Amazon, and others.
Thank you for the very kind words Pete.

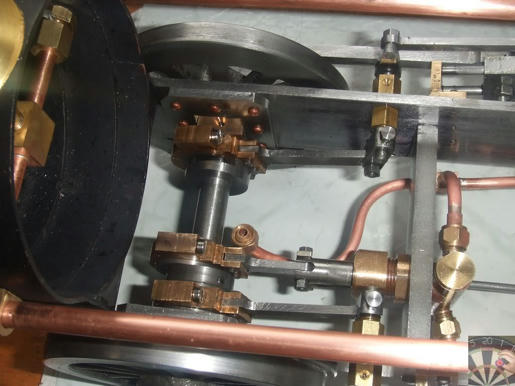
I didn't get hold of Martin's articles from ME until after I had decided to go for the Royal Scot - but with hindsight, I am still very happy with my choice. It may be more difficult than some of the simpler designs to make, but the reality is, is that for a non machinist any loco will be quite difficult - so difficulty is only really relative :)

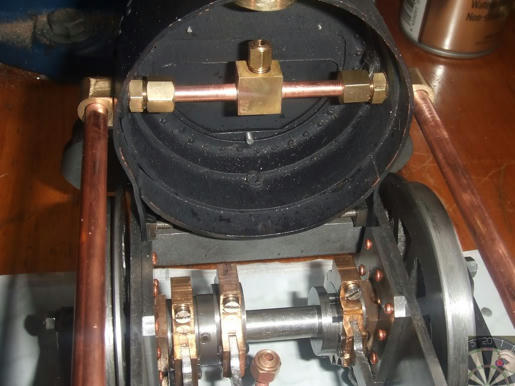
Good luck on the Crossheads for your Simplex - do keep us posted on how your approach them and the outcome.

Cheers

Smifffy

 
I'm trying my best to save the Simplex for the winter (summer here at the mo'). Which should give me enough time to get the Northumbrian onto steam. The materials for the last odds and sods came yesterday (turret, steam pipe union's, oiler banjo's, exhaust etc etc) and I've also ordered the fittings from Poly/Bruce Engineering. I find I can do these small parts pretty quickly in the evenings but once we get Christmas over I'm going to get a few straight days at it, so no excuses. I just need to keep away from the Simplex.

Pete
 
So much for doing the odds and sods in the evenings. I got out into the workshop today and got stuck in

w50hbhfmt8xki544g.jpg


From the top left

1: Part 96 - Water Gauge elbow

2: Part 97 - Turret

3: Part 105 - Steam Pipe Union (x2)

4: Part 106 - Oil Union (banjo) superheated version (x2)

5: Part 89 - Exhaust Elbow (x2)

6: Part 88 - Exhaust Elbow Back Nut (x2)

7: Part 87 - Exhaust Elbow Union Nut (x2)

8: Part 85 - Exhaust Tee

9: Part 86 - Blast Pipe (see note below)

They are all in the pickle overnight for silver soldering tomorrow, not a big job.

Here's the exhaust assembly just pushed together.

2p5apdczkd3415l4g.jpg


The blast pipe is another example of poor drawings in ME. This is made from 1/4" hex and isn't even 1/2" long from the dimensions. The drawing width/height ratio is around 1:4 not 1:2. I've made mine to the dimensions fully expecting to have to make another one. Although having a set of different blast pipes isn't a bad thing when tuning locos.

Unless I get some time in the workshop tomorrow that's it now until the holiday is over. So seasons greetings to you all have a Happy Christmas.

Pete
 
Hi DT,

Lovely work sir,

Did you file the curves on the exhaust elbows out of interest or do you use a rotary table?

Hope you also have a great Christmas and New Year

Pete
 
Back after the holiday and managed to sneak into the workshop for brief periods.

Pete. I did the radius on the exhaust elbows in the rotary table. I used 1/2" sqr bar offset in the four jaw to turn the threaded stubs and drill the concentric hole. That was then transferred to the mill and the centered and the hole at right angles for the exhaust pipes was drilled. Then to the rotary table and secured by the threaded stub to do that radius and then onto an arbor for the exhaust pipe hole to do the other radius.

The replacement valve chests arrived from GLR on Christmas eve morning and by the end of the day the milling had been done. I left the holes for the gland nut, steam inlet and lubricator inlet until today as something bothered me so I decided to stop. I'm glad I did. Once again the drawings in Model engineer are wrong and if you are making the super heated version of this loco to magazine articles you need to be aware. It isn't helped by the fact that dimensions are spread around various drawing published in different issues. If you make the chests in part 8 by the time you get to the lubricator plumbing in part 13 you'll be doing them again or adding the lubricator pluming differently.

The steam chest drawing (item 31) in Part 8 has a number of dimensions missing

1) thickness nears bolting face (with exhaust port) = 1/4"
2) width of cavity 9/16"
3 outside wall thickness 3/16"
4) centreline 17/32" from bolting face

Other hole locations are given in item 42 also in Part 8.

If you are doing the superheater version you can't put the inlet port on the center line. By the time you get to Item 100 in issue 13 the lubricator banjo mount is shown to 5/16" inboard of the the inlet port. If you drill the 3mm hole for the 4BA tap it will go right through the rear inboard stud hole. See attached pdf, I've moved the inlet port and lubricator banjo 1/16" outboard. The inlet doesn't need to be in line with the valve rod as it doesn't reach that far back on the rearward stroke.

I was so close to stuffing up my third set of steam chests I was not a happy chappy (wrong castings, temporary pair and replacements)

Anyway here we are

j7n1ddv44jfw3ln4g.jpg


egoqkng4ngxga654g.jpg


Pete

View attachment Steam Chest Northumbrian.pdf
 
Time to move on to something that isn't in the ME write up, the burner for gas firing. I've based it on the version I made for my Rob Roy but this time I've done it in stainless rather than copper (use what you've got).

I got all the parts completed today, except for the jet, that came from Polly Model Eng.

ct0zeeo8byzlf4p4g.jpg


Loose fitted, ready for a silver soldering session tomorrow.

rejx74xxpgiie5d4g.jpg


The pipes through the middle are to improve the secondary air flow as the burner has to be made as big as possible to fit the firebox. You don't want to need to draw air through the firedoor and if you don't have enough secondary air the burner will go out. The cross bars are to support the ceramic, it can slump if not supported

There's a full writeup of this approach to burners here http://www.homemodelenginemachinist.com/index.php?topic=10883.0

The ceramic I'm using, also from Poly Model Eng

tahxbnaz46ceoll4g.jpg


Hope that's useful to somebody

Pete
 
Finished the burner today

ohpz1g3u3rdrs5g4g.jpg


And tried it out.

cwm8c6mee35s7334g.jpg


These burners don't work too well in open air and need to be enclosed and in a bit of a draw as it would in the firebox.

Installed in the frames.

7uuur05c36ll5034g.jpg


You'll see a bit of the plumbing in the background, I've been doing that between work on the burner. I'll show you that next year (its only 6 hours to go for us in NZ)

Happy New Year everybody

Pete
 
As promised some pictures of the plumbing. I don't have the fittings yet as they are somewhere between the UK and NZ, which means the bypass valve isn't installed just yet.

u5wdikl61u9cg8f4g.jpg


6ysx1e5o8mt53ff4g.jpg


fh6o9javu8j5xu54g.jpg


BTW - you can see the valve gear pivots are too short on the outboard side. They were made to the dimensions in the ME writeup but are wrong. I need to remake them.

i5u7c497dorn7dh4g.jpg


ff6rib6l0lugnjp4g.jpg


pus9kzub1vpk34d4g.jpg


33pkz855cehzz0j4g.jpg


z5df38vu8ipg99e4g.jpg


fv5r2cr2f2edmf94g.jpg


obp6m3fi4fx3huz4g.jpg


abxu3b1g3pwzh2w4g.jpg


I feel I'm on the home straight with this now with just a handful of parts to complete the loco. Then I need to start on the tender

Thanks for looking in.

Pete
 
This is looking really good!
 
Great Work DT,

Hope mine is going to look at least half as good. You should be very proud of your work so far. Is it my eyes or are the cylinders missing the central bolts to the frame ?
 
Thanks guys I'm feeling pretty good about where I'm at right now. Apart from making it run, which is something else, I've got past the hard bits.

Pete - Yes you are right they are missing. I put everything together just for the photos, the boiler has been in and out 5 times today. By the end it will be down to all the individual parts many more times.

I'm learning as I go that's the point of this project, this is my first loco build from scratch. One thing I am aware of at this stage is making it all go together with the foresight of the bit you haven't done yet, otherwise things just start to get in the way of each other and re-makes are on the cards. Now I've got all the major bits in place I could think about a complete strip down and painting the frames, however, I know once I get it steamed up there will be something that needs a tweak and a complete strip down again which could mess up the paint job. How do I know, this was my first foray into this stuff just 18 months ago

http://www.homemodelenginemachinist.com/index.php?topic=9516.0

I think I had this completely in bits around 3 times before it got to a proper working state.

Keep up the good work with your projects

Pete
 

Pete, This is really looking nice. I know what you mean about tearing things down several times. :big: :big: :big: My Simplex and I have become very very intimate. :big: :big: :big: :big:


Ron
 
Looks nice. I'll be doing my plumbing in the next couple of months, so that'll be a learning experience.

Did you make or buy your lubricator? I was wondering why the output tube was so large compared to the steam pipes.
 
Pete,

How do I know, this was my first foray into this stuff just 18 months ago

I have been following you since your first tentative steps, and I must say, now you are up with the best of them.

You have shown that you are a natural model engineer.

Well done, and keep it up, you have nothing to prove any more.

John
 
Talking of lubricators do you have any check valves in the line as I can't see any?

Its comming along well.

J
 
Ron

Thanks, a Simplex is my next project, its sat in the garage right now looking a bit sad it was built in 1994 and from what I can tell hasn't been run in about 10 years. The underside is caked in oil coal dust and sand. It needs a complete strip down and can't wait to get stuck into it. One thing at a time though.

Kvom

The lubricator came out of my Rob Roy, its a commercial item to the LBSC design. The stroke was too long so was pumping too much oil so I replaced it with the Martin Evans design that should have been fitted. The outlet is a standard 1/4" x 40 connection hence the thicker pipe to the small manifold with thinner tube to each of the steam chests. On this I've set the stroke so it only does about 2 clicks on the ratchet.

When it comes to the plumbing one of these is a great help in getting nice bends. RECORD 210 MINIBENDER * Bending Capacity:3, 4, 6mm 1/8"/5/32"/1/4". COPPER TUBE/STEEL/STAINLESS

210s.jpg


John

Thank you; praise from you is praise indeed. I've seen you as my mentor on this journey, the advice you have given me over the past 2 years has got me through on more occasions than I can remember. Thanks again.

Jason

The lubricator has a check valve and I realise normal practice is to have another in line, I think the ME write up acknowledges this. I'm going to see how it goes, there is an opportunity to fit one in the short line up to the manifold. Actually while writing this I have through of a way of doing it as I have a spare lubricator check valve that could probably fit into the manifold.

Pete
 
A bit more progress since the last update I've made the;

  • firebox door,
  • lid for the oil tank,
  • handrails
  • regulator lever

In addition the fittings arrived from Poly Model so I could get those installed

evn72cqabwzsz354g.jpg


You'll notice that the hand rails aren't as described in the ME write up. To my mind they were a bit half arsed even though they tried to look a bit like whatever records exist of the original

northumbrian.jpg


However, I did like the hand rails Don and his brother did 45 years ago for their rendition of LBSC's Rainhill. So I copied them from Dons photo

(Dons photo is on PhotoBucket so is AWOL currently)

Picture007.jpg


More

286kotgkewetxqq4g.jpg


7b045jf2274l2wp4g.jpg


Only a handful of parts to do now, the couplings, cylinder cladding, blower pipe and the super heaters. I've now found a source of 1/4" stainless pipe for the super heaters so once I get hold of that I can make the pipework for each end. Once that's all done it will be ready for a complete strip down, clean up, paint and final assembly. Oh; and of course then there's the tender........

regards all

Pete
 
Hi DT,

I reckon the wooden handrails look a bit over scale to me - I assume you are hiding the steel frame constriction with them. I think thinner would look better but hey, it's your engine and make it to ring your bells, not mine :) I went for the handrails as drawn - they are pickling at the moment after silver soldering this morning.
 
Pete

It did cross my mind, that's what I had to hand, they are only on there with double sided tape as a try out. On scale; the fittings are a bit big as well, but there isn't much by way of choice. For a loco as small as this its going to be a problem. From what I can see almost all fittings tend to be very similar and can trace their origin back to LBSC's Shop, Shed and Road.

Pete
 
Scale fittings wouldn't fit non-scaled hands :big:
 

Latest posts

Back
Top