Small Locomotive & Boiler (ME Northumbrian)

Home Model Engine Machinist Forum

Help Support Home Model Engine Machinist Forum:

This site may earn a commission from merchant affiliate links, including eBay, Amazon, and others.
looking good ;D

i have a question about your boiler.

at the mo i'm starting work on a 2" burrell boiler. its about 10" long with an o/d of 4"ish (that's the boiler tube). i'm having problems with getting enough heat into it.

how did you go about welding your boiler?

 
Ron

Thanks

I pondered over what lathe to buy, but in NZ there isn't a huge choice of this type of lathe. I couldn't get much by way of reviews either, apart from a couple of Ozzies on HMEM with Hafco's. Once I'd bought it I then found that there are a lot of people out there with a lathe from this range, re-branded by the importer , Hafco, Crusader, Grizzley and no doubt many others. When I found John Bogstandard has the same model I knew there were to be no more excuses.

Arnold

Thanks

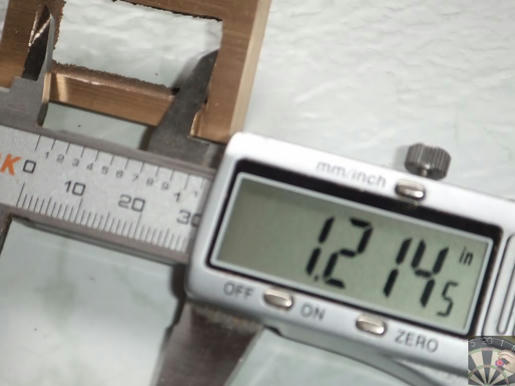
The same thought crossed my mind, but I've built it to the drawings. I also checked the Rob Roy drawings and that's 90deg as well. I'm pressing on, its a long weekend coming up so may just start on the castings.

Blighty

Thanks

I had all those problems and had to work on getting it right, solder, flux, torches, gas, hearth and technique. (no welding involved)

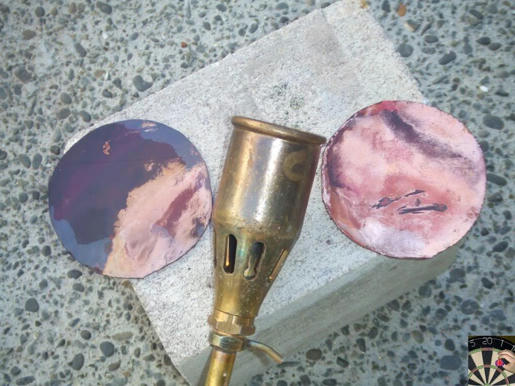
This is my biggest torch 85Kw. I haven't used it this way but I understand 'normal practice' is to have a helper on the big torch keeping the job hot and then use a small torch to heat locally. I've no idea how that works with this flame thrower going. It can get very hot just holding it

bq302kgw2t3266g4g.jpg


Take a look at my other boiler threads to see how well they went, or not. That's why I did this boiler to learn more. Even teh technique of holding the torch at the right distance from the job was realised recently. That big torch is way hotter when 18" from the job than closer in.

Pete
 
Blighty,

When I assisted Stew with the boiler for his 3.5" loco, it took 10 to 15 minutes with a big torch on the outside to get enough heat into it, and that was with a burner like Pete showed.

One thing you musn't do is try to do your soldering without enough heat, once that solder begins to move, you've got to finish the job, otherwise the chemical properties of the solder changes and it takes a lot more heat to remelt it and get it to flow again.

For the larger boilers, which I reckon yours is, it is a two man job to get it done without struggling.


John
 
thx for the tips gents.

i was thinking about putting it on a bad of charcoal and heating it up that way, then go in with the blowtorch.

if that don't work ill see if i can borrow i BIG torch like you have ;D
 
blighty said:
i was thinking about putting it on a bad of charcoal and heating it up that way,

That should work quite well. But you will have to remember that the charcoal will be very hot when burning. So you will need heat protective gloves to do the soldering or you need to somehow cover the fire so there is not much heat radiation.

Regards, Florian

 
Looking at the regulator you are intending to do the superheated version?

Pete
 
Pete

That's the plan, yet to source the stainless tube but I haven't been looking that hard, but that's a bit of a way off yet.

Current challenge is the motion and get the chassis running. I'm slowly working through the various parts and really owe an update here as I've been turning various bits out quite steadily since my last post. I want to get it on air by Christmas, which I think is doable.

Our club is in the process of completely renewing its raised track with the grand opening scheduled for Feb 6 which is a public holiday over here. Whether I get it running for that is another question a bit of a race with one of the other members who is doing Canterbury Lamb, but he started a year ahead of me.

I may do a few more pics over this weekend. Thanks for looking in

Pete
 
I've promised a few more pictures of progress

Eccentrics, nothing out of the ordinary here, just my first set of 'real' eccentrics. I followed the instructions in the write up, more or less.

8dxb466bybb8c3n4g.jpg


I started the water pump and struggled at first trying to work out how to turn the casting I'd been sent into the pump in the drawings. I came to the conclusion I had the wrong casting so fabricated it.

ypu2jqgfak29bk74g.jpg


Water Pump parts

y88du9w6d8dkyud4g.jpg


Assembled

0501ghbobs1qyie4g.jpg


I had to get myself into the right frame of mind before I started on the cylinders. We had long weekend so it was time to just get on with it. After a number of sessions in the workshop it all came together.

Cylinders, end caps & pistons

ml829opbjo0n9pp4g.jpg


Then it was a case of the other bits and bobs,

Cross heads and guides

53xl4vdfrqx2prw4g.jpg


Valve chest covers

8z64r150ro6qsaa4g.jpg


Getting this far it was time to start the trial assembly this needed the main wheels, axles and eccentrics assembling.

Quartering the wheels with gauge blocks holding one drive pin horizontal

b78564887n1lcjb4g.jpg


checking the other is at right angles

3l89y8ol5fule764g.jpg


By this time the assembly bench was getting a bit untidy

xscgalf3jlzvn9a4g.jpg


But its coming together

5r74e26o65dsje44g.jpg


dyabzeuld92fda34g.jpg


You'll notice the valve chests are missing well I started them and then found the cavity in the castings was the wrong size. Replacement castings are on their way.

o9tb2heh54y9lnm4g.jpg


u5qifwqo8m817ot4g.jpg


do88856qfz426w14g.jpg


l78crem1eefr8us4g.jpg


Well that's it so far. It's coming along. Thanks for looking in

Pete
 
Its that time.........

The replacement steam chests are winging there way over here from the UK but I couldn't wait so made some temporary chests from aluminiuim. A bit of fitting to get all the parts working together and some silicon gasket and I've had it running on air.


http://www.youtube.com/watch?v=nEDLqLKn7pA


Now I need to work through those bits and bobs to get it plumbed in.

{edit - now video appears in the link}

Pete
 
Good going Pete ;D - It runs like a champ Thm:

Kind regards, Arnold
 
Wow, that's coming along great! And so smooth and quiet in the video!
 
Thanks Guys

The timing is just an eyeball job for now but it is reasonably OK, you can just hear a bit of a knock in the background but I think that's one of the steam chest guides not quite right. That will get sorted when the new chests turn up. The left hand valve chest was leaking which contributed to the hissing noises.

Only one problem that I realised when it was too late. There is a flat on the main axle for the water pump. I didn't pay any attention to its orientation when I quartered the wheels. The upshot being that the pump eccentric is just about in sync with the left hand valve eccentric going forward and the right hand one going in reverse. It probably won't be a problem but I'm sure would look nicer if all three were out of phase. I can always do another flat.

All in all happy with it.

Pete
 
Another video

I gave it a run on my rollers for a better view of how it runs.

[ame=http://www.youtube.com/watch?v=4qE2vOQyGHY]http://www.youtube.com/watch?v=4qE2vOQyGHY[/ame]

You'll see its bouncing around a bit. If you look at the right hand roller you can see its not concentric (neither is the left one). I could say I designed the rollers this way so they gave the loco a more realistic environment and ensured running in exercised all the drive train components including the axle boxes, springs, rod ends etc. The truth is I had taken some stock 19mm aluminium bar, drilled 1/8" holes in each end and Loctited some 1/8" silver steel in each ends and mounted the result in some small bearings I had. Concentricity wasn't considered. Also the springs are off the shelf DIY store items cut in half, so won't have the correct rate.

Anyway a bit more realistic example rather than ruining in free space with no real load. Most of the noise is the interaction of the wheels and rollers

Pete


Excellent work Peter,

Hope mine runs as well, all praise to the master :bow:

What size wire did you use for the driving and trailing springs out of interest - 22 gauge (0.64mm?) seems pretty thick to me.
 
Thanks Jeff its getting there but still plenty to stuff up yet.

Pete

Thank you as well, I'm quite pleased with the way it runs right now. I don't think I warrant "master" I'm also new to this stuff, a good number of the operations I'm doing for the first time. That's really why I started the boiler just to give making one a try. The running chassis was sort of a logical next step.

The front springs I'm using are 22swg off the shelf items cut in half. They seem about right. The back ones are proving way to light. I'd say the quoted wire guages are correct, you'll be surprised how much they load up with everything mounted.

Pete

 
Smiffy

Thanks for looking in, and very helpful that you did. I had a look over on your Royal Scott, site very nice indeed. I see you say "what is far from a simple model - if only I had known that back when I started!" when the first paragraph of the fist ME article on the Royal Scott says "This model is intended for the more experienced loco builder."!!

Anyway; why was it useful? Yesterday I collected a second hand Simplex that I have purchased, it needs reworking, particularly in the valve gear area. Amongst other things it requires two new cross heads. And the first of your pages I looked at was making the cross heads. They are a slightly different design to the Simplex originals but being Martin Evans they are very similar. The one piece design may well be a better option than the core and side plates of the Simplex design. I may just make them the way you have done them.

Now I've got two projects on the go and I said I'd never do that.........

regards

Pete
 
Smiffy - PS

And just found the video of your Royal Scott running on air with only a single cylinder. Very nice indeed.

(others I suggest you click the link at the bottom of Smiffys post and go and take a look)

Pete

 
Back
Top