Rod's Aussie Shed

Home Model Engine Machinist Forum

Help Support Home Model Engine Machinist Forum:

This site may earn a commission from merchant affiliate links, including eBay, Amazon, and others.
Gus, if you can cut gears, somebody suggested to ditch the motor gearbox and go with a worm drive so the motor runs along the end of the table driving a worm that turns a cog to drive the leadscrew. That makes for a very compact layout. Apparently you can buy the bare motor cheap on eBay.


Hi Rod,

Good idea but Gus has yet to cut his very second spur gear after the first was cut in Trade school 52 years ago. Been viewing YouTube of folks cutting the worm wheel with taps.Will give it a try. Tube made it look so easy.:D:D

Gear cutters has yet to arrive from ctc.com but will be j.i.t.(timely or just in time).Will be cutting a small pinion for the Webster Engine.Been reading Harold Books on Gear Cutting and dividers. :cool::cool:

Have all material on hand to build Webster. Taking my sweet time.Base and frame is up with blank shaft fitted in. So far so good. will post tonite.
 
Gus, if you can cut gears, somebody suggested to ditch the motor gearbox and go with a worm drive so the motor runs along the end of the table driving a worm that turns a cog to drive the leadscrew. That makes for a very compact layout. Apparently you can buy the bare motor cheap on eBay.

Or use a pair of bevel gears out of a garage sale angle grinder to both reduce the gearing and turn it through the 90 degrees. I am working on something like that for fine feed on my old Drummond lathe.
 
Well, had a good run today with the lathe stand. I decided to make up a quick jig to see how that worked out


The scraps of wood were pretty wet as they had been sitting on my materials rack but I have bought the iron for the roof this week.

Tacked up the top rails and then started to weld the legs on


And got it on its feet


And added the bottom braces using a spacer to keep it all the same height.


I needed to clamp a couple of the braces but overall I was amazed how square I managed to get things.


All went together OK.


Time to check out the drawer units and work out how to mount them up a bit higher


No spare room and I am really pleased after all this work that it all fits in place

Anyway, this looks better


The centre mount is made out of 50x5mm steel hanging down for above. Make sure you allow enough room for the weld fillets.


The side mounts are 25x25mm angle iron I had on hand.


Time to move on to the cross members that the lathe mounts to. They need to sit up a bit from the frame so I made up a spacer the right height.


There only needs to be two of these cross members to hold the lathe but I added a third at the headstock end.


Another view


Now we are talking. I have pushed a piece of aluminium angle iron in above the tool box as it had a bit of a gap. It is only sitting there at the moment, I have to figure out how best to mount it.


Now with the adjustable feet fitted.


And now the reason for the hole in the back.


That was for the coolant tank and drain fro the drip tray. I am not happy with the angle iron side mount here. I am going to remove the back section of the angle iron and support it with a hanger from above. This will let the coolant tank slide straight out from the end for servicing.


You can see the holes in the legs to mount the removeable wheels.

I just hope the lathe lines up with the mounting holes. I went off the manual initially which said the holes were 722 mm apart but when I measured it up, it was 726mm so I was pleased I checked. To measure the distance of the lathe mounts, I removed the bolts and pushed a transfer punch up from below so I had a reference point near the hole centre to work with.

It is still only just tacked up so I need to finish off the welding and figure out some mounting points for the drawer units and work on the wheels etc. It should be complete tomorrow but I don't have material for the bottom shelf so It probably won't be ready for painting until next weekend.

So what should I use for the bottom shelf? MDF, PLy, steel, ally checkerplate? cast your vote and help me decide.
 
Well, got a bit more done today. I came up with some pretty cool ideas last night after a bit of prompting via a few emails to and from a mate I met on the forum here so I had a bit of a change of plan.

But I am getting ahead of myself. I welded up the frame totally and sorted out how to mount the toolbox and drawer unit into the frame. The tool box was pretty easy. First I welded in a hanger so I could cut away the angle iron seen in my previous post so it was not in the road of the coolant pump. Then all I did was weld on a tab and drill a hole in it and the hanger and inserted some nutserts into the toolbox. so I could screw it in. You can see one of the M6 bolts screwed into the nutserts in the top left of this pic.


The easiest way to secure the drawer unit is to use the existing M8 threaded holes for the handles. Beauty! this was a chance to use my transfer screws I bought recently from little Machine Shop. They are pretty cool


The toolbox obscured one of the bolts so there is only one on the inside


Now it was time to start work on the cool ideas from last night. I grabbed the identical drawer unit in my shed that I had sitting above the left hand grey drawer unit.


Hmm, I really need to do something about that droopy shelf. I actually have plan tat will fix it, so bear with me.

I decided that if I hung the second drawer below the first one, I would have 80mm clearance under the for long pieces of stock maybe some 35x50mm steel bar for tool posts and the like. Call it balast down nice and low for stability. I decided to just hang the second drawer down on the bolt holes.


on both sides. You can see the tab I welded on to secure the toolbox with a M6 bolt into a nutsert.


And from the front, this is what I now have


You can see I added a couple more cross members on the bottom shelf to handle any extra ballast I add by way of materials on the bottom shelf.

Just for fun, I jammed the lid of the toolbox I had removed last week in above the coolant pump. I am not sure if I will fit this here but it is food for thought as a bonus shelf!


I would have to drill a hole through the shelf for the coolant return drain if I want to utilise this space.

From the side it now looks like this.


The coolant tank can just slide out of the end of the stand for servicing. Cool hey!

So the plan is to get some light steel plate (1.6mm or 2.0mm) and make a shelf and build a wall around the coolant tank on the front and the left hand side.

Then I should be able to make a short material rack below the tool box for short pieces (up to 500mm long) for special stocks like brass etc.

If I choose to use the toolbox lid, I will also end up with a bonus shelf above the coolant tank.

So after this heavy thinking last night, I can see that it is going to work out but I have inherited another project.

You see, if I cut away the bottom busted shelf the lathe landed on, I think I can just make it fit where the red toolbox was in the shed. That way it will look all consistent.


Anyway, stay tuned. Hopefully this will get finished off next weekend if I can round up the flat plate material during the week. I have decided I will paint the frame Henry Ford black so it matches the red and black theme of the Seig SX3 mill and stand.

Cheers guys, I am really pleased with progress to date and the cool ideas I had last night.
 
looks good mate can never have to much storage space.
 
looks good mate can never have to much storage space.

Thanks Cam, it would look better painted. I wish these things painted themselves.

Another observation is that I am glad I have a desk job! I can hardly move this morning so hopefully will recover by the weekend for the next instalment.

You don't realise that you are working when doing something like this but gradually, the thing you are making gets heavier and must make you work hard by the end.
 
Well,I have added a few more features during the week and have the stand prepped for paint which I hope I will get done after work tomorrow.


You can see I have welded a couple of bits of SHS in the corners to mount a cover panel below where the tool box goes to hide the storage area


I remembered that I had a heavy duty set of drawer runners rated for 100 kg, maybe more that I used to use as a fridge slide in a vehicle and I have never found a spot they would fit as they are 550mm long. Anyway, they are a perfect fit for this space. They overextend so the whole drawer will slide right out for access.

The storage area will not be very wide, maybe 4" or so but it will be nearly 12" deep.

I've also got material for the bottom shelf and cut out ready to fit.

Not shown, but I also rotated the coolant pump to gain clearance as the housing for the starter capacitor was fouling the frame.
 
Rod it looks awesome. I think I will do the same for my lathe since I have to build a stand for it anyway. "G"
 
Rod it looks awesome. I think I will do the same for my lathe since I have to build a stand for it anyway. "G"

Thanks. Don't underestimate the effort involved I have put in 5 full days and a couple of afternoons so far and the lathe is still not on it yet!

We've got a long weekend so hopefully, tomorrow it will be in the shed. I figured there were too many little things to do and if I did not get it all done, I would never do it.

Anyway the middle of winter here so not very good paint drying weather so I decided to paint the stand Friday evening as I knew the paint would need 24 hours + to dry. That way, I could do the fiddly stuff the next day that did not involve knocking the paint around.


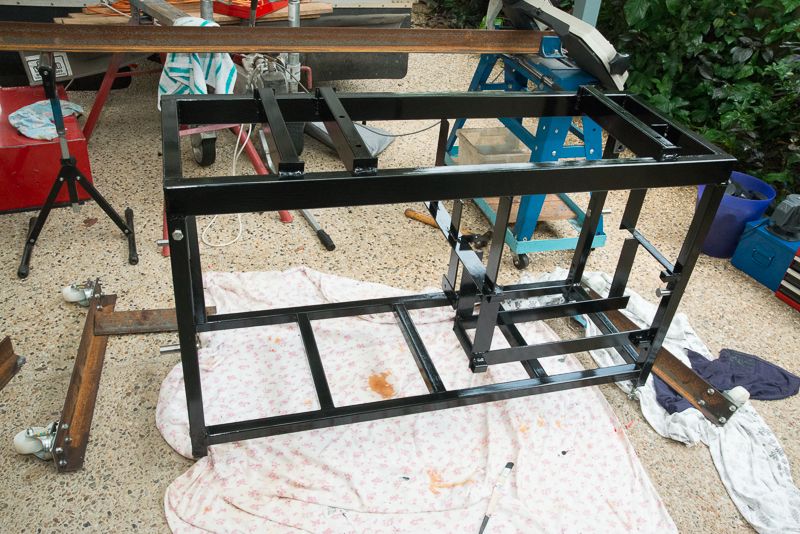
Chris down the road suggested adding some lifting lugs on top of the frame but it will be all covered by the drip tray so there is no room so this is what I came up with on diagonal corners


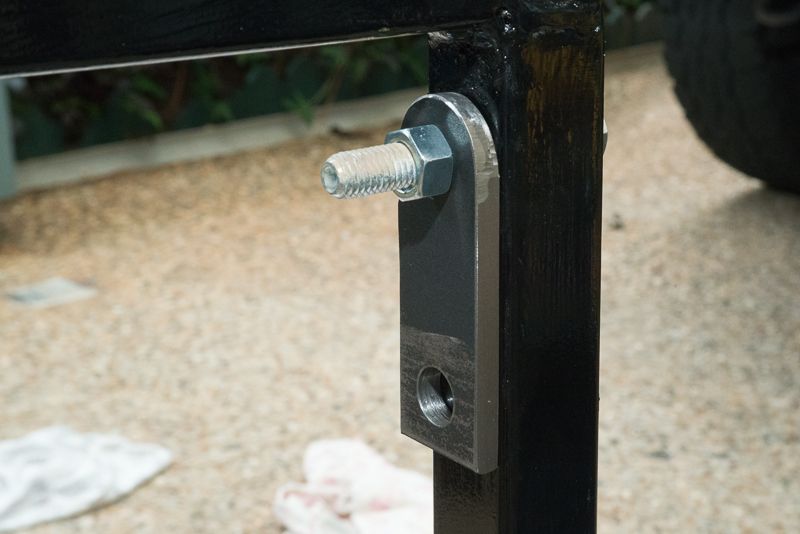
So to sling the lathe, stand and all, they will just swing out


Yeh, I know the bolts are too long and I will fix that eventually.

Then I spent a fair bit of time making up 4 pins.


There is not a lot of clearance between the leg and the tool box, hence the very flat head to it. I was very pleased with the accuracy and I worked out how to keep the dimensions the same on all 4 pins. I still need to remember I have a big lathe and can turn down a pin 6mm in two passes! Wait until I have coolant!

The next step was to drill holes for casters and figure out how to mount up the legs.


You can see I ended up buying a set of 125 kg casters from Richmond Wheel Co so I knew they could handle the weight of the lathe. Anyway, inspiration came to me and I headed back to my shed to play with my new toy


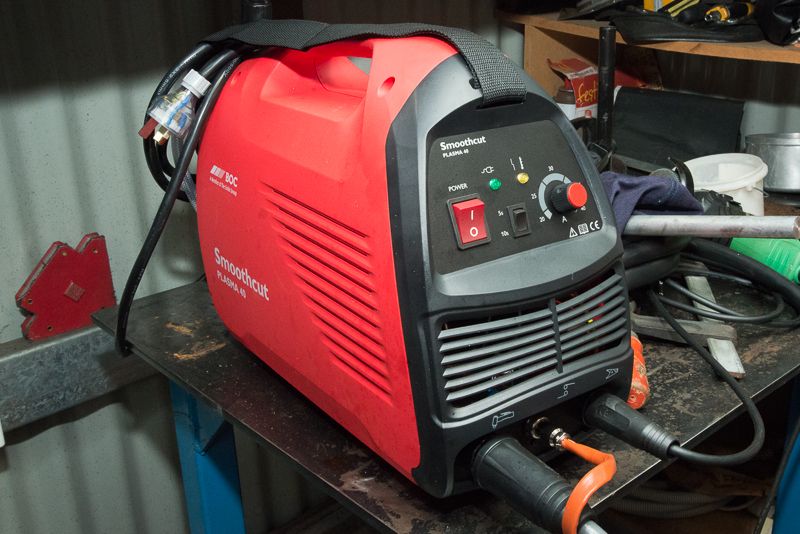
BOC had a special on plasma cutters and I got this for about $550 which I thought was very good value seeing the no name eBay ones are about $450. Best part about it, I don't have to pay for it until next month!

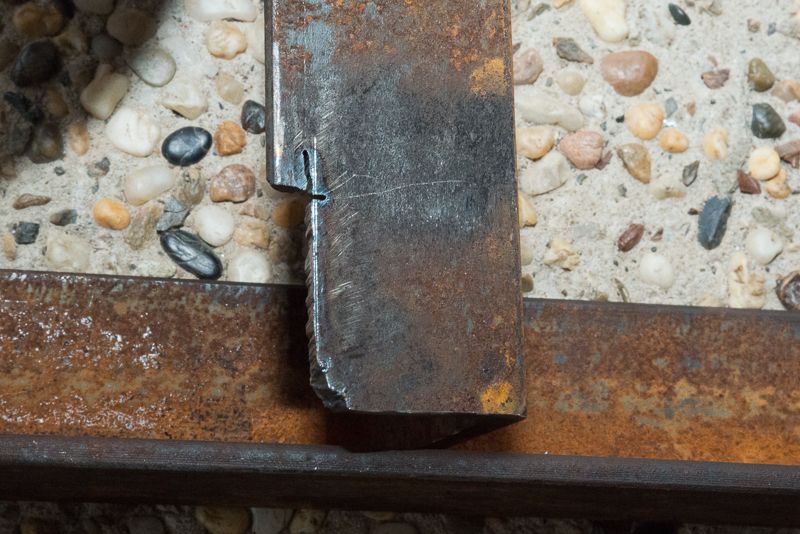
Anyway, my first cut was a live one and you can see I got a bit excited and cut too far!


Anyway, that is as far as I got on Saturday. This morning, I started on it again. I just have to work out how to drill the holes in the pins.


Back to the shed again. I decided to see if I could use a 5C collet block and a collet stop from Little Machine Shop to simplify things.


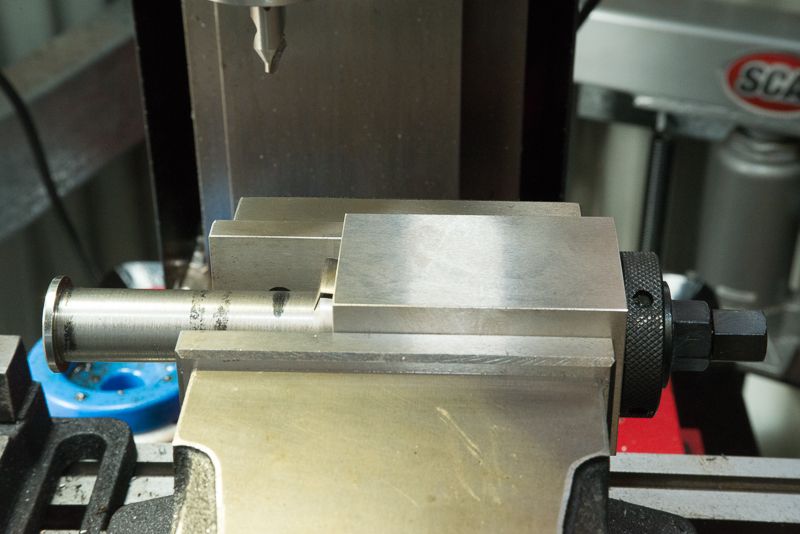
I found the edge of the pin and centre drilled a pilot hole seeing as I have not got any spotting drills yet.

Then drilled it out to 11 mm for an M10 bolt. I wanted plenty of clearance to make it easy to put together.


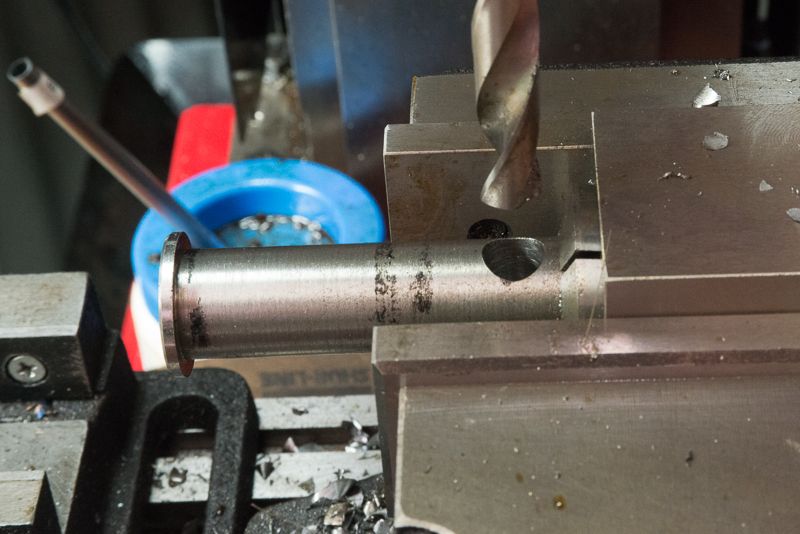
the collets worked perfectly. I only needed one setup for all 4 pins and they were all perfect. The spring loaded collet stop ejected the pieces as soon as the collet was loosened. Being a collet the pins remained centred under the mill spindle.

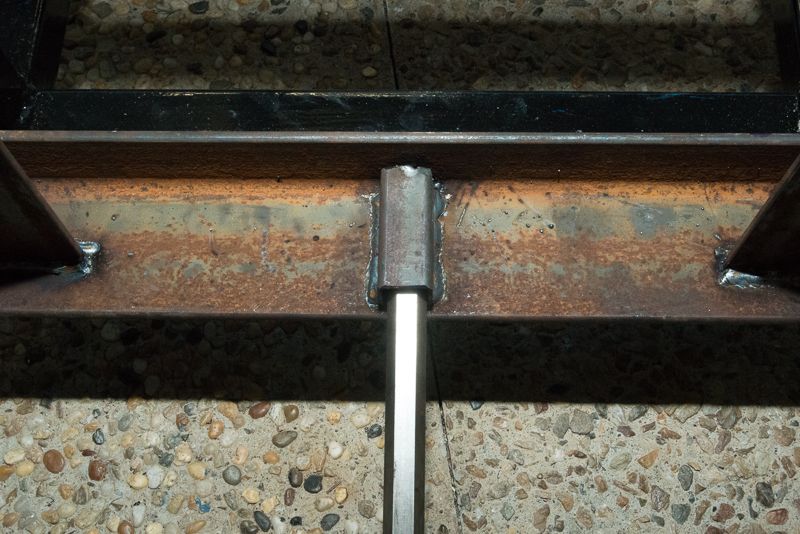
I used the plasma to shorten some angle iron brackets for mounting points to the pins. No accuracy required on these parts and the bench grinder tidied up the visible edges. I drilled the hole in the tab after the tab was welded on using the first hole as a guide.


When I welded the tabs on, I put some packing (probably 1.6mm) in with the pin so there was plenty of room.

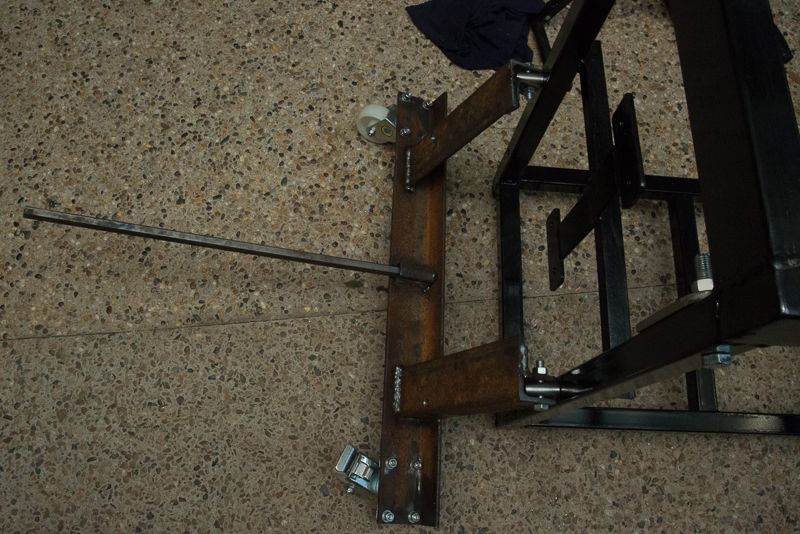
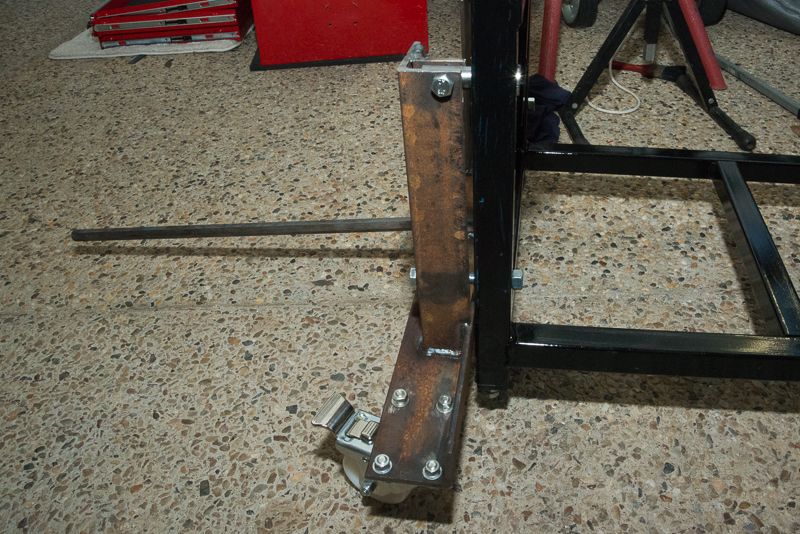
Then weld the uprights to the caster support plates. I did this with the uprights mounted to the pins so I had the clearances set right.

then some 25mm SHS to hold my jack handle


I cut down 600mm of 5/8" hex for now. Its a bit loose. A 20mm rod would be nice and snug and might need reducing to fit on the lathe. I will sort that out eventually.

So this is what it looks like now:


And in the lifted position, secured with a 12mm bolt. I had already drilled a 13mm hole in the leg, so used a transfer punch to mark the hole position. This made it very easy to drill.


So the theory is to bolt on the legs at the top and just stomp on the lever


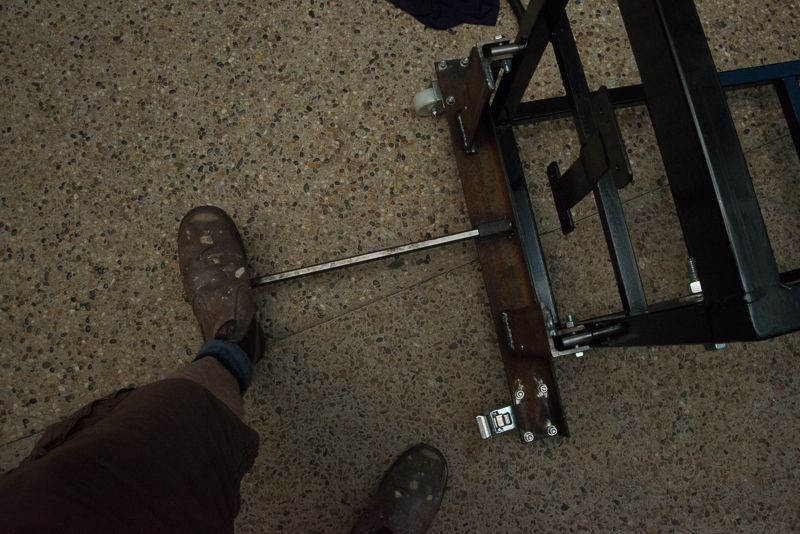
and bend down and secure the legs on with the bottom bolts.

So tomorrow I am going to see if I can mount up the drawer runners, make ad mount a front panel to hid the drawer and assemble it. Hopefully, that will include mounting the lathe. Painting the lathe early has worked out OK, might need a bit of touching up at the end in places that are visible.
 
Excellent thread Rod, love the toolbox storage deal, lookin sweet !!!!!!
 
Excellent thread Rod, love the toolbox storage deal, lookin sweet !!!!!!

Thanks ZipSnipe you can see why I have not made any progress with Power feeds and Rotary Table controller..

Anyway after six full days, the lathe is on and its in the shed. Before I put it on the stand which was bit of a mission in itself, I decided I better add a coolant drain. Chris down the road suggested I press two sockets together to make the drain and then weld on some steel tube. Well, I figured the drip tray would be Sikaflexed too tight to the lathe to remove it, so I did it in situ by drilling a 12mm hole and using a M12 bolt.


So I had finally found a use for some imperial sockets :eek:


Great idea Chris!


1 found steel 3/4" hose joiner at an irrigation shop the other day and I parted it in half.


Now I knew I would have trouble welding this tail on the underside with an overhead weld. I had it looking pretty good and of course I decided to fill in a pin hole and of course I blew a huge hole in the tray. I gotta get some grinding tips for my Dremel before I show you some photos of this but it will work out OK. I just bolted the tail in place to hold it while I was welding. If there are leaks, I will smother them with Sikaflex :D

And here we are back in the shed!


I still need to add a couple of bolts to the front of the drawer runners ( need a right angle drill for that). I thought about it was I welded it up but decided I was not sure how it was going to fit together so would worry about it later.

The drawer is only about 145mm wide but it is 55 mm long and rated for 100 kg's I need to make a checker plate drawer for it to match the rest. I have the material (in 3mm), but no way to bend it so I might just ask somebody to make it for me. Anyway, it should be handy for special stocks like brass etc. It is good to finally find a home for the drawer runners which are rated for 100 kg and cost me about $150 about seven years ago.

And I am pleased to report my lifting lever did the job. to move it into position, we lifted the heavy end onto the wheels by stomping on the lever and manhandled the light end.

Also, with legs under each of the 4 corners of the lathe, now I have leveled it, it is as solid as!

I have a few things still to do. eg. Enlarge the hole in the coolant tank for the drain because the hose I need to use to match the tail is larger than what came with the coolant tank, mount up the plumbing up to the lathe and get the splash guard back on and sort out the drawer. I will probably touch up the drip tray as it has got a few scratches on it. Hopefully, I will get it tidied up during the week. That is unless, I just stand in front of it every evening and just admire my handiwork.

Oh and I am calling for ideas on how to add some sort of screen on the return drain.
 
Much betterer!
A lot of work but well worth it.

As far as screening the return drain... the suds pump on the Horiz. Bandsaw at work has a built-in conical strainer in the top of the reservoir. The return hose just dumps into it. I reckon you could easily do something similar.

Got a kitchen store like 'Matchbox' nearby? They usually have stainless steel conical strainers:
https://www.google.com.au/search?um...5.681.3-2.2.0...0.0...1c.1.16.img.Bz-lajnZ5ow
 
Last edited:
Oh and I am calling for ideas on how to add some sort of screen on the return drain.
__________________

Pretty good looking set up Thm: You'll love it mine is set up
on tool box and would never go back to the standard rack

as for your return I'm suggesting this unit
remove the cap, and secure it upside down or make some kind of pipe adapter and push it in
 
as for your return I'm suggesting this unit


Thanks Luc. Did you mean to add a link?

///

Thanks for the idea. Maybe I just stick a conical strainer in a funnel in top of the lid and let the hose empty into that? That would be nice and easy and also very easy to service too.
 
Thanks for the idea. Maybe I just stick a conical strainer in a funnel in top of the lid and let the hose empty into that? That would be nice and easy and also very easy to service too.

Probably wouldn't need a funnel, just open out the hose hole so the strainer will sit nicely without falling thru.
This is the one on the bandsaw at work: http://www.machineryhouse.com.au/P235
Can see the strainer in the top, return hose just sits in that.
 
Brilliant job Rod, looks great! Very good use of storage space now.

cheers, Ian
 
Probably wouldn't need a funnel, just open out the hose hole so the strainer will sit nicely without falling thru.
This is the one on the bandsaw at work: http://www.machineryhouse.com.au/P235
Can see the strainer in the top, return hose just sits in that.

Simon, Thanks. I think you are telling me to enlarge the hole in the top of mine with my new plasma cutter to take a conical strainer! Now you are talking woohoo1

Brilliant job Rod, looks great! Very good use of storage space now.

cheers, Ian

Thanks Ian, yes nothing like storage space. I will say since I have added all of the storage drawers etc in my shed, it keeps itself cleaner as everything has a home.

Very good mate, looks a lot safer to boot!

Yes Dave, it is really rock solid with a leg in every corner. Much more stable!
 

Latest posts

Back
Top