POWR-KRAFT (Logan) Lathe Info

Home Model Engine Machinist Forum

Help Support Home Model Engine Machinist Forum:

This site may earn a commission from merchant affiliate links, including eBay, Amazon, and others.
Update...

Spindle bearing cover LA-194 is now installed. Indeed, the piece that was screwing up the works was LA-195. It was installed backwards, as suggested, and was keeping 194 from sitting correctly. The bearing looked to be in good shape and was retained by a clip. I added some grease and put 194 and 195 back on.

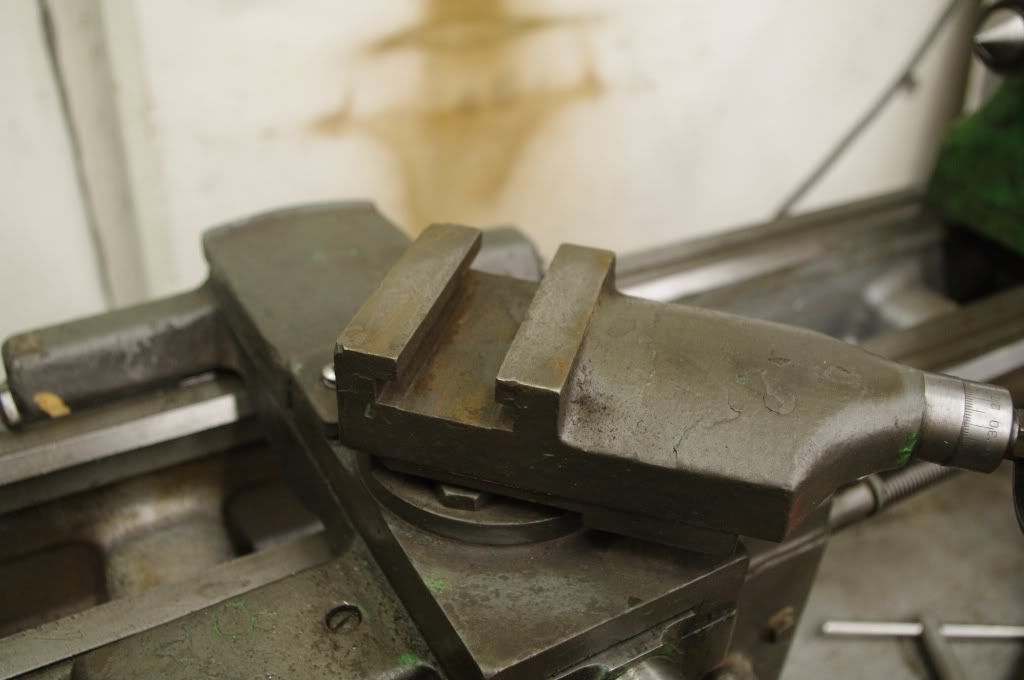
AND! I pulled the jaws out of the 3-jaw chuck to have a look at them. They are indeed worn. :( The #1 jaw was not even square. Was warn on the tow and heal. Can they be reconditioned or should they just be replaced? I thought about putting them in the mill and facing each one square, again until dimensionally they all matched. Is it worth it? Not sure if I can get jaws for it. It's made by Falls Products. Don't know if they're even around anymore.
 
I've used the Little Machine Shop QCTP on one lathe for 3 years and on a second lathe for 6 months. No complaints.

I don't recognize that chuck name, maybe someone else has? Many times those jaws are hardened and will be a challenge to mill. Cost of one trashed carbide end mill = cost of one import chuck (often of decent quality). Pays your money, takes your chances.

Cheers,
Phil
 
Philjoe5 said:
I've used the Little Machine Shop QCTP on one lathe for 3 years and on a second lathe for 6 months. No complaints.

I don't recognize that chuck name, maybe someone else has? Many times those jaws are hardened and will be a challenge to mill. Cost of one trashed carbide end mill = cost of one import chuck (often of decent quality). Pays your money, takes your chances.

Cheers,
Phil
That's good news about the QC tool post! I think I will give it a go!

Here are the jaws removed from the lathe. Looks like they were once 1.800" long, .618" wide and have an adjusting pitch of about .288". Any chance that someone might know of a replacement jaw?

There is a Falls Products that makes de-burring machines, but aren't even in the same location as the one that made this chuck, so I'm thinking it's an entirely different company.

This is frustrating...
 
Ok! I ordered a QC tool post and an adapter for one of my other smaller 4-jaw chucks. It will have to be machined, but that will be a great project once this thing if finished.

Also, I talked to a machinist over the weekend that said I can save my 3-jaw chuck by locking the jaw outward (inside a tube) and use a carbide tipped boring bar to re-surface and true them up. That is great news because I had no luck finding new jaws and it would be a shame if it was destined to be a paper-weight.

Thanks for everyone's help! You folks have been great! Can't wait to start doing something useful and fun with this machine!
 
Two things wrong with your method of truing up your chuck.

1. If you want to hold the work with the outside jaws, that is hold a piece of round bar, you have to have the jaws clamped in, not out. The easiest way to do that is is to tighten the jaws on a thin piece of round (like a hard washer) at the very inside end of the jaws and then remove that shoulder after truing up the jaws, It is much easier to grind the jaws than to bore them.

2. When you have completed this operation, you will have a chuck that is precise at the diameter you ground them at, but may be worse than it is now at any other diameter. The wear is in the scroll and is not uniform for all diameters. Grinding or boring the jaws is legitimate to correct for bell mouthed jaws but otherwise is usually a waste of time. Think about it logically. Why would one jaw wear more than the other two? Also remember the scroll would wear more where it is used the most.
 
Stan said:
Two things wrong with your method of truing up your chuck.

1. If you want to hold the work with the outside jaws, that is hold a piece of round bar, you have to have the jaws clamped in, not out. The easiest way to do that is is to tighten the jaws on a thin piece of round (like a hard washer) at the very inside end of the jaws and then remove that shoulder after truing up the jaws, It is much easier to grind the jaws than to bore them.

2. When you have completed this operation, you will have a chuck that is precise at the diameter you ground them at, but may be worse than it is now at any other diameter. The wear is in the scroll and is not uniform for all diameters. Grinding or boring the jaws is legitimate to correct for bell mouthed jaws but otherwise is usually a waste of time. Think about it logically. Why would one jaw wear more than the other two? Also remember the scroll would wear more where it is used the most.
Yeah! Duh! Good point! Of COURSE the diameter of the cut is going to change. Brain fart!

The jaws are worn strange. It seems only ONE of the jaws is damaged. The other two match dimensionally and the third seems to be worn on the heal and tow of the surface, essentially giving it a curved face with the highest (or longest) dimension matching the other two jaws.

Okay. NOW! With my blunder been admitted, can the correct process be explained to me? What is the correct grinding process?? Should I just send these out??
 
I found this video on Youtube...

[ame]http://www.youtube.com/watch?v=IAtASZxDaf4[/ame]

It explains one of the grinding processes. Is this what I have to have in order to true up those jaws? Is it the only way??
 
The video doesn't show any method of loading the jaws so I don't know what keeps the jaws in place while they are being ground. If you have a tool post grinder, then certainly use it.

Doing model work, my chuck jaws get worn at the tips from holding short pieces (bellmouthed) and I regrind them with a Dremel mounted in a simple holder. As I said in the previous post. I look in my junk for a hardened washer about 1 1/2" in diameter and put it at the very back of the jaws and tighten the chuck on the washer. When the stone has cleaned up all three jaws, I remove the washer and grind the shoulder on each jaw where the washer was clamped lower than the newly ground jaw. I lose the thickness of the washer on the length of the jaw which is no big deal.

I looked at the hobby club method and haven't seen that method of loading the jaws but it looks valid and they give a good description of what they are doing. They use a pencil grinder instead of a Dremel and remember to run the chuck in the opposite direction to the grinding stone.
 
Thanks Stan! When you first described the washer method, I didn't fully comprehend, but I can visualize it now! Makes sense. Thank you for the info!

I also saw another method, while doing some searches. I saw where 1/8" pins were installed into the chuck jaws so they could be loaded in a similar fashion to your method without having to move the washer.

During my search yesterday, I also ran across a publication on restoring chucks, so I ordered it.

Got to thinking last night that maybe the reason the jaws are worn is because there's too much play in the jaws themselves or maybe the scroll plate is actually worn out...

...How much play is too much play in the jaws? How could I tell if the scroll plate is worn?

Thanks again for your input, Stan!
 
...How much play is too much play in the jaws?

Like everything we do - it depends.

Depending on the type of work you do and the repeatability required plus numerous other things, if the chuck does the job that you require, then it is not worn too much. If, on the other hand, the chuck continually frustrates you, then fix it or replace it.

For example: If you put a 6" diameter chunk of flame cut material in the chuck to make a flywheel, then .015" is immaterial but if you just want to true up a 1" diameter bar so that you can cut a 1" thread then it is not acceptable.
 
Right now, I would say that the chuck is in the "completely unacceptable" range. With even a 3/8" diameter piece of stock I'm getting .030" (very possibly more) of orbital run-out. I would use one of my 4-jaw chucks to achieve a more precise cut, but would certainly like to have a usable 3-jaw for doing quickie cuts.

Spending some time with this 3-jaw chuck, the real problem seems to be the inability to hold a part parallel to the center-line of the spindle. The orbiting increases as you move further away from the chuck jaws and there is actually visual gap in the #1 jaw when anything is mounted.
 
Update...

Getting closer to making chips!

First: Countershaft busings are replaced! WOW, what a difference! One bushing was almost completely worn thru one one side. Things are looking good in that department.

On to other things, though. My quick change tool post came. Pretty cool! Except... Something is very obviously not right here...

(I know this is stupid, but this is my first time dealing with anything like this)

What do I have here? I ordered an AXA 100 style and it confirms it right on the box. Am I missing the block that slides into the slot or do I have the wrong tool post? ???

(original on the left)
IMGP8368.jpg


IMGP8370.jpg


IMGP8371.jpg


That is the standard block that you have to machine to fit your lathe unless you bought it from Logan who machine the block for you. No two brands of lathe use identical mounting, so the seller of these tool posts just gives you a block of steel to make your own.
 
Stan said:
That is the standard block that you have to machine to fit your lathe unless you bought it from Logan who machine the block for you. No two brands of lathe use identical mounting, so the seller of these tool posts just gives you a block of steel to make your own.
Oh!! Awesome! I was pretty much thinkin' I was going to do that anyway. Pretty simple! Was thinking a T-nut style would probably work pretty good.

Thanks for the reply!
 
You are right to make it in a T nut shape. It give you room for a lot more threads.
 
Scoot.

I own a Logan model 200 made in 1947, this is essentially the Model 825 but mine was not supplied with a quick change gearbox, your model is very close to the 825 free standing bench type. The previous owner of my machine was a clock maker and he made some superb work on this machine right up until he died two years ago that’s when I got it and I am the second owner.

This is my second lathe in the shop and I find it gets used far more than the Atlas 12” I own, all my threading is done on the Atlas as like I stated the Logan has no QC and I do not possess all the change wheels yet. I find it flawless and a joy to operate, it’s well-built with quality castings and the saddle, crosslides and compound slide are accurate with the jib screws being very responsive to slight pressure.

Here is the one negative I have ( or had ) with it, vibration from the motor base traveling through to the headstock, which in turn could be recorded into your work, I did some research on the Logan group on Yahoo and it was established my model had a leg that was supplied from the factory that was attached underneath the motor base and grounded to the floor, I purchased mine at an auction and I am sure they lost it while transporting the lathe to the sale same with the change wheels.

On your reply 22 of this thread I see in one of the photographs you have the cast base with motor base attached, you may want to check into the history of your machine to establish if it once needed this said attachment. I did not bother to purchase the correct leg I just fabricated one up from pipe and made my own. I still have a little vibration after my mod , but in the future I have this dream to install a line shaft assembly and drive both my Logan and small milling machine to make it look Edwardian. Here is a picky of mine.

All the best Anthony.


Logan200IMG_2205.jpg
 
Anthony,

Great lookin' machine, there! I'm intrigued by the story of it being owned by a clock maker. One of the things I would really like to do in my shop (some day) is build a replica Seth Thomas Tower Clock Movement. Without straying too far off-topic, do you know what kind of clocks he was building?

Very good note on the vibration. The POWR-KRAFT Lathes did not come with a leg, or at least it's not shown in the manual and parts book as being standard with this model. How it mounts now is simply a heavy 1/2" (or maybe 5/8") plate that goes between the leg and bed foot that extends out to the motor support. I suppose it would be possible to make a stand for it to isolate it better. Or maybe even mount it to the wall. Alignment may get difficult. OR! Maybe use a floor plate that would relate the stance of the lathe to a remotely mounted motor support, as suggest. Would probably still need to be tied to the bed, one way or another, to insure accurate tensioning on the flat belt (similar to how yours is attached by the lower portion of the case). Anyway... Great thought! I'm getting closer every day to making chips. Once I get it working and dialed in, I'll be able to determine if that modification would be needed. I'm definitely going to keep that in mind.

I'm very excited about the comments made here. I'm feeling pretty good about picking this machine up...
 
Another thing that may need attention are the saddle gibs. I have no idea what condition they are in or really how they are even adjusted. I haven't paid much attention to how much play there is in the assembly, but with a lathe this old, I suspect I will need to restore or replace them.
 
Anthony: Just to clear up the different models of Logan lathes. The 825 is a cabinet model with underneath drive (completely different drive than yours). The 820 is on a metal pan with cast iron legs with the motor mounted behind and below the pan with a leg to support it. The 822 has the same headstock as the 820 but is a bench model which you bolt down to your own bench and it has a motor mount assembly which you bolt to the bench behind the lathe.

If you spend time on the Logan user group you will see every possible combination of these that people have made up using parts from two or more lathes.
 

Latest posts

Back
Top