Philp Duclos "Victorian" IC engine Project

Home Model Engine Machinist Forum

Help Support Home Model Engine Machinist Forum:

This site may earn a commission from merchant affiliate links, including eBay, Amazon, and others.
Steve,

A support collar behind the gear and a centre support on the front will help to cut the gear in one pass, which is the way I was taught, even with a single point cutter and even on steel gears. :eek:

All the burrs etc. are then removed once only. Mating the gears is best done with brasso.

Hope this helps. ??? ???

Best Regards
bob
 
Bob
Okay... I'll admit I'm often a bit of a skeptic and being my first gears, I naturally took the cautious approach. After posting the loss of the first small gear, I chucked up new metal and managed to eat a second one, while making multiple mind numbing passes. Since the setup was already at the depth I wanted to reach, I decided to put your suggestion to the test. I made the cuts in one pass.

It worked like a champ and the cutter didn't seem to care that it was doing a bit of heavier lifting. It actually gave a much cleaner cut with far less burring and flash to deal with. The gears are now nicely messed and the metal polish is quickly working the burrs out and things are getting smoother. Success is not far away. All I can say is thank you for the push.

Steve
 
Steve,

Glad it worked :big: :big: :big:

Best Regards
Bob
 
Could you please give a short synopsis of the use of 'Brasso' to bed/seat the gears Please. I have never had the occasion (read: courage) to cut a gear. How is the polish applied to the gear set and how is it bedded? I apologize for the sidebar, but I am curious and just know that the time for my having to perform this task is approaching rapidly.

Thank you

BC1
Jim
 
Jim
Cutting the gears leaves a bit of burring on the teeth and in the gaps. Once the gears are meshed, you can feel the friction / binding they cause in the fit. Bob uses Brasso while I used a metal polish called MAAS, which has a bit of microscopic grit in it. Simply apply the stuff onto the gear teeth and run them against each other. Right now I'm doing it by hand, but will later turn them slowly under power so that they can finish lapping (bedding) against each other. It will soon create a nice smooth running fit.

Having a fine metal polish in the shop is almost like having another right hand. It can be used for all sorts of fine finishing. I use it not only for polishing metals, but also for lapping bores, lapping surfaces and removing scratches from my plastic lens glasses. Crest tooth paste is also good for these things, if you have nothing better.

Steve
 
Thanks Steve, that makes sense and I had an idea that is what was happening but having zero previous experience in the matter, had no idea as to exactly the method was performed. I hope that when the time comes I will be able to have remembered that small trick.

BC1
Jim
 
I am absolutely in awe Steve that parts are looking great.

Enjoyed the chat this evening and looking forward to talking again.

Bob
 
You guys are still here?....LOL Okay we'll keep going. It's a little hard to stop when you know you're being watched.

The project cleared a couple of hurdles over the past two days. The rings were turned from the remaining small piece of Durabar cast iron and then I launched off into uncharted waters. Cutting the rings was no big deal. Lots of care was taken to get the dimensions right and the end product was 2 small rings measuring .750 x .0625 with a wall thickness of .0312. That is 1/32 of an inch for those who are still getting used to decimals. The darned things even felt fragile.

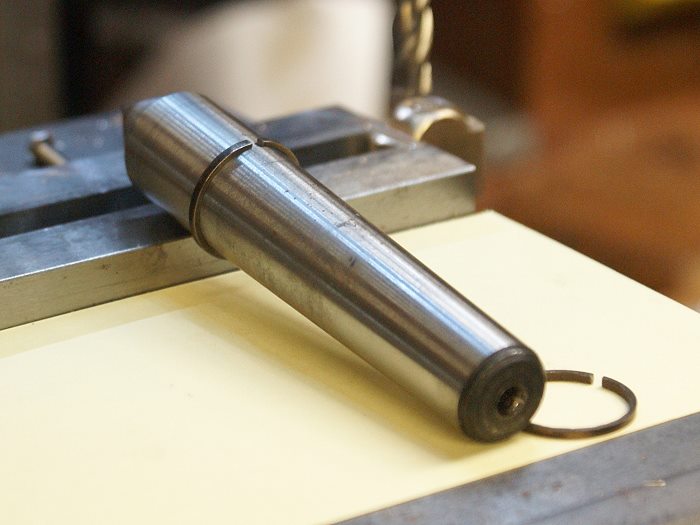
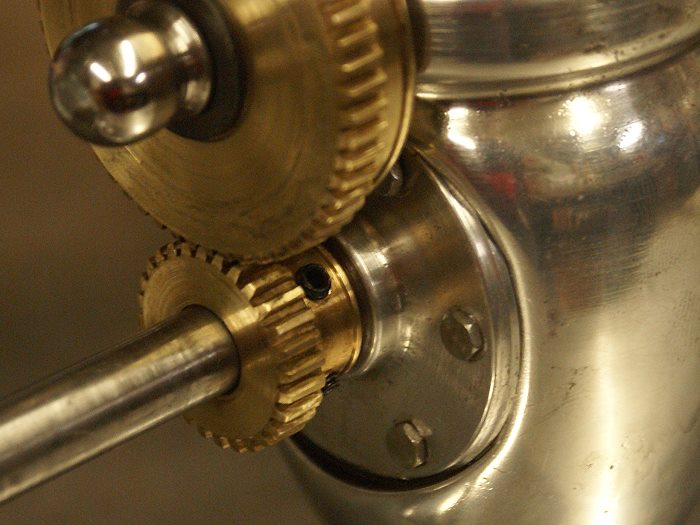
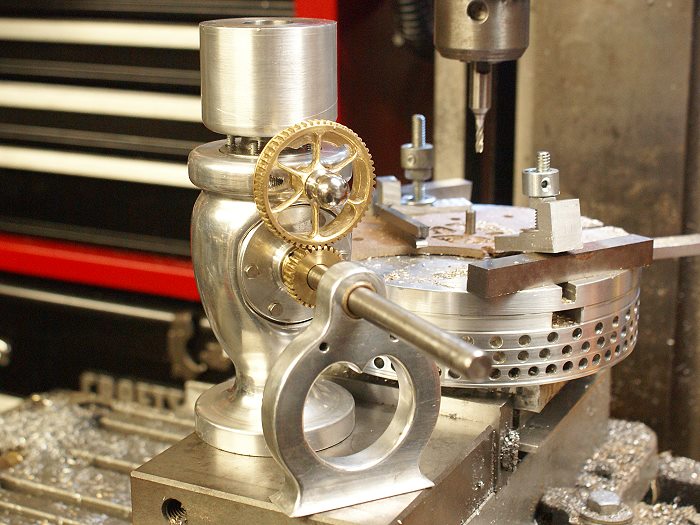
Now.... the rings had to be split. Thank the gods for good advice from a local friend and machinist who builds IC engines. On my recent visit, he showed me a couple of tricks I didn't know I needed. One was the easy way to split a cast iron ring that looks like it would fall part under any sort of stress. The photo below shows how the the ring splitting was done. It was slipped over the end of a MT2 taper and then gently struck with a piece of brass. It split cleanly and happened so fast that at first I thought the piece had broken.

The photos were taken after the rings had been completed, so bear with me when you see the gaps are already opened.

ring-split.jpg


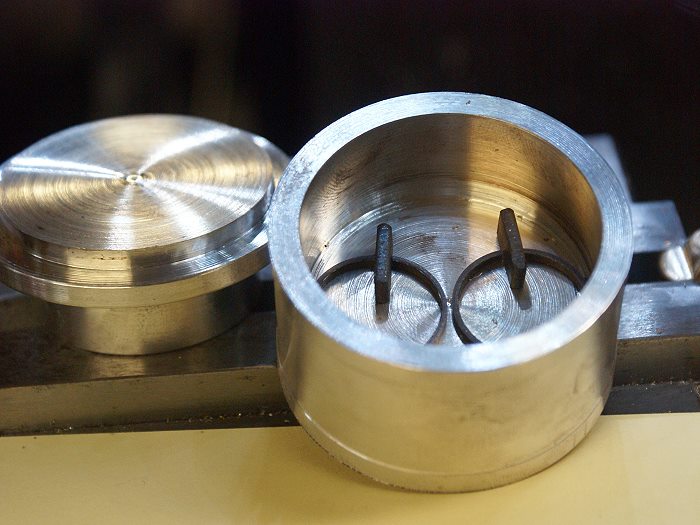
The other trick my friend John shared with me was his method for heat treating the rings to prevent warping or uneven heating. He showed me his little aluminum "can" that he made for just that purpose. The rings needed to be expanded so they will spring against the cylinder walls. This is done by placing a spacer in the gap and then placing the rings inside the "can" and closing the lid. The can was then placed in the kitchen oven at 500° for an hour and then left to cool, unopened. The aluminum spreads the heat evenly and cools the same way, preventing warp and relieving any stress the machining might have induced.

ring-wedged.jpg


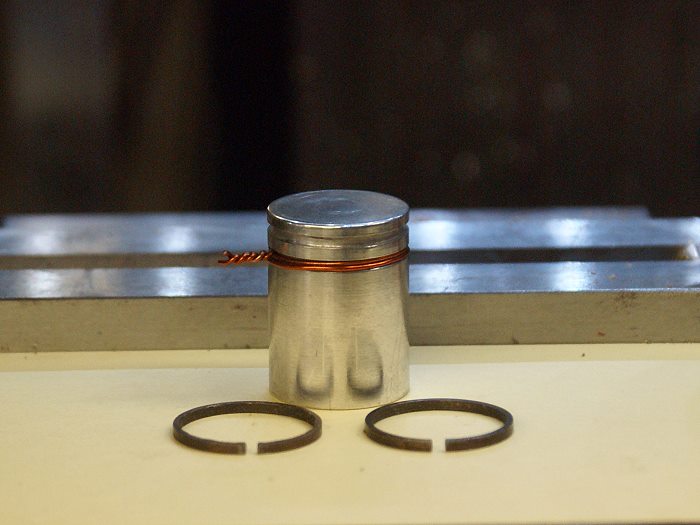
Once the rings were cool, the ends of the gaps were filed to allow the rings to fit within the cylinder bore with .003 left in the gap for what I assume is expansion clearance. The end result was a beautiful fit. The piston was then turned and the grooves were cut to fit the original inner diameter of the rings, plus .001 (who really cuts a .0005 pass on a hobby lathe?) The copper wire in the ring groove is there to keep the piston from disappearing down the cylinder bore while I'm handling it.

ring-piston.jpg


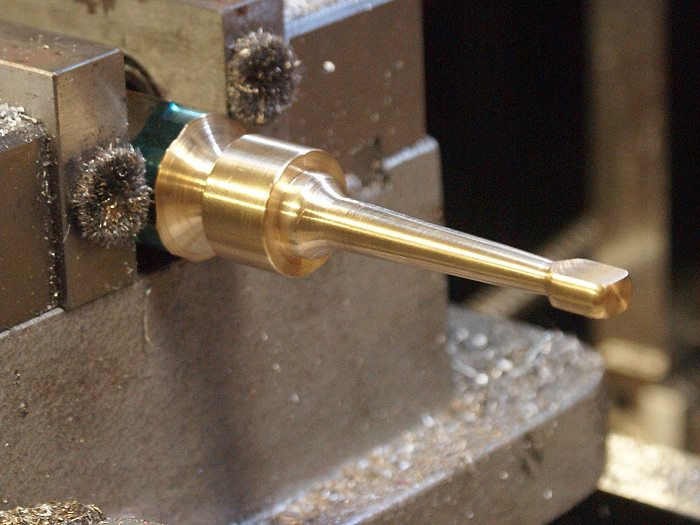
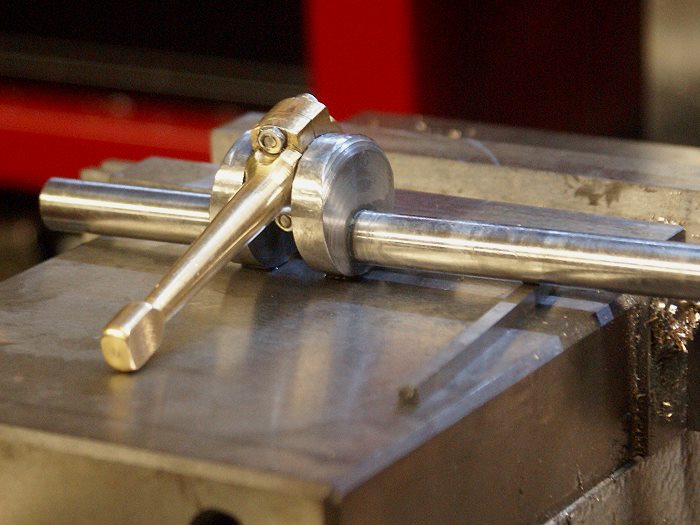
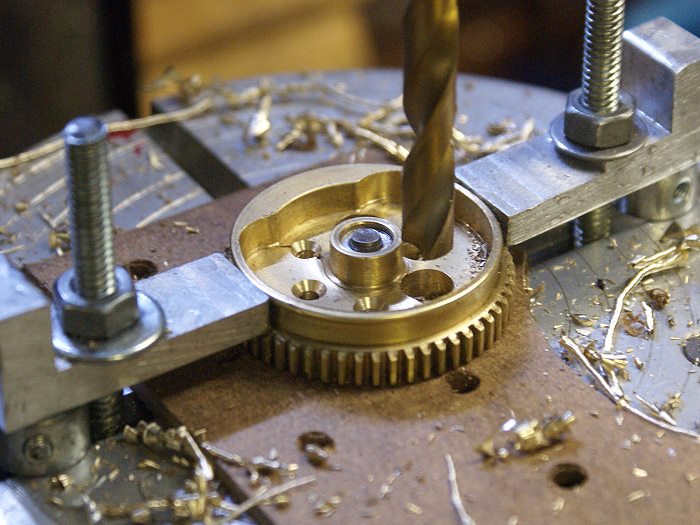
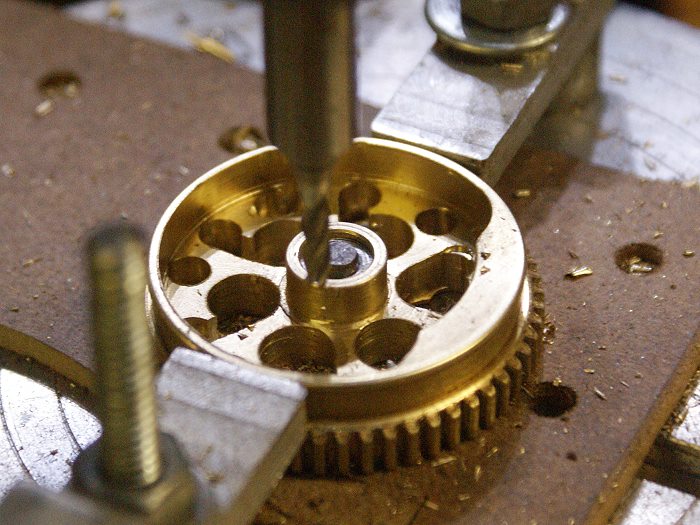
I then moved back to the lathe to turn the basic shape of the modified connecting rod. Once the contour was as I wanted it, the piece was moved to the mill to give it the flat surfaces. Yes.... I know the vice is more stable in the middle and yep... that small end is probably a great place for a machinist jack, but I was only removing .010 per pass for a total take of .0625. No harm, no foul.... and it worked out fine. The big end was still very firmly attached to a nice solid supportive piece of brass hex bar which.

conrod-1.jpg


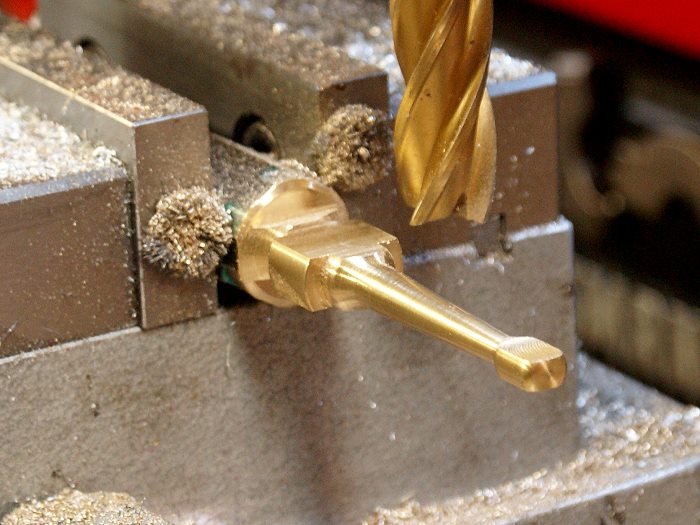
The big end got the same treatment, along cuts for the bolt heads. The piece was then cut off the hex bar before drilling the end cap bolt holes. Brass was chosen for the connecting rod due it's wear properties, since the crank design made installing a bushing impractical.

conrod-2.jpg


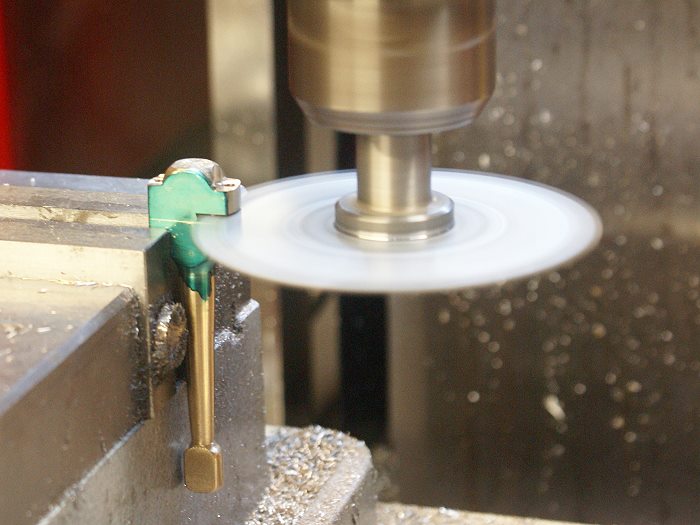
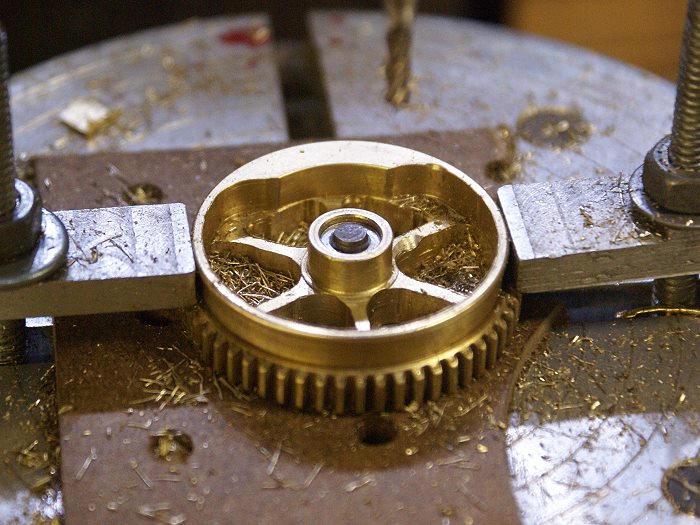
The big end was made longer than its final configuration so it could be cut away. The end cap bolt holes were drilled prior to the separation so things could be cleanly re-mated. My handy dandy carbide saw blade made easy work of the cut. The setup is much more stable then it appears and the blade was introduced slowly and advanced into the cut in quite small increments. A final pass with an end mill put the mating surface to rights and once bolted together, let me drill and ream the journal bearing surface in the proper spot.

conrod-3.jpg


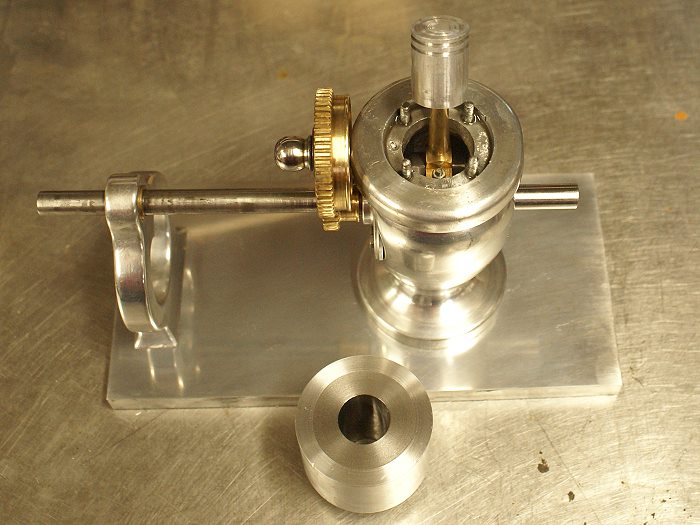
The con rod was then fitted to the crank shaft for a test fit and with a bit of oil, proved to be spot on. Just enough friction to let me know it was a good fit and little enough to allow for an easy lapping fit with a bit of metal polish, just to slick it all up.

conrod-4.jpg


Another couple of steps out of the way. The piston and con rod will get some attention tomorrow as the wrist pin is fitted and the crank is tested int he crank case. I'm a wee bit concerned that the modification to the con rod might require some clearance adjustments to the inner bore, but that remains to be seen. Tomorrow should tell more of that story, as some of the assembly process begins in earnest.

Steve
 
Very nice Steve, :bow:

To heat or not to heat piston rings. Let's not go there. You had a good result :bow: and it's a well proven method.

Best Regards
Bob
 
Steve,

Looking great and going quite fast!

I'm intriqued with your ring splitter technique. Did you hit the ring radially or axially?

Dave
 
Steve, everything is coming along great. No matter how long I have been doing this I still learn tips and tricks from everyone. Great photo work also.
gbritnell
 
Bob...
If you noticed, I went out of my way not to recommend heat treating the rings. I simply said "I" needed to heat treat mine....(grin). I too have seen that old saw get out way of hand on other boards.

Dave...
You want to strike it axially so it rides further down the taper. Pressure stays even around the ring and it splits cleanly at a point of its own choosing. I simply assume that point was the weakest.

GB...
Thanks for the kudos. I'm glad someone else is learning too. I certainly am. Many of the tricks used in this project were firsts here.

My concerns for the crank proved out. The big end bolts are going to need a wee bit more room to clear the walls of the crank case. It looks like a small adjustment in a couple of places will put things right, but I've yet to reassemble it all just yet. I want to fit the piston first, so the con rod stays centered in its normal orbit. That should tell the rest of the story. Nothing major... just the sort of tweaking that any project requires.... so far....(grin).

Steve
 
No major parts made this weekend, as I began fitting things together so they work properly together and catching some of the small items, like spacers, that I've needed to make, up to this point.

The crank case was relieved enough to miss the crank bolts and the crank now clears the walls for a nice smooth rotation. I can highly recommend having a rotary file bit in your tool box. It saved me hours of hand filing work in awkward places and positions.

Once those thing were all taken care of, it was time to assemble the parts and pieces in a semi permanent state. The photo below shows the connecting rod installed along with the temporary piston. Installing it became almost second nature while the crank case was being expanded. It was a little tricky since the end cap had to be held onto the crankshaft with a piece of copper wire while the nuts were being inserted from the top of the engine base. The copper wire was then removed to allow things to rotate.

conrod-install.jpg


The gears still needed to be bedded in, so once the cylinder was fitted back on the base and the small gear was secured tot he shaft, it was time to see just how well things were really fitting. The little engine was placed on the lathe bed and the crank shaft was secured in the three jaw chuck to give it a spin. Since the lowest speed on my lathe is 100 rpm, that is where things began. The final run speed was at 500 RPM and if you look closely, the camera shows no hint of vibration in base. Smooth as silk.

gears-run-in.jpg


The whole process took a while, with several grades of polishing materials being used. I began with a gray stick compound which is typically used for quick scratch removal and as things began to settle in, progressed to my preferred finishing polish, called MAAS. It's similar to Flitz or Semi-chrome and leaves a super fine finish without leaving unwanted grit behind during clean up. A bit of cutting oil was added to the mix just to make sure there was enough lubrication to prevent any chance of binding as the metal worked against itself. The gray slurry in the photo is oil and MAAS after about 30 minutes of run time at about 500 rpm. The gears are now feel close enough to finished to attempt to run the engine when the time comes.

gears-polishing.jpg


Even with the temporary piston and no rings, the engine is already proving to have very good compression. After a squirt of light oil into the bore I placed my thumb over the hole and was delighted to see strong spray of oil mist escape as the compression easily lifted my digit and them sucked it back hard enough to leave an imprint of the bore on the thumb pad.

The bearing cover was drilled and bolted in position using 4-40 hex head cap screw. Like others on the board, I dislike using socket head screws on an engine like this one. It just deserves better.

bearing-cover-bolts.jpg


Tomorrow, I'm off in search of band saw blades. The last one in the place gave up the ghost while cutting the material for the cylinder head. That certainly slowed progress a bit.....(grin). Hopefully, I'll be back in the shop later tonight to at least begin gathering materials for the governor build.

Steve
 
That's going to wind up a PoM for certain when it is finished. Anyone want to make any wagers to that effect? ;D Beautiful work, disgusting how simple you make it look, but beautiful just the same. Thm: Thm:

BC1

Jim B.
 
Today I gambled a bit and took on a project that saw the cam gear back on the mill for a bit of careful, and I do mean careful, modifications. With all the work in making it one piece, cutting the gear and running it in for smooth operation, this step could have burned a whole lot of work.

The cam on the rear of the gear actuates a rod which controls the exhaust valve in conjunction with the governor. A roller runs inside the rim of the cam side of the gear which rides up on the cam when the engine is ready for a power stroke. This action is somewhat hidden in the original design, so I decided to reveal things a bit so the action can be seen.

The operation began with some careful calculations and a couple of drawings, just to prove the idea was going to fit in the limited space and accommodate the cam. Once everything checked out, the gear was placed on the rotary indexer and drilled for creating six spokes.

spokes-1.jpg


As thing progressed, it didn't look much like spokes, but everything was fitting where it was supposed to be and unwanted metal was disappearing at a nice pace.

spokes-2.jpg


The whole gear is about the size of a silver dollar and the interior of the cam ring is a radius of only 3/4 inch and drops to 19/32 inch where the cam runs along the rim. Did I mention that the central hub robs both dimensions of 1/4 inch radius? Like I said, things were tight and large movements were not on the menu. As The last cut was made and 6 small spokes emerged, I got the chance to breathe again.

spokes-3.jpg


Once the gear was off the mill, I began hand filing the spokes to reshape and contour the corners and edges. I enjoy file work and the time it gives me to think ahead consider any other changes I want to add. The session was quite peaceful and soon the small gear was taking on a nice old fashioned look. Three of the spokes were completely independent and were quickly knocked out. The remaining three were a bit more of a puzzle. The one center of the cam is heavily attached the cam by about half the thickness of the spoke. This required some very delicate file work, especially since half of the spoke was embedded in a solid mass.

The outer two spokes just miss the ramp to the cam and gave little room to maneuver. This is where patience and a steady hand come in handy.

spokes-4.jpg


Here is the reverse side, showing the cam and the embedded spoke. Now all it needs is a bit of final polishing to improve on the current hand filed finish.

spokes-5.jpg


I think the results were worth all the sweat and the open look should make the engine even more interesting to watch when it's running. Ya just gotta love a good challenge like this one....(grin)

spokes-6.jpg


Steve
 
Now that's "gearing up" :) Well Done Steve :bow:
 
Great work on the cam gear Steve. It adds character to the engine.
gbritnell
 
Back
Top