Opposed Twin I.C.

Home Model Engine Machinist Forum

Help Support Home Model Engine Machinist Forum:

This site may earn a commission from merchant affiliate links, including eBay, Amazon, and others.
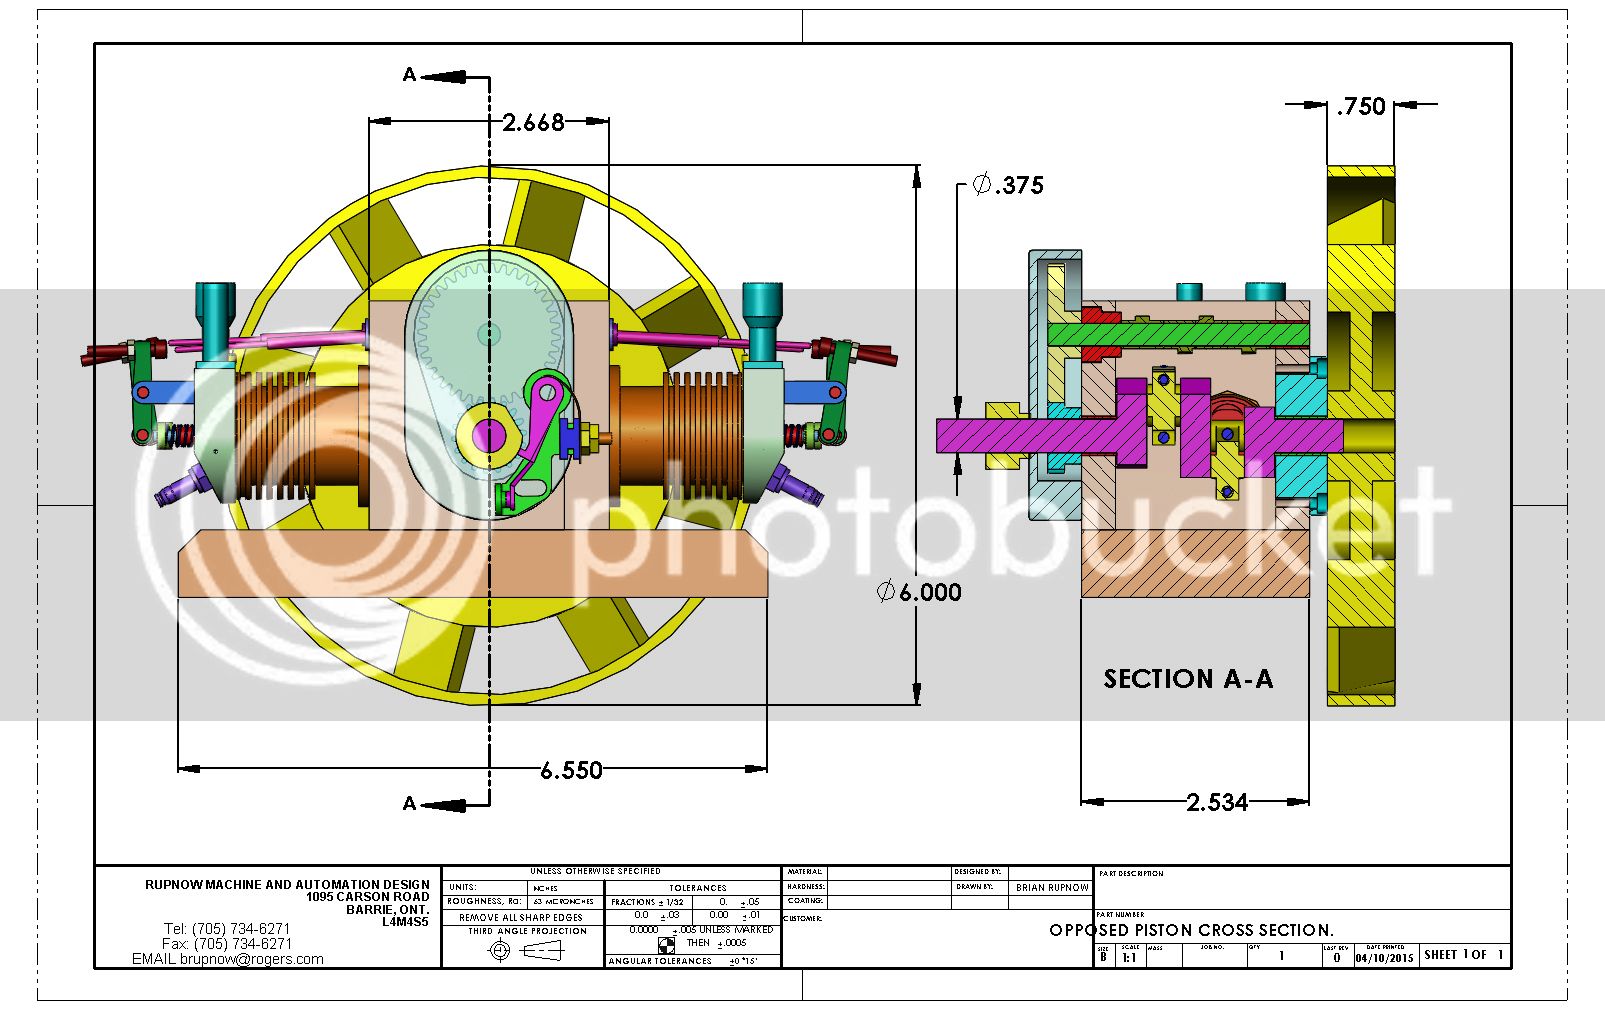
I resorted to a little hocus pocus when I designed the bushings for the crankshaft and camshaft. I wanted to be able to pull the crankshaft or the camshaft straight out of the engine without splitting those two main frame angles. So---I have a large "bushing insert" with the bushing pressed into it, bolted into a counterbore in the frame angle which supports the end of the crankshaft closest to the flywheel. If I remove the flywheel and the blue "bushing insert" the entire crankshaft should pull straight out through the side of the housing. I did something very similar at the opposite end of the camshaft, only there the bushing itself has a large enough outer diameter that by unbolting it and pulling it out, the whole assembled camshaft can be pulled out thru the side of the main frame.
 
Last edited:
......still looks pretty tight inside the crankcase. You are not showing accessibility with a sealed angle frame to disconnect rod caps from crankshaft to then pull the crank from the frame........without unbolting the frame segments. With an opposed engine, you have to come in from both sides for the caps! I really don't see using a pair of bolted angle pieces as a frame as allowing this engine to assemble or service. :eek: -----Dave.
 
Longboy--It is VERY tight. the only redeeming point is that if I unbolt the baseplate, I have access from top and bottom to get at the con rod bolts.
 
Yes!..... I'm seeing you have a blind right angle access to the cap bolts in a tight space and not much room to turn a wrench....this doesn't look good.
 
Yes!..... I'm seeing you have a blind right angle access to the cap bolts in a tight space and not much room to turn a wrench....this doesn't look good.
God works in mysterious ways----and so do I!!! Thank you for noticing and commenting. I may have to use my flexible Allen wrench.---Brian
 
Brian yours has a much room as my crankcase and I can get at the bolts. You also have the advantage of an open top and bottom mine is closed in on 5 sides.

With the cylinder and liner removed the conrods drop to about 40 degrees so access is quiet easy, run them in with a ball ended hex screwdriver and nip up with a standard key

With no top on your crancase the upper bold is straight acces, the lower works with the ball ended tool and you can swing an L shaped hex key with no problem

crank access.jpg


IMAG2717.jpg
 
Brian yours has a much room as my crankcase and I can get at the bolts. You also have the advantage of an open top and bottom mine is closed in on 5 sides.

With the cylinder and liner removed the conrods drop to about 40 degrees so access is quiet easy, run them in with a ball ended hex screwdriver and nip up with a standard key

With no top on your crancase the upper bold is straight acces, the lower works with the ball ended tool and you can swing an L shaped hex key with no problem
Thanks Jason--I knew that.
 
Hi Brian.

Can we run with glow plugs to save the hassle with ignition timing??? Some 4 stroke OS engines are glow plug fired.
 
Gus---I have never used glow plugs and I don't know anything about them. I think they only work on two cycle engines but I may be wrong.---Brian
 
I'm thinking that makes a rather nice fuel tank. It is 1" o.d. x 3 1/2" long. It is supported off the carburetor bracket. (Don't ask me exactly how yet), and the top of it is about 1/4" below the center of the carburetor barrel. It does clear the flywheel.

 
Last edited:
A slight change to the "magic flywheel". I have noticed at my metal supplier that they frequently have offcut "donuts" of 660 bronze. This one measures 4.1" o.d. x 2.76" i.d. z 1.1" thick. The 3" square piece of aluminum is also an offcut. I get offcuts for half the price of new material, because they don't charge for a mans time to pull material out to the saw and cut it off. The bronze will of course be the main weight of the flywheel rim. The aluminum will be set up in my 4 jaw and turned to become the center hub. The brass bar will become the "vanes". I haven't got the material for the outer band yet, but it will probably be thin wall steel tubing.

 
I don't plan on boring you to death with a thousand pictures of "How to build a flywheel.", but this rim has a special place of honour.--It is the very first piece ever made on my new lathe.
 
I chickened on the flywheel center material. A 1" long slice of 3" round aluminum stock was only $5 and the 1" long outer rim part was $5. I will save the 3" square piece of aluminum and use it for something else.
 
Yes Gus, it is performing very well. I am as nervous as a cat in a roomfull of dogs while running it, but it has performed every task very well. I stalled it this morning taking trepanning cuts on the center of a flywheel. It didn't like that very much, ---Just stopped turning and gave a very angry hum. I hit the e-stop, backed out the tool and started the lathe again. No harm, no foul.--scared me though!!! The trepanned recess is 1/4" deep. I tried to plunge the full depth in one shot just to see if I could.--I couldn't. So plunged .100 deep closet to the center, then plunged .100 deep closest to the rim, then used crossfeed to move back and forth between the two annular grooves taking .010" deep cuts until I had a flat bottomed recess, then plunged 0.100' again at inner and outer extents, repeated the back and forth, then a final plunge of 0.050" and travel back and forth removing .010" on each cut until I ended up with a flat bottomed 1/4" deep recess.
 
Last edited:
The flywheel center is finished except for keyway and set screws. I am going to try my hand at heat shrinking the bronze outer rim onto the aluminum center. I have only .003 to .004" interference, and could most likely press it in cold. Mrs Rupnow wouldn't take very kindly to me heating up the bronze ring in the kitchen oven, so I will leave it under my big heat light overnight and keep the aluminum center in the freezer overnight and see what happens. I'm not ready to assemble them yet. I have some very strange and devious things to do to that bronze ring with my milling machine and rotary table to prepare it for the eight cooling vanes, and I need to leave the center open to grip with the 3 jaw chuck fingers on my rotary table.
 
I'm a great advocate of shrink fitting, but I would only use about .001" to .002" interference on a part that size. suggest to your wife that she makes an apple pie, and when she is not looking, put the ring in the oven:D

Paul.
 
Gus---I have never used glow plugs and I don't know anything about them. I think they only work on two cycle engines but I may be wrong.---Brian

Glow plugs have been standard fare RC 4-stroke engines for must be approaching 40 years now. Glow plugs are intended for "glow fuels" (methanol/oil premix). 4S glowplugs are same principle as 2S plugs, but slightly different wire (temp) & other properties.
http://www.osengines.com/history.html
http://www.osengines.com/engines-airplane/index.html


..but something I didn't know until recently, 1/4-32 plugs for gasoline RC engines.

10-11-2015 0000.jpg
 
Last edited:

Latest posts

Back
Top