Open Column Launch Engine from Kit

Home Model Engine Machinist Forum

Help Support Home Model Engine Machinist Forum:

This site may earn a commission from merchant affiliate links, including eBay, Amazon, and others.
That's how I do offset bends (or joggles if you want the scientific term ;) ) Marv - only keeping all them bits lined up while you get a bit of pressure on with the vise is not easy. Far better to just slit a longish bit of sheet metal of the appropriate thickness - the slitted end becomes your blocks, only firmly held together by the unslitted section at the top. Much easier.
 
Bonzer hint, Tel. Since the blocks may need to be machined to size anyway, why not mill the blocks and the required gap between them into a piece of scrap that serves as a holder. I'll have to give it a burl next time I do this.
 
Hi ZEE ,Here is how i do it ,the lower part of the jig is held in the vice and the part bent then with the part held in the jig you can mark out the correct spacing for the holes, as it is already bent you don't need to take into account the bend allowance.
Rob

sssssssssssss.JPG


xxxxxxxxxxxx.JPG


bbbbbbbbbbb.JPG
 
Hi Marv,

Thanks very much. I appreciate the point. If I may say so...we share the same vision.

I also wondered about the bend changing the relative position of the holes. I've been assuming the design took it into account. Several of the dimensions in the drawings make no sense (read...are simply wrong...I mean...obviously). So I'll just press forward and see what happens (pun intended). (The middle of the part is 0.49...with an offset of 0.0625...I calculate something a little less than 0.004 change in distance.)

Thanks Tel.

Rob...At this point my experience is limited and I'm likely to bugger up the tool. If I were doing more than one...I'd seriously consider it since it would also minimize the chance of buggering up the part...or rather...it would maximize the chance of making accurate duplicates :)


Ok, I took a look at the picture of the engine you're building on the LMS site (should have done that earlier).

It appears that changing the hole spacing in the conrod will only change the location of the piston in the bore for any particular angle of the crank. If said change in hole spacing were large it might cause the piston to hit the cylinder cover at TDC. However, assuming they allowed for some dead space in the design, small discrepancies almost certainly won't matter. Even if what I described occurs, shaving a few thou off the top of the piston would cure the problem. I think you're good to go. One less thing to worry about. :)

Slight errors in the amount of conrod offset won't matter much either. They'll only affect where the conrod sits on the wrist pin (gudgeon for our English cousins). As long as that position is close to the pin center all will be well.

Does the kit contain those awful Phillips head screws to secure the cylinder cover? The engine would look much better with hex head screws or studs and nuts. Get the engine running with the kit parts and then think about replacing the screws when you start blinging.
 
mklotz said:
Does the kit contain those awful Phillips head screws to secure the cylinder cover?

Thanks for checking Marv.

The Phillips head screws...well of course it comes with those. And yes, I agree with several posts I've seen...awful. Personally, I like the hex head nuts. But to be fair, I haven't enough experience to comment on 'studs n nuts'.

To be perfectly honest...I doubt I'll take the engine any further. I'm already starting to wonder about the next project. [EDIT EDIT EDIT EDIT...not what I meant. I'm finishing this project. I meant I wasn't going to take the project further than a 'build out of the box'...going to use the 'awful Phillips' heads. Also, felt I was getting close to completion and so starting to think about the next project...don't want any down time between them. For sorry for the confusion.]

Thanks again.
 
zeeprogrammer said:
Thanks for checking Marv.

The Phillips head screws...well of course it comes with those. And yes, I agree with several posts I've seen...awful. Personally, I like the hex head nuts. But to be fair, I haven't enough experience to comment on 'studs n nuts'.

To be perfectly honest...I doubt I'll take the engine any further. I'm already starting to wonder about the next project.

Thanks again.

Take the studs 'n nuts route. Use some a bit longer, set them in place, double washer and run the nut down, trim the screw to the end of the nut, now you have the stud(s) Remove and heat the components up to a red color and drop in some old dirty motor oil. You'll end up with blackened parts. Reassemble with only one washer and the stud(s) protruding from the nut(s) should all be even. Just that little touch looks so COOL.(if you mar up the pieces, cheat with a magic marker to hide the boo boo)
 
To be perfectly honest...I doubt I'll take the engine any further. I'm already starting to wonder about the next project.

What's this? You can't wuss out on us now. You need to finish this. Maintaining one's sense of accomplishment is a key element of the zen of machining.

I'll tell you a little story to bolster your persistence.

My efforts in this hobby began back in the early 70s when I bought a Unimat. At that time, my only formal machine shop training was one semester in high school. As my first project, I picked something that I knew was really going to stress my abilities. It was Rudy Kouhoupt's two cylinder, double-acting marine engine with slide valves. Over the years, interrupted by a couple of consulting tours of duty in Europe, I managed to make some parts (quickly discovering the limitations of small multi-purpose machine tools). The problem was that, each time I returned to the engine I would examine some already-made part and say, "What an abortion. I can do better than that now." and start to remake the part. Some of the parts in that engine were "made" as many as six times.

Flash forward 15 years. After complaining to the Frau about never-ending projects, she says, "Build something simpler to reinforce your motivation." I completed one of Elmer's small oscillators and it (the engine and my wife's advice) worked. I was stoked. I bought a larger lathe and within a few months the marine engine was done and running. It "only" took fifteen years but it was done and it worked.

To this day I treasure both the first engine I started and the first engine I completed. They both have numerous flaws but I keep them in prominent places in the display cabinets because they represent a very important psychological lesson learned. Without that lesson and the efforts it prompted later I'd have a pretty boring retirement.

Given the relatively large investment of time and mental effort needed to get even a simple engine built, one has to be very careful about managing the psychology of our hobby. It's at least as important as the actual machining skills. Boxes of half-completed projects under the workbench can be terribly debilitating.

Now, get out there and finish your engine. It's an investment in your mental health. :)


Hear! Hear! Marv. Thm: Thm: Thm: I needed that little pep talk too.

Ron
 
ZEE!!!!
Listen to Marv. Don't bail on that engine! I looked at the previous posts and all looks just fine. So what's up stickpoke ???
Tony
 
Zee, I don't mean to derail this train but when you speak of "wondering about the next project", what is it exactly that you have in mind? th_wtf1 Finish what you have started and continue on from there, don't begin anew on something else thinking that it will be easier, it won't be, trust me. th_rulze The frustrations can be a bit overwhelming at times, especially when first starting out on ones own I know, :hDe: but you have all of us here that have been in the very same position at one time or another and we are all willing to support and share ideas and opinions on making chips. Please don't quite on us, :bow: you have progressed so far in a short amount of time, we are all anxious to see then end product, something you will proudly be able to say that you built it yourself. Give it some thought, pick yourself up by the bootstraps lad and forge ahead. stickpoke

BC1
Jim
 
zeeprogrammer said:
To be perfectly honest...I doubt I'll take the engine any further. I'm already starting to wonder about the next project.

WHAAAATTTT?!?! :eek: ??? :eek:

Don't stop now! Any project will have it's easy parts and tough parts. If you drop this one to go learn on another, sure, you'll get a little further, you'll have more experience. But, you've already got a set of plans in front of you that'll give you not only more experience, but a FINISHED ENGINE when you're done.

I'm worried that if you keep switching projects, you'll only experience the tough spots, miss out on the satisfaction of finishing one, and get bored of the whole thing.

Stick with it man! :D
 
Zee,

Listen to us, we know that for the most part this is a solitary pursuit, that's why most of us are members here, to share, to be inspired to learn from each other etc. YOU are part of our group, my day will be poorer without a Zee question to keep the gray matter active.

Don't think too much remember "It will be alright on the night."

Best Regards
Bob
 
Oh my goodness. Oh my goodness.
I am so sorry.
That is not what I meant at all.

Oh I can't believe I did that. I am so sorry that everyone had to take that kind of time and effort.

No no no. I have no intention of stopping. What I meant was...

I intend to use the 'awful Phillips' screws and not go so far as to 'bling' the engine.

I am definitely finishing this engine. Never any doubt about it. I am anxiously awaiting a few tools and am hoping that I can complete this in the next couple of weeks. That's the reason for 'wonder about the next project'. I don't want a gap between finishing this project and starting the next.

Oh how I would like turn back time on that statement. Entirely my fault and I very much appreciate the reaction and time to respond.

Marv...thank you. And I hope to have a bigger/better lathe in less time than you had to wait.

Ron...thank you. If that pep talk helps other newbies 'stay in there' then this is worth it.

Tony...thank you. I'm not going anywhere.

Jim...thank you. This train has only one destination. Can't get off.

vlmarshall...thank you. Sticking with it man.

Bob...thank you. With such a great forum...hardly solitary to me.

All...thank you and I apologize again.
I would understand anyone reading that post and simply switching off. If anyone did, I hope you'll be back.

'nuff' said. Please put this behind you.

There should be a way to take karma away.
 
zeeprogrammer said:
I have no intention of stopping... I am definitely finishing this engine... Never any doubt about it... I'm not going anywhere... This train has only one destination... Can't get off...Sticking with it man.

:big: Awesome. Don't worry about the misunderstanding. Switching projects is a BIG weakness of my own, I guess I projected it onto you. Oops. ;D

-Vernon
 
Thanks Vernon.
I thought it was 'Vernon'. I wanted to make it more personal but I didn't want to take the time to go look. I was pretty intent at the time. :)
 
zeeprogrammer said:
I intend to use the 'awful Phillips' screws and not go so far as to 'bling' the engine.

I got ya on that, but come on, try the stud and nut route, like I don't want to be the only one fiddling with those tiny parts, having em slip from the fingers and the associated hour of "Hey where did it go" happen to :)
 
And, of course...I got the 9/16 reamer today.
So off we go...time to get the cylinder out of the lathe (uh..bore, ream, and then take it out).

Need to bore to within 1/64 of the finished size before reaming.
I'm at 0.5 from the biggest drill bit I had.

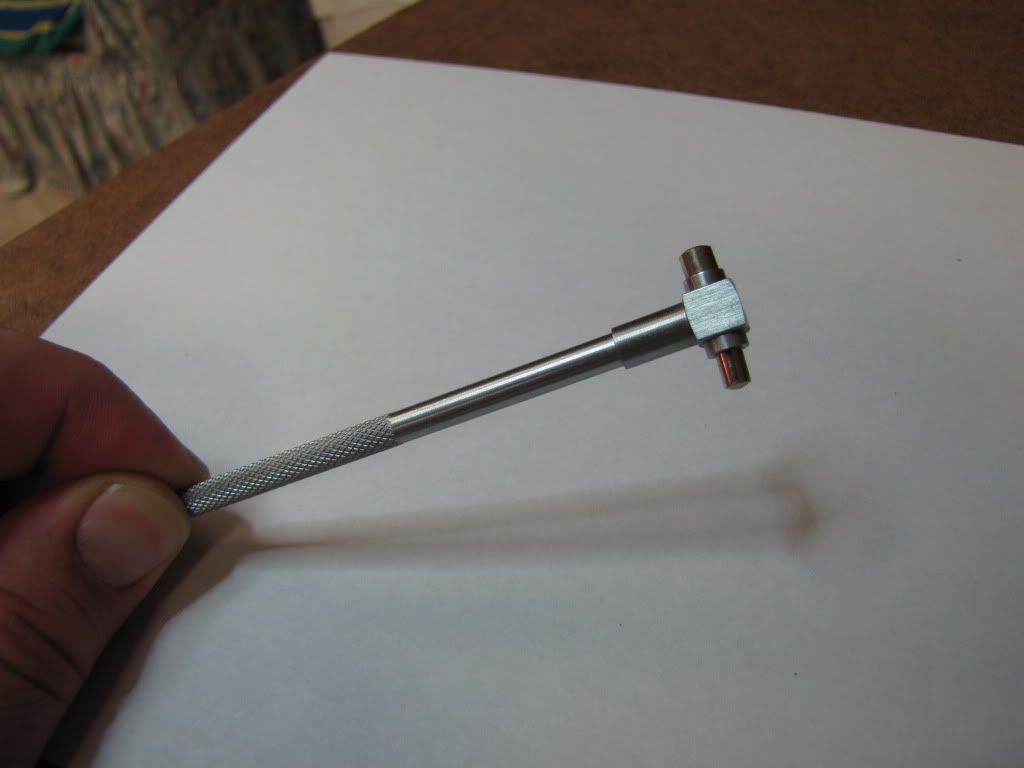
Used this telescoping gauge to get to 0.546. Almost forgot...but didn't...0.01 on the cross slide is 0.02 on the diameter...whew.

IMG_0181.jpg


At least...the caliper on the gauge said 0.546. Moved the gauge around in the hole to maximize the reading...same with caliper.

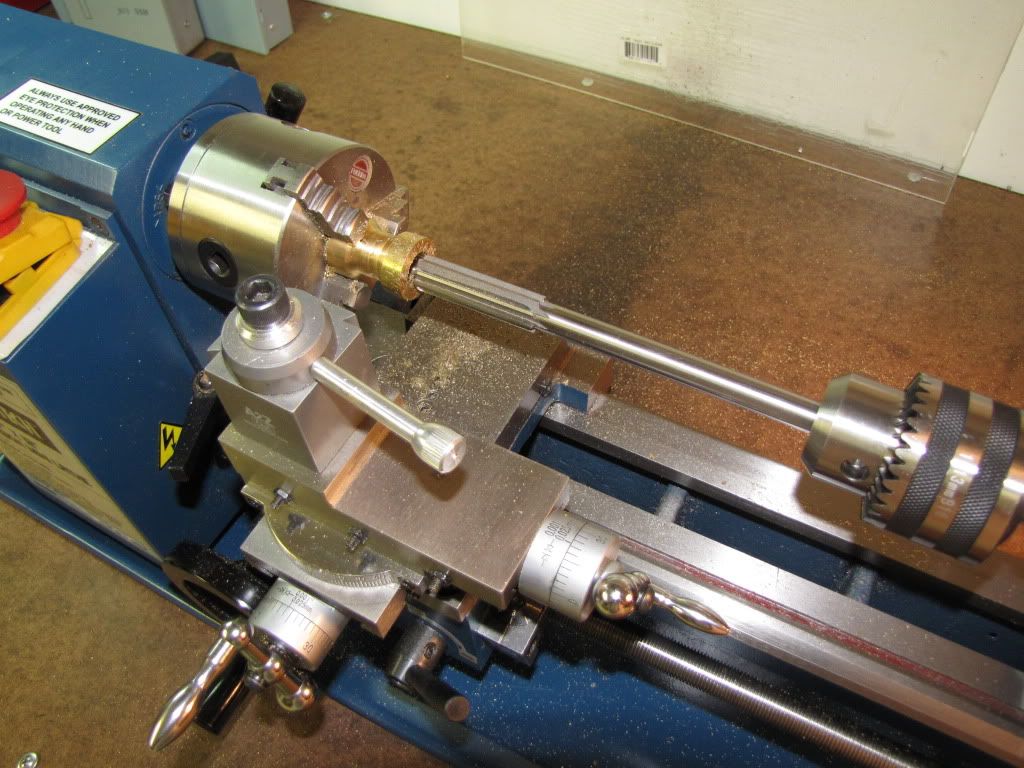
Then reamed. That's some reamer. I just know I'm going to have to shorten it some day. (As it turns out...I took the pic after reaming.)

IMG_0180.jpg


Used the telescoping gauge again and calipered...0.564. Should be 0.5625. Cheap gauge? Swarf in the way? Poor measuring technique? Most likely the 1st and 3rd. I was pretty careful about the 2nd.

Side note: I have a cork plugging the spindle hole above the gear box to keep swarf from dropping into the gear box. Remove the cylinder, remove cork, and blow...

So now the cylinder is out. I won't drill the holes for the columns or cap, or polish the sides, until the piston is done. But I'll probably work on some other pieces first.

That's enough for tonight. Still reeling from my earlier 'fopaux'...time to medicate.

 
Foozer said:
I got ya on that, but come on, try the stud and nut route, like I don't want to be the only one fiddling with those tiny parts, having em slip from the fingers and the associated hour of "Hey where did it go" happen to :)

Believe me...I'm fiddling with tiny parts and wondering where did it go. ;D

But no...not this engine...it's going to be straight from the box...'kit-bashing', as the plastic modelers say, will come as I develop and learn.

Man...if I had to spend an hour...it's time for a new part...if I could.
 
OK. Done and done. Now that the formal apologies are out of the way it is good to see that you never left the saddle. Now, giddity-up! :big:

BC1
Jim
 
Back
Top