Miniature Tool Collection

Home Model Engine Machinist Forum

Help Support Home Model Engine Machinist Forum:

This site may earn a commission from merchant affiliate links, including eBay, Amazon, and others.
Wow. I'm in awe.

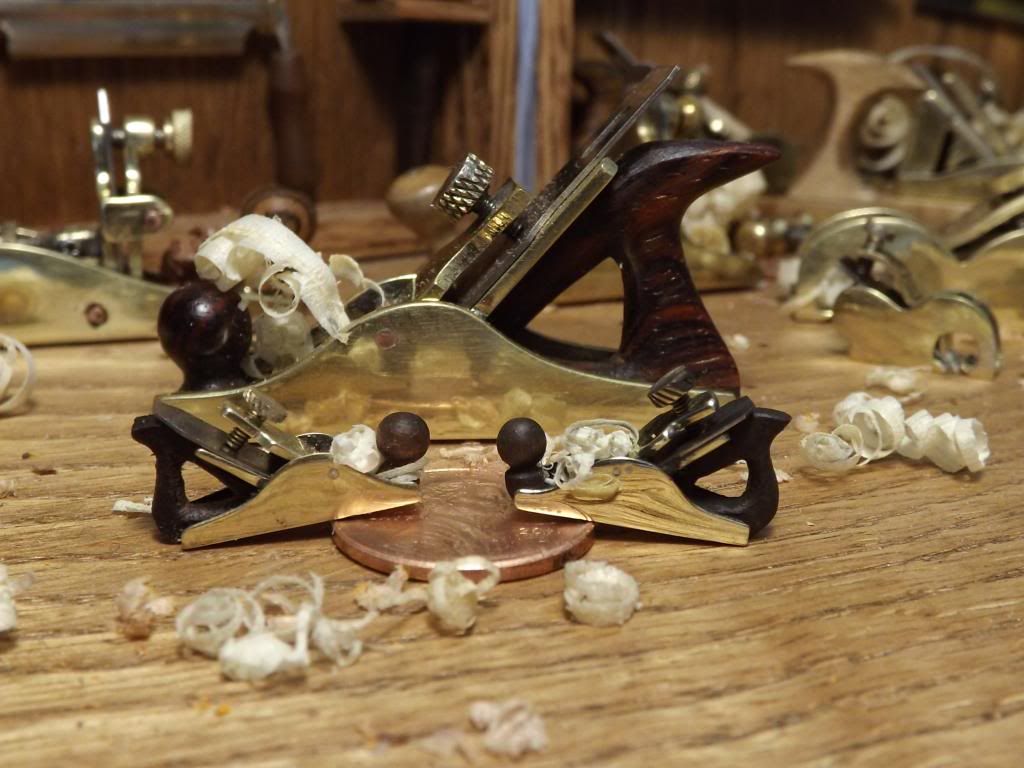
I hesitate to voice any suggestion, since that level of work is far beyond me, but one thing I see that detracts from the tools is that the sharp edges and corners have been polished away. Polishing without rounding over edges is very difficult, so it's not surprising. The book "Gunsmith Kinks #1" from www.brownells.com has a good discussion of polishing.
 
Wow, absolutely beautiful work!

I've always found the idea of home casting appealing, but am a bit nervous about exactly how difficult/expensive/time consuming it would to get started with the melting operation.

Would you mind making a post with some pictures and basic description of what kind of equipment you are working with, for the metal casting?

I'm looking forward to seeing more!
 
Thanks Mainer. I appreciate your thoughts. But the sharp corners and sharp edges were carefully and intentionally removed on some pieces. Hand tools need to be ergonomically friendly to fit the hand without presenting hazards that could be uncomfortable or injurious. I could, however, use the information you referred to on some projects. Thank you. Ralph
 
Thanks Victorymike18. Below is a rough sketch of procedures that I have used. The upper half is simple and inexpensive enough. The rubber mold making, wax pattern production and lost wax casting is considerably more complex. I'll try to post some procedural photos in the future. Ralph


castinginfo_zps58fb40d3.jpg
 
Here's the finished plane with Rosewood accents and steel blade. Ralph


SilverMiniPlane3001_zpsdb9d98a8.jpg
 
Last edited:
those tools are so good it must have taken a long time to make them what craftsmanship

Tom
 
Last edited:
Thanks Tom. Yes, it is a slow process, and I work in spurts as time allows and giving my cramped hands and sore eyes time to recoop. But in the end I have a little something to show for it - usually. Sometimes I end up with a melted heap of scrap and have to start over - or not.

I've started a new build. This one will be a scraper (#12) - I think. We'll see how / if it turns out. In this one there are some elements new to me and some very delicate operations to perform. That may be why I chose to try this model. I like a challenge and will figure it out as it progresses knowing that sequence, patience and finess are key. The weekend is here, and I expect to make good progress barring any mishaps. Ralph


SilverscraperPlane4002_zpsd6aea266.jpg


SilverscraperPlane4004_zpsc6932ff3.jpg


SilverscraperPlane4007_zps6c1cd796.jpg
 
WOW even your drawings are a work of art. Let me guess, you don't need to do a lot of measuring, meaning you are able to just eyeball the sizes and shapes you need. I really like how the tools look used but well cared for.

Pat Wicker
 
Thanks Pat. You are right; I've always had a keen eye and spatial sense, but it's hard to admit on a forum like this, where real experts work to a measured 1/1000", that I just eyeball and freehand everything. And yet at the scale which I work, in some cases 1/10 and smaller (that would be 1/10,000" tolerance -- see below), my results work out fine (most often). I think that it's just a matter of how one holds one's jaw and the size of the magnification glass one uses. Well, I don't claim to be a trained machinist; I'm not trained in anything. I'm just a self taught artist who may now have to find a different forum. But I love the work that real machinists do here. Maybe now that I've come clean I can just watch. Ralph


MicroMiniBullnoseplane2003_zpse1d69528.jpg


MicroMiniBullnoseplane005_zpsfe8921a7.jpg


MicroMiniJackplanepair007_zps3d1ccf1a.jpg


SmoothingPlaneEarRings3003_zps98ca200d.jpg
 
A little more progress already. I just had to get that tiny drilling and tapping done so I could breathe easy. Ever tapped an 0-80 thread? It is difficult to get right - not break in the hole, ruien the whole piece, and it is scarey. But it's done just right now. On to other operations. Ralph


Silverscraperbuild2010_zpsfaf5e03b.jpg


Silverscraperbuild3002_zps57412856.jpg


Silverscraperbuild2005_zps623c728a.jpg


Silverscraperbuild001_zps8dc56a2c.jpg
 
Took a diversion from the #12 - had to; it just got too cumberson and demanding. This will be a quick gratification little Chariot Plane. Ralph


ChariotPlanebuild002_zps0c0c4aa9.jpg


ChariotPlanebuild003_zps243b13cd.jpg
 
Very nice work. Will you please say something about how you hold those tiny parts together to do the silver solder? That has been my biggest problem in fabricating items. Kozo shows lots of ways to use small screws drilled and tapped as temporary fasteners, then he files their heads away. But you items are much to small for that.
 
Sometimes I pin the parts together in proper proximity on a ceramic board with flux painted on the adjoining parst and tiny pieces of silver "sprinkled" around each joint and hope that they hold their position while I apply heat. Sometimes I need to wire the parts together with tiny wire to make sure that they hold together then bursh on liquid flux and apply solder. This is a very trickey procedure. It is more like silver brazing than lead soldering, but it is magical because when done right the pieces aren't just "glued" together; they really do become one piece as the parts melt into each other without distortion if the temperature applied is carefully regulated. I have used a butane torch to unite smaller pieces and sometimes need to use an oxy acetylene torch. Sounds simple? Well, maybe it is untill a second or third piece is to be united with the previously joined parts in a multiple piece part. Keeping in mind that brass melts at 1650 to 1720 degrees Fahrenheit. When a particular part requires the joining of several pieces that cannot be laid out for a "one shot" soldering, the first union is soldered with a "hard" solder which melts at 1365 degrees; the next union is soldered with "medium" solder which melts at 1275 degrees, and the third union is soldered with "EZ" solder which melts at 1240. Therefore it is important to observe and carefully regulate the soldering temperature in each case so that the second soldering heat does not remelt the first soldered joint and the third heat does not melt the previous two joints causing everything to fall apart or shift rather than adhere in place (I hate it when that happens). This got wordy because it can be a complicated process and much care must be taken. Ralph


Miniaturescraper020_zpsd0b84a23.jpg


Miniaturescraper017_zpscbafe9a3.jpg
 
Thanks. Finished the Chariot Plane today with Rosewood accents. Photographed on 1/4" graph paper. Ralph


ChariotPlanebuildfin003_zpsbeb46986.jpg


ChariotPlanebuildfin002_zps668c3bbc.jpg
 
Last edited:
A little more progress (pictured in reverse order). Ralph


PlowPlane3002_zpsfaca7d3c.jpg


PlowPlane2003_zps2a674a82.jpg
 
Last edited:

Latest posts

Back
Top