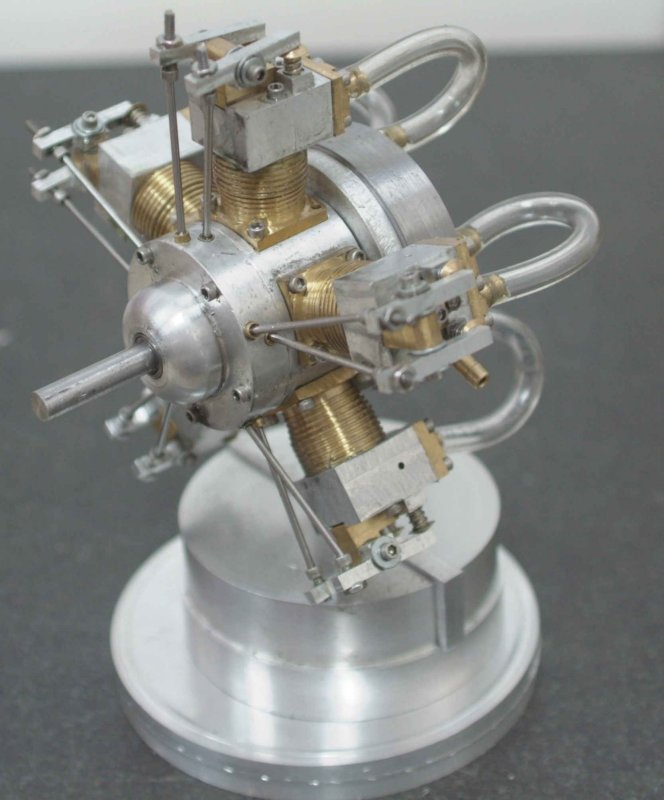
Liney Halo

Home Model Engine Machinist Forum

Help Support Home Model Engine Machinist Forum:

This site may earn a commission from merchant affiliate links, including eBay, Amazon, and others.
I am not very sure where the leaks are. The next time I disassemble the mount I plan to submerge it in WD40 and blow air in. It may not be significant. I can feel air inside the crankcase, but that can also be escaping around the pistons.
 
I spent a while in the shop this afternoon getting a start on the base.

large.jpg


One lesson learned was that when cutting a deep slot with a small endmill, clearing the swarf as it cuts is a good idea. Cost me a 3/16" carbide endmill to learn this.
 
A most commendable build! To say the maker is formidably competent would not do him enough justice!

So much more involved, intricate, and inspiring a project that it makes my steam locomotive look like the relic it is.

Somewhere, when I was a kid, my Dad having taken me to some sort of open house or show, an old 2-seater airplane was on display, having a big, radial engine, finned cylinders sticking out all over. My Dad, Tool & Die Maker he was, always marvelled at works of mechanical construction, and he explained to me that all those the pistons within the cylinders each had a connecting rod which somehow had to connect to a crankshaft. It troubled him no end to not know exactly how that was accomplished. I will never forget that conversation, or the fact that, years later, after he had died, my mind resurrected the scene from that show while I was looking at a picture in some book showing how a "master crankpin" was made to attach those rods...........

Thanks for listening to my story! jack
 
Very nice work Kvom. This certainly isn't an easy build by any means. I'm sure you'll get all the bugs out.
gbritnell
 
I've had a lot of fun making this.

As far as my being "formidably competent", that's hardly true. I know Jack is being both polite towards me and extremely modest in comparing it to his loco. I'm still a newbie at this, and while the little engine looks complex it's actually pretty simple in concept. I did learn some new techniques in the build, which was one of my goals in starting it.

There is no way I could build an engine of any sort at this stage without plans to go by. So the people I really admire on this site are those that conceive their own models and then execute them. People like George, Jack, Cedge, tel, Maryak, Gail, and many more are the real inspirations for me to try to improve.


Sunday I took the engine "mostly" apart for some tweaking.

First job was to test the manifold for leaks. I submerged it in wd40 and applied air while blocking the barb outlets with my fingers. I got leakage from the back seam and also around the barb holes. However, In think neither of these may be a big problem. I could use a silicone sealant on the back as that surface presses to the mount and hence is not visible.

Next, I filed the leading edge of the cams where they start to lift, giving a more gradual approach. The plans call for a .125 radius, but I just eyeballed it. With the cam housing reattached to the crankshaft I did about 15 minutes of run-in powered by the mill at 800-1000 rpm. Afterwards the shaft and cams spin quite freely under finger pressure.

Next, I tested each head's input valve individually. Four were airtight, but the 5th was not. On disassembly I found a couple of tiny pieces of swarf in the valve bore that were keeping the ball from sealing. After cleanout with brake cleaner and air, I reseated the ball and retested until I got a clean seal. This valve may have been one reason I needed such high pressure on the first test run, as the cylinder would have been pressurized full time. I noticed that there is some air leakage between the head and the valve covers, but I don't believe this will be significant.

This morning my objective was to run the engine on each cylinder solo. I did so on the first two before stopping for lunch. The first one ran on 40 psi, certainly an improvement, but the second ran on 25!

One discovery I made inadvertantly is that interchanging the pushrod positions changes the direction of rotation. Seems logical when you thuink about it, but was a surprise when I did the first run of the morning when I switched them unintentionally.
 
kvom,

Thanks for the kind words. I have yet to tackle a multi cylinder model engine and a boiler so I don't think I am quite in the same class as the others you mentioned but it sure gave me warm fuzzies. :bow: :bow:

Now all I have to do is keep clear of the "Fluffy Bunnies," especially if they are overshadowed by a pink terry towelling dressing gown. ::) :eek:

tel can explain, (I hope). ???

Best Regards
Bob
 
I put it all back together and applied air. Ran a few pounds lighter (i.e., 70 PSI) but came to a halt when the crank pin came loose. :(

Another reason not to run it CCW.

So it needs another partial disassembly, retuning, etc. I think I am going to put this off until I can get a polishing setup established so that I can bling it at the same time. Meanwhile I need to put the finishing touches on the paddleducks engine.

And the shop was such a mess I spent the rest of the afternoon cleaning up (and still not done).
 
:D :D :D

I understand you kvom, when an engine (or two) are about to be finished, usually the shop is such a mess that one day isn't enough to clean it...

the liney halo however is a wonderful engine and everything is worth to build it
how are going the POM votes? I voted for you, hope you catch the victory :-*

 
That engine really has the look of an internal-combustion radial. :bow: I can't wait to see it finished and polished.
 
KVOM,

I would like to know if your Halo is running any better since you last posted the video. I just started making chips on this engine.

Dave
 
Like all my other engines (except the flame eater), the Halo is sitting in pieces in a drawer waiting for me to "bling" it and build a better manifold. :( I also would want to remake the master rod, and probably then remake the heads from brass rather than aluminum. Still, it was fun to make.
 
I plan to use brass for the heads as well. Thanks for the response

Dave
 
Great build kvom!!! ;D

Can't wait to see it all blingefied!!!!

Andrew
 
Back
Top