Lifelong Dream: Live Steam

Home Model Engine Machinist Forum

Help Support Home Model Engine Machinist Forum:

This site may earn a commission from merchant affiliate links, including eBay, Amazon, and others.
black85vette said:
I have also spent some time in Northern Arizona. My dad owned a motel in Ashfork right on old Rt 66......

You don't say! My wife & I did 20 years outside of Phoenix prior to moving to the Ozarks. During the early part of that time, laid-off from work during the Reagan REcession, no job available, we lived for a year near Show Low, at 6700' altitude, up in the woods with no electric power or water. Best experience of my life! My nephew has lived in Flagstaff since mid-80s, worked at NAU, now counsels at Coconino Community College. My very first trip through that area, I-40 was incomplete, 1960s, and I recall passing through Ashfork, Seligman, Valentine, Peach Springs, I believe it was, following old Rt. 66 to Kingman- a most beautiful part of our country!

I fully understand the desire to again be amongst mountains and real scenery! jack
 
cobra428 said:
.... Got my Lionel's from my childhood and my dad's Lionel's from his (1925 vintage).

That's a beauty you have there, I wish I lived closer to visit.

Tony

Thank you, kindly! It's only as far as you wish to travel....
My first Lionel set was a black steamer, 2-6-0, I think, maybe 4 cars, a little track, no accessories, maybe 1949 or so. A bit later, the new Santa Fe red & silver diesel came out, the folks got me that one for Christmas, then one accessory each important date: birthday, Christmas again. Over a span of years I managed to fill the basement with a fairly big permanent layout, about 12X18 feet as I recall, automatic switches, etc. The kid on the end of the block, Doctor's son, had EVERY accessory, coal loaders, log loaders, milk cans, how I lusted after his stuff and envied him; he NEVER even played with the damn things, and could not learn how to connect anything to make it work. Thay say money brings privilege, but now I see it was I who was privileged then, as I can truthfully say those Lionels taught me many of the basics of Electricity, gave me enough interest to secure as an adult, a degree in Electrical Engineering.


Very nice info on the drive wheels. Thanks. This is going to be a thread to watch.

Ron
 
jack.39,
I know what you mean. My basic electrical knowage came from those trains. I knew how to hook them up when I was 6. Just wanted to play. I think it was a conspiracy by Mom and Dad to make me learn. No computers back then, that was the only game in town. I have boxes of Lionel's mark in pencil with the date of purchase, while I was still in the oven (got to love Dad's). I think I have the same set you have 2-6-2 and many other cars. I always asked Santa to bring me a car or loco for Christmas. Now my HO's have sound and digital control (NCE and Sound Trax) they cuff and you can hear the fireman shoveling the coal. boiler creek and the blow down.

Good to have you here Jack! I'm an airplane guy but still a Trains Planes ans automobile guy!

Happy New Year to ya!

Tony
 
Please understand that when I started this engine, we had no: computer, digital camera, and little current knowledge of the technology. Blackberries were still something we picked growing wild near our house; yum, they are good! So, all the pics posted so far, were taken with throw-away 35mm cameras, and I scanned my prints, then sized them for forum presentation, and enhanced them so they would show detail better. We did get a D. C. about 2 years ago, cheapie, which would not get in close-up; it fell off the kitchen counter about 3 months ago, and then started turning off whenever it wanted to! So, now we have a pretty good one; all future pics will be taken using the new one. However, I must apologize for the poor quality of some of the early pics, but at least you can imagine my end of this harangue- our location allows only dial-up internet service, through the local phone co. Satellite we have decided is just not within our meager budget. And, it seems, it isn't really all that fast; Hughes only GUARANTEES 108kb/sec, hell, our modem rates at half that, runs at 1/4 of that, and Hughes would cost 5 times as much! Now that you-all are bored so much the following will be ignored................

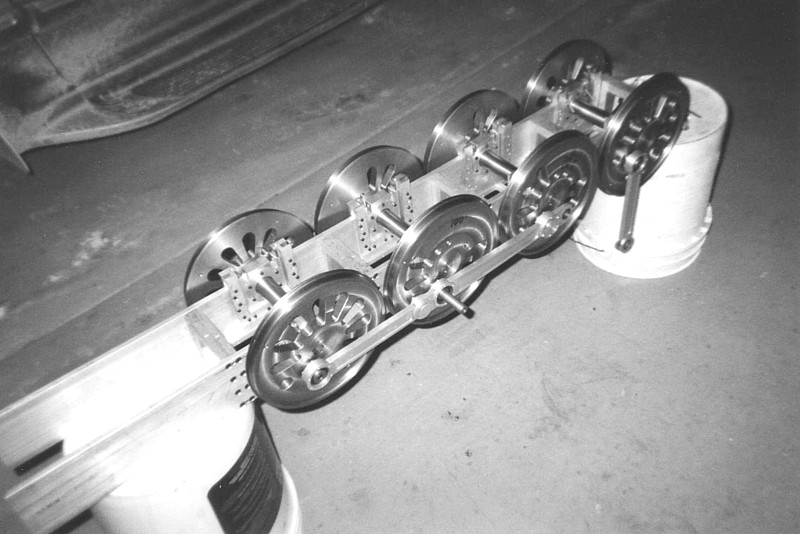
Here is a pic of the drive wheels mounted in the frames, with the side rods attached. Originally, I thought steel ground-stock would be appropriate, until it came to buying it..., I wound up using 3/8"X4" wide 6061-T651 aluminum, reasonably strong stuff, and those 2 slats are kept properly separated and aligned by 1" thick cross pieces, guess they call them "spreaders"? They are dowelled in location and later I elected to add 1/2" thick top plates which are close-fitted between the rails and spreaders, and screwed to both from the outside and through the spreaders. Sorry, I have no pics of just the frame. As stated, when this part of the project was built, I did not yet know what an Internet forum WAS, much less that I would be sticking pictures into one!

The "hornblocks" and axle boxes can be seen here. The boxes slide up & down confined within the horns by a 1/2" wide groove. I elected to use Martin Evans" suspension scheme, neglecting to incorporate equalization of springing, using individually-adjustable springs to secure even loading on drivers, thinking I could lay track good enough to get by with this. Well, it works, but sometimes rather "iffy". One's first attempt includes little knowledge of who's "expert opinion" is of true value....If someone wants to know how I "quartered" the wheels, please ask!
img04010.jpg

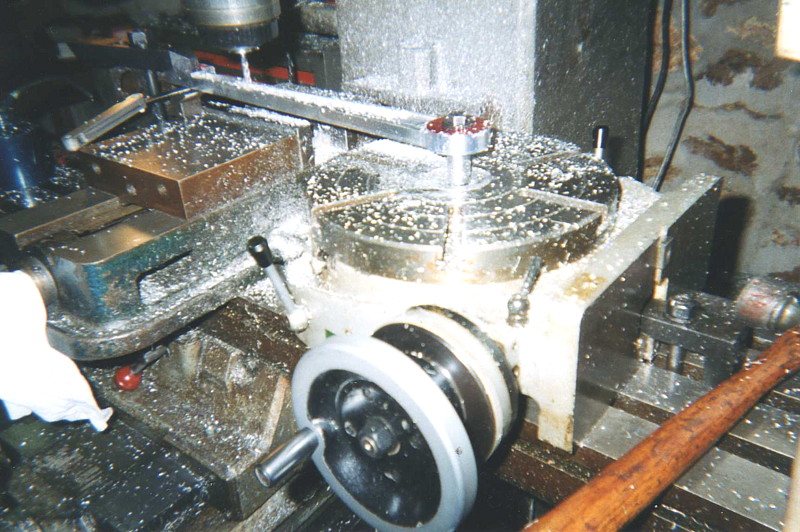
Below is a main rod being "fluted" (made to look like an I-beam cross-sectioned piece). It is bolted to a post driven into the rotary table's tapered center-hole, at it's "big end", and supported out above the vise, note the feeler-gauge stack supporting it to give rigidity for milling. This scheme allowed me to move the rod angularly by rotating the table a bit, which helps, since the rod tapers in width along it's length. This saved fastening it down, loosening, moving, locating, refastening, etc.
img04110.jpg

Here's a shot which shows fairly well, before painting, the Baker Valve Gear, and other associated parts. One of the ball bearings which support and guide the valve stem can be seen peeking through the window in the guide. Those were difficult to make, one of the most intricate parts, actually, in the whole damn locomotive! Hey, if anybody is interested, please ask about drawings, I'll be glad to post my prints of any of these parts. Beware, though, I started out gung-ho and made blue-print quality reproducibles, but toward the end, there is a stack of 8-1/2X11 sketches, even of things like the steam pump!

The crosshead consists of a hunk of 6061, also fairly involved, having 4 ball bearings, you can see the 4 hex-head screws which retain the pins they ride on, out near the corners of the head. The 4 bearings ride all in a plane, in grooves 3/16" deep in the 2 bars which are seen above and below the head. So far, after some few zillions of cycles, there is not discernible play in those bearing grooves, even though they are soft. The combination lever, and the other attached to it, whatever it's called, ride also on little ball bearings.

The "dog-leg" in the eccentric rod is....sh!t, don't ask, please! (miscalculation "fix").
img04210.jpg


And, finally, the 
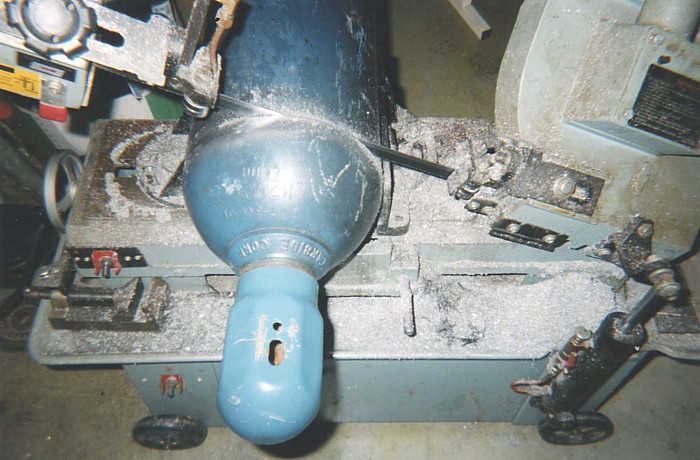
ultimate scrounge! Needed a small metal box, leak-tight, for oil reservoir. Sought out wife. Request made regarding maybe a spice-can? Just right! Imported Hungarian red pepper, still packaged like in the old days! Wonder WTH "SZEGED" means in Hungarian? It fastened down on top of the valve guide by little ears soldered to it's base. The cap is a flip-up plastic affair with a small hole just right for filling with a small funnel, the top actually being mostly concealed beneath the "catwalk" which ain't there yet, in the photo. The little tube feeding into the side of the smokebox carries cylinder oil to the pistons and valves. A whole story of imponderable impact lies behind the oil feed. Remind me, if I forget! For me now, it's "na ucho" after a nice cold bottle of homemade beer! See you tomorrow! jack
img04310.jpg


What is "quartering" and how is it done? The Drawings would most certainly be appreciated. Although I probably won't build in this size, it will give me an idea of what's in store for me when/if I finally give it a shot.
It appears that something like loco building is a long term project, even in smaller sizes, say half the size of yours.


Ron
 
ozzie46 said:
What is "quartering" and how is it done? The Drawings would most certainly be appreciated. Although I probably won't build in this size, it will give me an idea of what's in store for me when/if I finally give it a shot.
It appears that something like loco building is a long term project, even in smaller sizes, say half the size of yours.... Ron....

Ron, drive wheels on a typical steam locomotive are each rigidly fastened to their axle; this means a pair on a given axle rotate together along with their axle, always "fixed" in relation to each other with respect to angular location. In simpler words, a point on one wheel remains exactly in line with a point on the other, as they rotate together. One pair has the crankpins to which rotational force is applied by the main rods connected to the pistons in the cylinders. When a wheel is located rotation-wise such that a straight line may be drawn through the center of the main rod passing through the center of the wheel, it is termed to be on "dead center", dead meaning no matter how hard the rod pushes in either direction, it can't turn the wheel.

Now, if the 2 crankpins on opposite sides of the driven pair of wheels are in line, or 180 degrees out of line, with each other, no amount of force applied to either or both main rods could make the wheels begin to turn. If you can visualize this condition, then it will be clear that if the wheels are locked onto their axle in such position that the crankpins are 90 degrees apart rotationally from each other, the wheels are said to be "quartered". Such a condition allows that one or the other of the 2 cranks will ALWAYS be able to exert turning force to it's wheel, thereby making the wheel/crank system together "self-starting".

Quartering must be done accurately, in the case of multiple drive wheels, which virtually ALL locos have, in order that the side connecting rods be able to rotate freely as the whole bunch of wheels turn. If quartering is imperfect, the rods will "bind" and lock-up as rotation is attempted.

Yes, this type of modelling is long-term in nature, especially if the work involves not only assembly of parts, but the making of them, as well. Now, there are literally hundreds of drawings involved, which I can't possibly spend my remaining time here waiting on my computer to do it's thing, so, if you will be good enough to indicate which part(s) you might want to see drawings of, I will be glad to dig into the heap! I would say the scale chosen does not greatly affect the time involved in building; all the parts are similar, just different sizes. If the desire to be involved in this work is felt to be nagging at you inside, you're ready! jack
 
WARNING! Controversial post! May provoke severe criticism.

Heavy-wall, strong steel pipe big enough for a 1/8 scale boiler was needed, but I had no clue where to "scrounge" that item! Then it dawned on me: what commonly-encountered item was actually almost perfect for this job?

img01310.jpg


Thanks for the "quartering info. That makes sense.

Regards the drawings, didn't realize there were that many. Fair enough, when I see something that I'd like to see more of in the way a drawing I'll let you know.

Thanks again

Ron
 
Thanks for all the pictures Jack. I'll be watching the boiler build. I scrounge to.
 
It was asked if the loco has been run yet. Yes, trial runs only, but the fact that it pulled itself along the tracks right "out of the box" was rewarding in itself! I had run it on boilers-full of air previously; those trials revealed the need for greater lateral movement capability in the drive wheels, as 50-foot curve radius proved to allow the lead wheels to "climb" the rail now and then, resulting in derailing. A story in itself, that "fix" has remedied the problem.

I had no idea my wife took some pics from across the road, where our house sits. The next time I went to use our computer, the pic below appeared as our desktop scene, a rather pleasant surprise! I was using a bottle of propane sitting behind me on the tender as a fuel source. This of course will not be the case later on. jack

1st_ti10.jpg
 
Vernon said:
Beautiful.

Aw, shucks! It stays nice here much longer than where I grew up, outside Chicago, even though we're only about 300 miles further south. The pic with steam billowing was shot in late October.

Seriously, thank you, kindly! (if you mean the loco! :) ) jack
 
Most of us get really excited when our little engines puff along on our work bench. Must be a real thrill for it to pull you along behind it!

Lets see..... all I need is:

1. Some more land
2. Lots more skill and experience in the shop
3. A bunch of books and learning about locomotives and steam
4. A ton of motivation
5. A vision of the completed project
6. Persistance
7. A wife who will put up with me building a locomotive engine in the spot where she used to park.

I am sure I left something out but I know I am a long way from a project like this.
 
Is not an option! Seriously, I found that if one dreams the dream long enough, somehow things can suddenly "click" together. Having been mostly a "city boy" all my life, I perceived that a chunk of land of decent size was to be forever beyond my reach. How wrong that was, took a lifetime to find out. My wife, bless her, loved Southern Missouri as a kid, visiting her Grandfolks each summer (from Indiana), so it was a natural for her to start searching the 'net for places there when I announced we had enough of the rat race.

277 acres, about 90% forested with oak, pine, sycamore, big hills locals call "mountains", crystal-clear year-round creek flowing across it, no zoning law (no building permits, regulations of any type), population density (this county) about 7 persons per square mile, the old farmhouse the wife always wanted, a pond full of fish, real secure feeling regarding crime (hardly any), property taxes $1.00 per acre per year! Real rural.

Downside: Got electric power (goes out often), telephone, no DSL or high-speed available, actually dial-up was not available until after we had been here about a year, no cell phone signal for a 15-mile radius. If willing to cope with this paragraph to have the one above, come join us! jack
 
hammers, I certainly do appreciate your input. However, I have to tell you that viewing vids is almost impossible with our dial-up service. I did try the first one; after five minutes, all I had on the screen was the opening frame showing the title, so I gave up.

This bugs me no end, but our only alternatives would be to move, or try satellite internet. Neither of these fits our meager budget.

jack
 
I quit trying to get a decent shot of the layout, with the old camera. My wife surprised me with this long shot, which at least shows the variety of curves, if not the entire thing; it's about 750 feet around.

She got a satellite view of it, not too bad, but found the software will not allow one to transport the image elsewhere. If anyone knows how to do that, please advise; I'll show it here.

Thanks for your interest. jack


1st_ti12.jpg
 
Jack

Nice picture of your layout. If you have a satellite view then when you get it on the computer screen you can do a screen capture and save it as a .jpg file then you can handle it like any other photo file. If you need help with a screen capture let us know and either I or someone else on here can help you out.

In Windows XP this may work

1. Have image you want on screen
2. Press <Ctrl> -<Print Screen>
3.Go to blank page in word processor press <Ctrl> - <V> this will insert the image on the page. Now save the page.

Cheers :)

Don
edit - Changed to ctrl V
 

Latest posts

Back
Top