
You are using an out of date browser. It may not display this or other websites correctly.
You should upgrade or use an alternative browser.
You should upgrade or use an alternative browser.
Honda GX160- 8.5cc
- Thread starter Basil
- Start date


Help Support Home Model Engine Machinist Forum:
This site may earn a commission from merchant affiliate
links, including eBay, Amazon, and others.

Beautiful, are you going to paint the brass? originality
or beautiful brass?? always a dilemma. A very interesting
and beautiful build thanks for posting.
or beautiful brass?? always a dilemma. A very interesting
and beautiful build thanks for posting.
jamesmattioli
Active Member
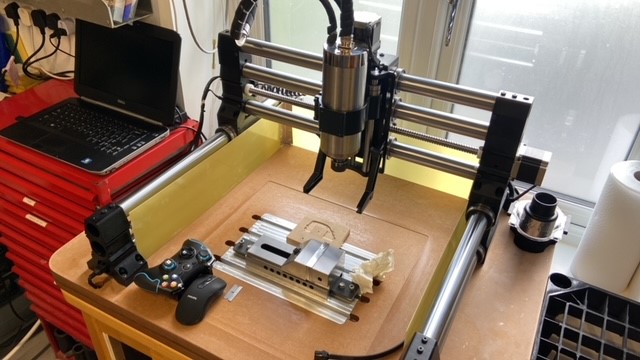
Ciao ho visto che usu una cnc per tagliare, mi sai dire dove l'hai presa, o link del sito .grazie funziona bene?Just before Christmas I decided to get a CNC router. After much research the Onefinity is what I decided to go with. Being in the UK and they are in Canada, I was a little concerned! But all worked out well and all 3 boxes arrived safe and sound. It is their machinist version which has a 406 square machining footprint. I've set it up without the customary spoil board opting to inset a "T" slot plate into a sturdy laminated machine base? Aluminum plate eventually!
I operated a Fadal CNC with Virtual Gibbs for many years and putting a tool into the table would have resulted in a self inflicted fate worse than death.
Fusion CAM is what I am getting up to speed with, Amazing features! and once I get my head around it I will be fine but it is straining the grey matter at the moment. Very happy with the results so far. I was really struggling to figure out how I could reproduce the two levels on the front cover and blend them to the drive flange, it was keeping me awake at night.. Onwards and upwards.

Thanks. I will be painting Honda red. The pull start assembly will be made from aluminum also painted.Beautiful, are you going to paint the brass? originality
or beautiful brass?? always a dilemma. A very interesting
and beautiful build thanks for posting.
Onefinity CNCCiao ho visto che usu una cnc per tagliare, mi sai dire dove l'hai presa, o link del sito .grazie funziona bene?
Attachments
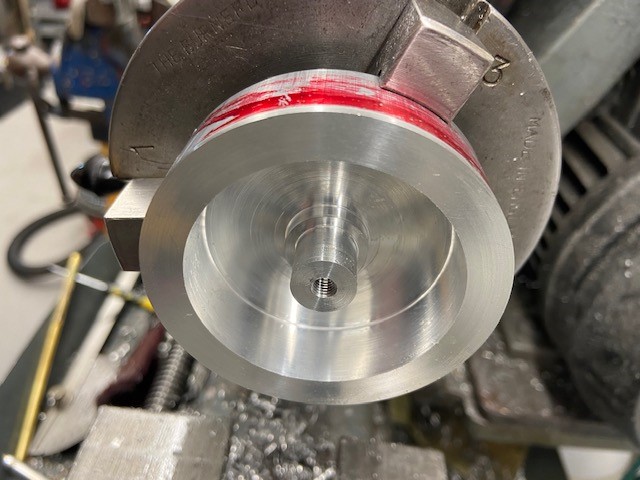
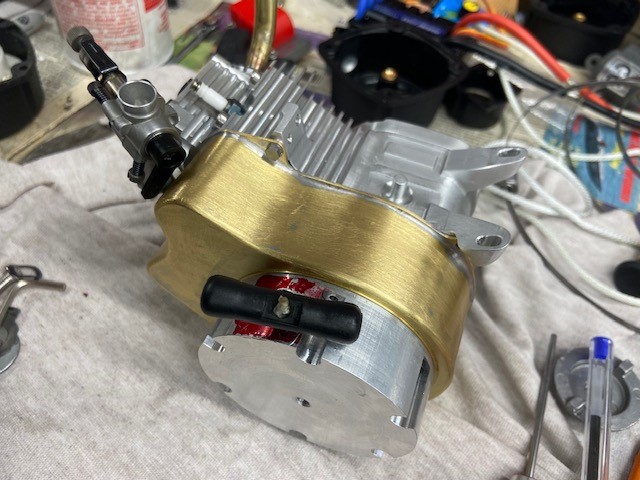
The pull starter is close to complete. I was going to go with a one way bearing but then started looking at the Zenoah starter. This is an excellent heavy duty assembly.
I also like the way you get some initial slack before the pawls engage and that it disengages completely as soon as the engine starts. With some adapting I was able to get the guts of it within the required size ally housing to look scale for this engine. I machined up a brass engagement drive dog that retains the flywheel.
The rest was some CNC work on the outer vents and then some long winded rotary machining of the peripheral slots. Happy with the result though. Just need to make a Delrin liner for the rope to run on.
Attachments
-
 IMG_7996.jpg101.4 KB · Views: 79
 -
 IMG_8002 (1).jpg122.3 KB · Views: 86
 -
 IMG_8009 (1).jpg127.4 KB · Views: 90
 -
 IMG_8010.jpg118 KB · Views: 90
 -
 IMG_8013 (1).jpg139 KB · Views: 87
 -
 IMG_8023.jpg120.6 KB · Views: 87
 -
 IMG_8031 (1).jpg110.5 KB · Views: 88
 -
 A47478DD-5EE1-459C-AA08-EF56C898AC1D.jpg89.5 KB · Views: 102
 -
 IMG_8066.jpg110 KB · Views: 97


Last edited:
jamesmattioli
Active Member
È un capolavoro bravissimo, bisogna sapere lavorare e ci vuole tanto tempo. Io non sono al tuo livello, e non ho mai tempo.The pull starter is close to complete. I was going to go with a one way bearing but then started looking at the Zenoah starter. This is an excellent heavy duty assembly.
I also like the way you get some initial slack before the pawls engage and that it disengages completely as soon as the engine starts. With some adapting I was able to get the guts of it within the required size ally housing to look scale for this engine. I machined up a brass engagement drive dog that retains the flywheel.
The rest was some CNC work on the outer vents and then some long winded rotary machining of the peripheral slots. Happy with the result though. Just need to make a Delrin liner for the rope to run on.
È un capolavoro bravissimo, bisogna sapere lavorare e ci vuole tanto tempo. Io non sono al tuo livello, e non ho mai tempo.
Grazie James
ajoeiam
Well-Known Member
The pull starter is close to complete. I was going to go with a one way bearing but then started looking at the Zenoah starter. This is an excellent heavy duty assembly.
I also like the way you get some initial slack before the pawls engage and that it disengages completely as soon as the engine starts. With some adapting I was able to get the guts of it within the required size ally housing to look scale for this engine. I machined up a brass engagement drive dog that retains the flywheel.
The rest was some CNC work on the outer vents and then some long winded rotary machining of the peripheral slots. Happy with the result though. Just need to make a Delrin liner for the rope to run on.
Wow! Most impresssive!
I looked around for the best way to do pushrods and discovered ejector pins. They are not expensive and are hardened steel. Cut them to length and ground and polished the ends round. Easiest job yet!
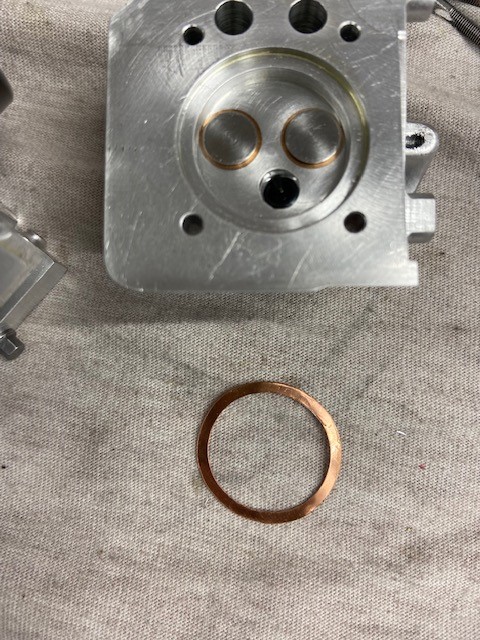
I wanted to use a copper head gasket, having no luck finding anything online that fit the bill I was going to make some fixtures and machine a stack from thin copper shim stock. A friend has cut some gaskets on his Cricut for this engine so we thought we would give it a try on the thin copper. It managed to score it enough with about 10 rounds that with a little working the shim washer broke free from the sheet. Result
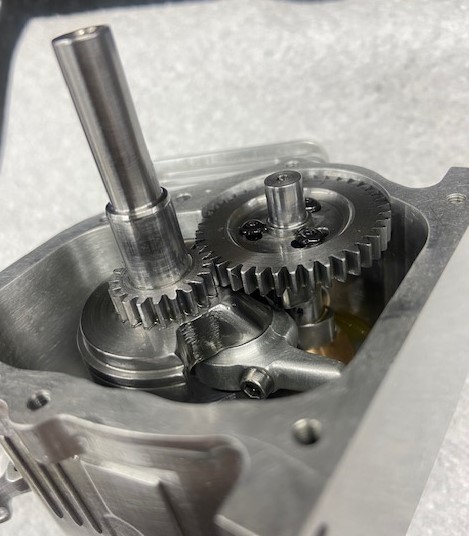
I have started to assemble the engine this evening but have slight interference between the exhaust cam lobe and the connecting rod. I will machine the rod thickness some which will be good because the rod is a little heavier than I would like, this should help with the balancing.
I will be initially setting the engine up to run with an OS four stroke carb which bolted on with very slight modification and a straight pipe exhaust.
Fingers crossed!
I wanted to use a copper head gasket, having no luck finding anything online that fit the bill I was going to make some fixtures and machine a stack from thin copper shim stock. A friend has cut some gaskets on his Cricut for this engine so we thought we would give it a try on the thin copper. It managed to score it enough with about 10 rounds that with a little working the shim washer broke free from the sheet. Result
I have started to assemble the engine this evening but have slight interference between the exhaust cam lobe and the connecting rod. I will machine the rod thickness some which will be good because the rod is a little heavier than I would like, this should help with the balancing.
I will be initially setting the engine up to run with an OS four stroke carb which bolted on with very slight modification and a straight pipe exhaust.
Fingers crossed!
Attachments


Last edited:
After some 3D printing and machining of the cooling fan I got impatient to hear it run. Didn't think it would start this easy. Opened the needle just over a turn, couple of pulls and it was running. Really chuffed!
Attachments

Last edited:
Wow, awesome, sounds great. Congratulations on your first run. The pull starter is epic.
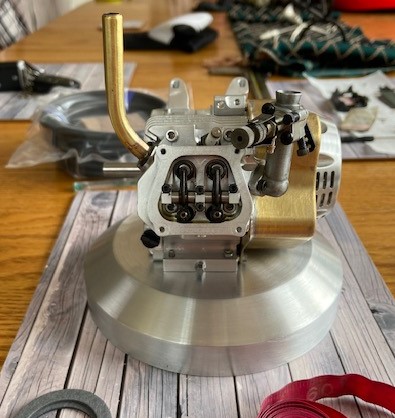
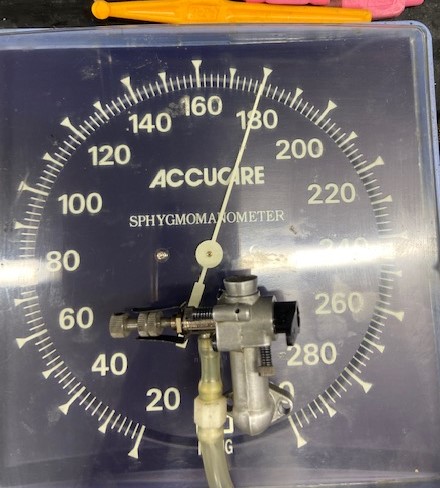
Thanks Greg. Starting work on the ignition switch and looking at designing a float chamber carb. I've done a flow measurement so I have a fairly good gauge where I am at. Now I know the engine starts and runs nice and smooth I can take my time and finish all the little detail items which I enjoy.
Attachments

Wonderful!!!
Congratulations. Amazing the level of details from the original engine you added to this model project.
Edi
Congratulations. Amazing the level of details from the original engine you added to this model project.
Edi
Wow, that runs nicely. Well done!
Thank you guys. It's been a really enjoyable build for me. Still quite a bit to do, mainly detail work at this point. The carb might take some sorting because of the top mounted fuel tank. Looking forward to that challenge.
I am at that point now where I am looking towards my next project.
Something steam I think
Honda petrol tank 3D printed plug.
I am at that point now where I am looking towards my next project.
Something steam I think
Honda petrol tank 3D printed plug.
Attachments

Last edited:
Just seeing it run - Fantastic!
Obviously the carb has to be "to size" rather than "to scale" (due to fluid dynamics that I don't understand). Looks good and works!
Similarly, the coil has to generate the 2000V or whatever, so cannot be "to scale". (Looks relatively huge on this engine). Of course, you can hide it in a box somewhere, but is it possible to re-work a "Coil-on-plug" spark plug cap to make a smaller than "normal" coil? I have never stripped none down to see what the innards are like, to find out if possible - or not?
Just another (stupid?) idea..?
K2
Fantastic work!!!---Brian