Help with modus operandi please

Home Model Engine Machinist Forum

Help Support Home Model Engine Machinist Forum:

This site may earn a commission from merchant affiliate links, including eBay, Amazon, and others.

Mo deller

Well-Known Member
Joined
Mar 14, 2009
Messages
212
Reaction score
2
I want to help a friend out by machining an alloy prop driver for an engine conversion he is doing.
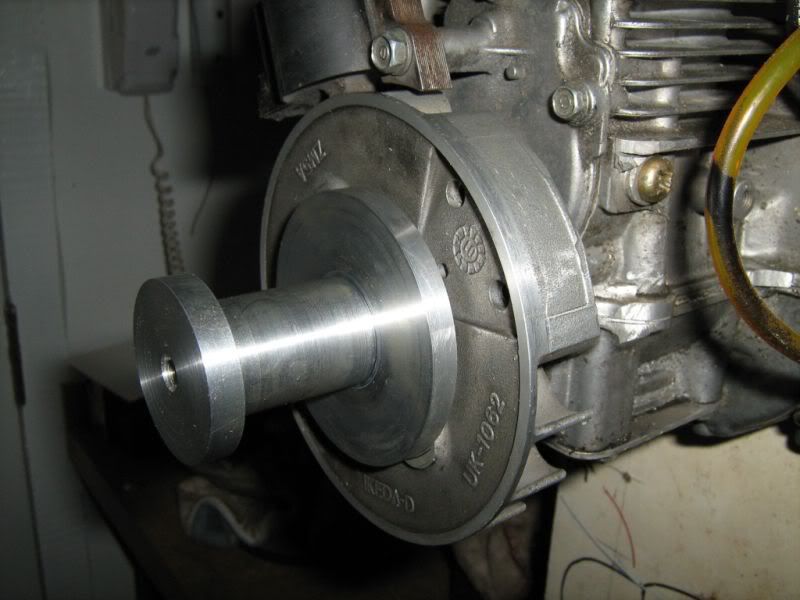
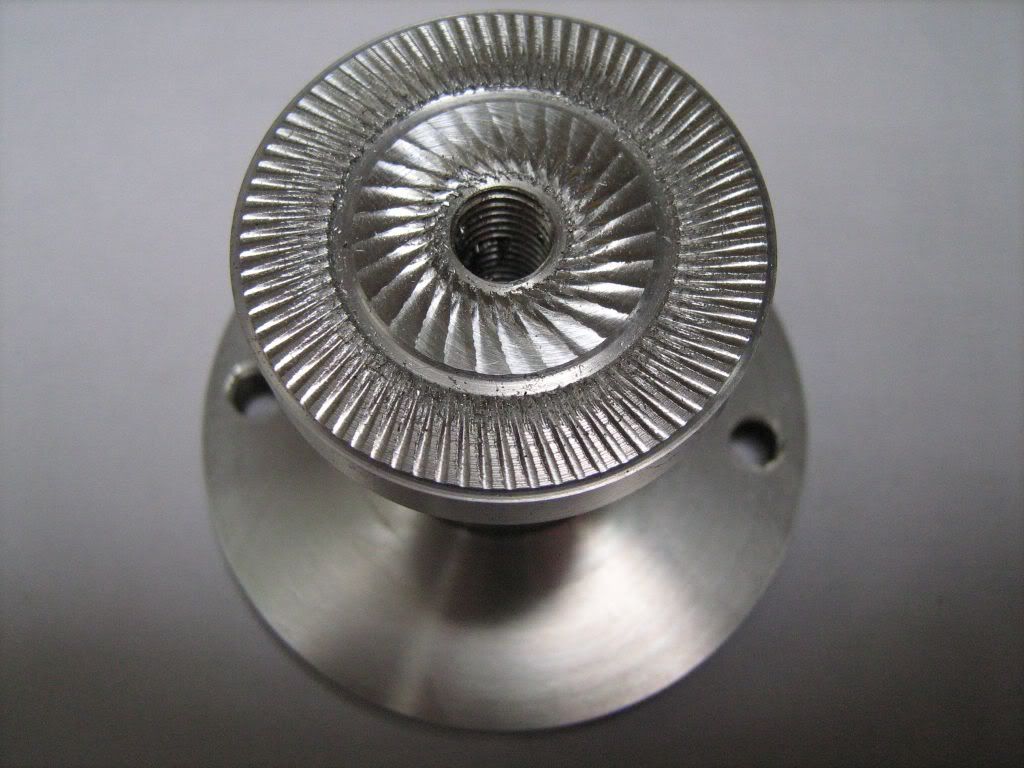
He has produced a drawing but I can't work out the best way of going about it. The large dia with a small 2mm boss fits against the flywheel. If I start with that end it only has the 5mm to then chuck and finish the other end which to me doesn't seem like enough to hold considering the length left to turn. The other way round isn't much better so I am stuck as to know how to proceed.

Peter ???


View attachment Prop Driver.doc
 
Do you know the thread that must go on the inside?

I'd suggest starting with a suitable blank just longer than needed, face one side and turn the 42mmx2mm step, drill through & tap the thread to run true.

Then make a threaded mandrel with a biggish shoulder you can screw the blank on, with the screw part just shorter than finished length for the workpiece. Screw the piece on the mandrel and machine the rest of it.

You'll just have to determine at which points you are going to drill the holes in the flange.

Regards, Arnold
 
The thread will be 8mm but doesn't go right through,or doesn't need to anyway. Not sure if the tap will go that deep ie. 56mm. Thinks....... I could tap say half way then that would do for the mandrel and then tap the front part for the prop bolt after. I think that could work.

Thanks
Peter.
 
Yes, that should work. I'd suggest doing the tapping from the tap held in your tailstock chuck to keep things as concentric as possible.

Also, if you can, thread the mandrel using the lathe to get the tread true; if you don't want to do the entire thread, a part-turned thread will help a normal die to get a good start and run pretty true.

Regards, Arnold
 
Mo,

Consider facing one end and then bolting that end to a faceplate. If you produced the 2mm boss first you could start with a sacrificial plate on the faceplate which you would bore out to accept the boss. Then you could drill through from the back of the faceplate and tap the holes in your work. Use soft screws so that when you get down to producing the 5mm disk you can just cut screws and all. If these screws are in the same place as the holes you need to make to complete the part it could work.

You would need to remount the part somehow to open out the bolt holes after finishing on the lathe.

Alan
 
Another good method Alan. That could be easier for me than Arnolds threaded mandrel. I'll ponder a bit on both ideas and see what stuff I've got I can use.

Thats a great help.Thanks to you both.
Peter.
 
How about this:

1) Chuck stock that is somewhat overlong (say 70mm), face, center drill, drill/tap thread, and turn half of length to 38mm. Make tapped hole deeper than necessary.

2) Rechuck the other end using the 38mm portion; face, center drill, turn flange diameter and boss.

3) Rechuck on the 38mm portion exposing the area needing to be turned to 25mm. Support the flange end with a live center. Finish turning profile.

4) Use a mill to remove the extra length from the hole side.
 
kvom said:
How about this:

1) Chuck stock that is somewhat overlong (say 70mm), face, center drill, drill/tap thread, and turn half of length to 38mm. Make tapped hole deeper than necessary.

2) Rechuck the other end using the 38mm portion; face, center drill, turn flange diameter and boss.

3) Rechuck on the 38mm portion exposing the area needing to be turned to 25mm. Support the flange end with a live center. Finish turning profile.

4) Use a mill to remove the extra length from the hole side.

;D yep that would work too but don't have the mill set up yet :(

There is one other area I am unsure of and that is the best method of turning between and including the left and right shoulders. Do I just have to do one side,change tool and carefully machine to join with the first bit or is there a clever way of finishing in one pass with a double edged tool ?

Thanks
Peter.

 
I've done this on occasion with a parting tool. Part to depth on one (or both) sides, then use a normal tool to turn down the middle bit.
You could also do side-by-side parts to near-depth on the middle bit. If your parting tool is sharp, you can then finish the entire length using it with a slow pass if the bit will stand some side-strain.
 
Hi Arnold, I think I have it now. My normal parting tool is the very slim(1/16 ish) tool steel in a holder so that wont do. Now you've said that the penny has dropped and I can visualize the tool I need to grind. There is no reason to have to finish square in the corners and I think a radius will be much better and stronger anyway. Therefor a double edged radiused tool should be good.
Just don't know why I couldn't see that before ::)

Many thanks
Peter.
 
Managed to do a half decent job with this. Didn't all go to plan and I ended up changing tools a few times along the way.

Hondapropdriver_20090704_24.jpg


Hondapropdriver_20090709_26.jpg


Thanks again for the help,
Peter.
 
Hi

If anyone needs to make such a part again; one solution would be to use soft jaws on the chuck.
With sowft jaws, you could clamp this workpiece on the large diameter. (And of course support with the tailstock)


My Way to do this would be:

1. turn the smaller end diameter from the small end to where the large end begins. But leave some material for finishing. Do not turn the recess yet. Then bore through the hole part and make the threads. Before unclamping it, make a 60° camfer. Then you clamp it inversely. You can clamp it on the "shaft" you just turned.

2. turn the large diameter end to a little more than exact size. Also make a 60° camfer.
3. Now you can take the piece between centers, turn the recess and finish it. This will result in a proper concentricity and you may not even have to balance it (depends on how high it revs...)

Florian
 

Latest posts

Back
Top