Building one of Rudy's steamers

Home Model Engine Machinist Forum

Help Support Home Model Engine Machinist Forum:

This site may earn a commission from merchant affiliate links, including eBay, Amazon, and others.
Looking real good Dean, gonna be a real delight when it's done.

With ref to the wood lagging however - there's always a way. Looking at your pics I can see two or three methods that would work nicely, one of which leaps to the eye.

Don't want to pinch your space, but here's one I did a few years back.

cylinder4.jpg
 
Mike and Zee, thanks. Always good to hear your comments!
And Mike, thank you again for the trouble you went to getting me the sticks. I'll use them on a better thought out plan on an engine or two down the line.

Tel, thanks to you, too.
I tried the method shown in your picture before I decided to put on the brass jacket. No go, in this case.
The steam chest boss is right up against the lower cylinder head, and there is no room for even a piece of tissue paper in there, much less a brass strap.
You are right, though, there is always a way! In this case, the way was to use a shiny brass jacket. Something that Dave (Steamer) had suggested a few weeks back via p.m. I think that will turn out to be a good idea.

It'll all look nice when it's done. I almost promise!

Thanks again, all.

Dean
 
It'll all look nice when it's done. I almost promise!

Geeze, Dean. I'd say it already does that!

Dennis
 
Thank you, Dennis. Very nice of you to say!

Zee, if you have blood lines that trace around the place, like to Kentucky, Arkansas, Kalifornya, Washington, Idaho, Montana, Indiana, Illinois, Pennsylvania, Sweden, England, Germany, or to Adam, then we're practically brothers!
A blood test will prove it. I'm sure we'll both test out at A-swarf-positive.

Dean
 
Dean, you already kept your promise :) - Looks nice already! Now it will only get better ;D

Regards, Arnold
 
Dean, the work you're doing on the engine is first rate. Everything is clean and neat, the finish is excellent. I tried lagging a small cylinder with wood one time and it got too fiddly. It's much easier doing it on a boiler. I like the way you went with yours.
gbritnell
 
kvom said:
If it's too fiddly for George it's too fiddly for almost anyone. ;D

Loving this build!

Kvom.. priceless!

Arnold, thank you, once again!

George, I appreciate your encouragement. Thank you for looking in on the build.

Dean
 
Dean,

I like wood lagging but your brass lagging looks great. Anyway, wouldn't the wooden bits normally be underneath metal sheet anyway?

Nick
 
Dean

I like wood lagging as well, have managed it twice, but I rather like brass anything, so brass lagging looks damfine to me too!

This whole build has been a pleasure to watch, you do really fine work.

Cheers, Joe
 
Nick, thanks again. I've seen old "real" boilers and a couple of old engines that had wood on the outside. Dave (Steamer) sent me a couple of pictures of (full size) brass lagged machines, which really did look nice. I don't know if there is wood under the brass lagging, or some type of regular insulation, like asbestos, and like that.

Joe, I'm with you on brass "anything". Thanks for your kind comments!


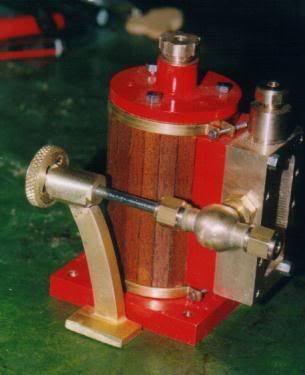
Today, just a few shots of the finish work. Although it's not real machine work, it needs
to be done, and someone may get something out of it.


303.jpg


First, the engine is disassembled to it's basic construction units so I can get to a few things.
The base needs a lot of finish work. For this piece, I chose what was probably the roughest
piece of aluminum flat that ever came out of a finish mill. It's what I had on hand. It may not
be visible in the picture, but it has grooves all down the long dimension, and the piece needs to
be filed flat. Also, a few rough spots on other pieces that need a little touch up.

Once that was done, the base was masked on the top and the rest of it painted the same
color as the sub-base.


304.jpg


Some gaskets need to be made for the heads, and for each piece of the steam chest assembly.
For the gaskets, brown paper sacks work well. If you need thicker gaskets, use large grocery
bags. For thinner gaskets, like I want, a small sack is better. I usually use the type of sack that
is flat, like what stationary comes in. They have a shiny-ish appearance, but couldn't find any last
time I was in town. That worked out well, though. The sack in the picture has a regular finish,
(not shiny), and it soaked up oil very well, which is what I want.

If you use this method for gaskets, best to avoid the white kind of sack that comes from greeting
card shops. They are very smooth, and some seem to repel oil to some extent. They may have a
little wax in them, or something similar.
Another note; I don't know if this kind of gasket will work well for things like cylinder heads on IC
engines, although I've used them for crankcase seals on that type of engine.


305.jpg


After marking out the general dimensions on the paper, one of the heads is coated with oil.
Once the oil soaks into the paper for a minute, it becomes transparent, and the locations for
the holes can be plainly seen.
I just poke the hole centers with a darning needle to mark them.


307.jpg


Then use one of these things to punch the holes out, using the pin holes to locate the punch.
The round bit that the punch cuts usually stays in the hole, and must be plucked out with a pin
or the edge of a razor blade. Hanging chad..


306.jpg


And there's a finished gasket. It's square, because that's the shape of the cylinder.


308.jpg


Next, a little packing for the glands. I used teflon tape for this, but have used small diameter
soft cotton string, too. For using teflon tape, peel off a few inches, and roll it between your
fingers to make like a rope. Then wrap it around the piston or valve shaft, and use the gland
to push it down into the recess where it will reside. It can't be pushed in too hard, or it will
start to squeeze on the shaft that runs in the packing. It needs oil, too, whether using teflon
tape or string.


309.jpg


There it is pushed gently into the hole.


310.jpg


Once it has been pushed into the hole, it holds it's shape pretty well.


That's it for today. Just have to finish re-assembling, and then, make the display base. The
base will probably take me days. It's made of wood. Eh...

Thanks again for looking in!

Dean
 
Great going Dean.

It certainly looks impressive all taken to bits :bow:

Regards, Arnold
 
Yes going really well Dean, looks like a heck of alot of parts in the stripped down pic! But for my own sanity, please explain that the green thing is not an M&M as my mind is playing all sorts of tricks on me! ???

Nick
 
Fantastic post. Great pic of all the parts. Very thankful for all the learnings.

Be careful with that M&M and keep it clean...it should last you at least a day. Two or three if you wait till after supper.

I've got Arkansas and all states in a bee-line to the Carolinas, Wales, and Germany. So our families may have crossed paths at some point. ;D

I hope I'm not A-swarf-negative.
 
Thanks for the idea on using teflon tape packing. Never would have thought about that. Better yet have couple of rolls of it in my tool box.

Great build.

JimN
 
Thanks for the encouraging comments and kind remarks, everyone.

Arnold, it's a fair number of parts. Not like some of the other builds here, though. It's amazing how many pieces one person can make, like for a multi-cylinder engine. Lots of fasteners on this one, all made in the shop, except for a few slot head screws and three hex set screws. Some of the assemblies are not taken apart in the picture. I just took it down enough to get to the parts I needed to work on, (for finish work, gaskets, etc.).

Nick, that M&M is a bit larger than the regular size. (I'll bet you figured that out already!) I put it in partly as a little gag, and partly for blood-brother Zee. It's actually a candy box, and came with a bag of real M&M's inside.

And speaking of you, Zee; There's no way you can be A-swarf-negative. It's all positive in your blood, friend. That's obvious by the morebetterness of each of your subsequent builds.

Jim, glad you found something you can use! I can't take credit for it, though. Someone must have shown me sometime in the past, 'cause I wouldn't have thought of it on my own.

I don't have any pictures today. Did a few final bits on the engine, and started the wooden base. Me and wood... Like oil and water. Working at it, though.

Dean

 
Hi Dean, I'm sure the base will come out good. I'm not a wood worker by any stretch of the imagination but I treat it like it's metal and I get by. I find that anyone who does nice work applies it to whatever material they work with.
George
 
Dean,

"Me and wood... Like oil and water. Working at it, though."

I saw that!! stickpoke Rof} Rof}

Tony
 
Haha! Can't wait to see the finished thing, it's going to be pretty spectacular.

Nick
 

Latest posts

Back
Top