Building Fred

Home Model Engine Machinist Forum

Help Support Home Model Engine Machinist Forum:

This site may earn a commission from merchant affiliate links, including eBay, Amazon, and others.
This thread is a LOT of fun to watch. Thanks for sharing it. :bow:
 
Looks better every time I check in, Arnold. I think when she's in motion, the shiny bits going 'round and 'round will really set it off.

I see your filing buttons took a bit of a beating.
I made some filing buttons some years back. Cut from drill rod, mainly to form a disc with a centering bore in the middle. Then hardened them and left them dead hard. They are so smooth and hard that when you get the work piece filed down to them, the file just slips across the buttons, as if it were sliding on glass. Makes a nice job of radii, and the buttons are so smooth that they don't hurt the file.
One of those kind of projects for when you don't have anything else in the works.

I'm kind of in the same boat with you, here in N. Idaho, (not having someone near who does this stuff). I live in a small town, (3500), and I've never run across another modeler. I do have an old friend who is a watch and clock maker here, though. Someone to talk to about metal, at least! Or I can go hang around the John Deere place. Like being in a really, really big model shop!

Keep up the good show!

Dean
 
Thanks Vernon & Dean :D

Dean, yes - brass was not ideal for the filing buttons, but I couldn't make them from drill rod, as my 2mm tap set was shot - got a new set in the meantime. And I'm glad I'm not the only one cut off; this site is great for guys like us ;D

Work interfered with my normal Saturday shop time this morning, but this afternoon I got some more done.

First up, I started hacking up a piece of 25mm square brass:
s0155.jpg


Ended up with blocks for the cylinders, port block and big ends:
s0157.jpg


Then on to the cylinders blocks; faced both blocks to size and bored the cylinders in the 4-jaw - 2 action shots; if you look carefully, you'll see some bright dots of swarf caught in suspended animation below & right to the workpiece:
s0159.jpg

s0164.jpg


The results of today's work - 2 cylinder blocks; one already marked out for port & pivot holes. I got a really nice finish in the bores, so no need for lapping :) - the spots in the bore is some "dust" from running the blocks over some 300 grit emery to get rid of machining marks:
s167e.jpg


Regards, Arnold
 
Hi Arnold


You really did get a good finish on the bores :bow: :bow: :bow: great job Thm: i like the mod you have done to your saw so you can cut short ends


Regards Rob
 
Arnold,
Really enjoying this thread. Keep it coming,please.
Dennis
 
arnoldb said:
I just want the live steam loco for now... I'll build "mining" cars for it (see below) - but very likely won't post building those on HMEM, as it's not on-topic :)

SURE it is! Rollingstock is as "on topic" as the flipping, slinking, rolling, blinking, and pumping attachments for the OTHER engines on here. ;D
 
Arnold,
Amen! to what Vernon said.
Dennis
 
Glad you got some more shop time, Arnold. I look for "Fred" in the topic lines everyday, and am always glad to see a new post about him.
The bores really do look good in the cylinders. Nice job!

Dean
 
Great work Arnold

Enjoying the thread keep them coming.

Have fun

Stew
 
Rob, Dennis, Vernon, Dean & Stew - thank you very much for checking in :)

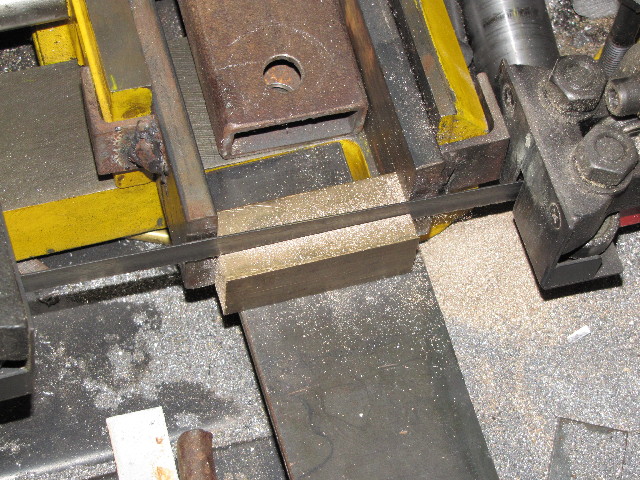
Rob, thanks very much mate - the finish in the cylinders is from the same boring bar I made that originally gave you a crick in the neck ;D - and thank you for the comment on my band saw mod, I'm very glad I made it; with material being scarce here in Windhoek, I need to use every bit I can ;D

Dennis, Vern & Ron - thanks for your support guys; your request for the rolling stock build is noted and on the tuit list ;) - but that will remain a future project for now. I just want need the loco to satisfy a little boy in myself that's been dreaming of it for 30-odd years ;D

Dean, thank you; I wish I was further along though, but every bit helps :)

Stew, thanks, and oh yes, I'm having fun ;)

On to today's itty bitty bit - some domestic issues interfered...

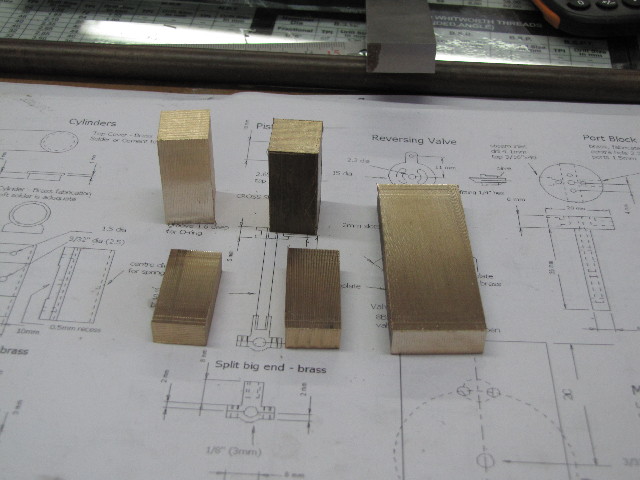
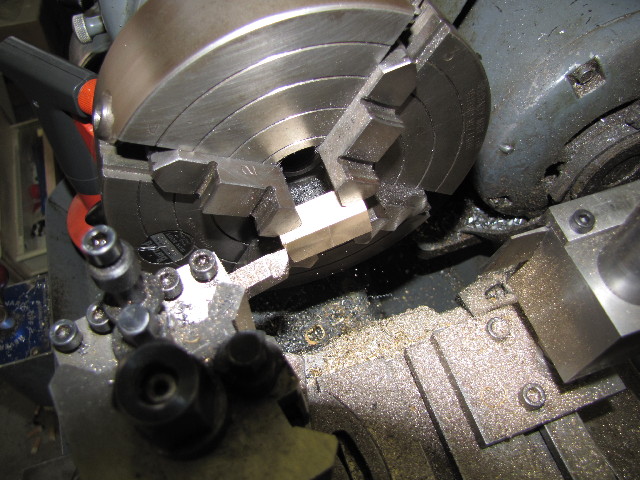
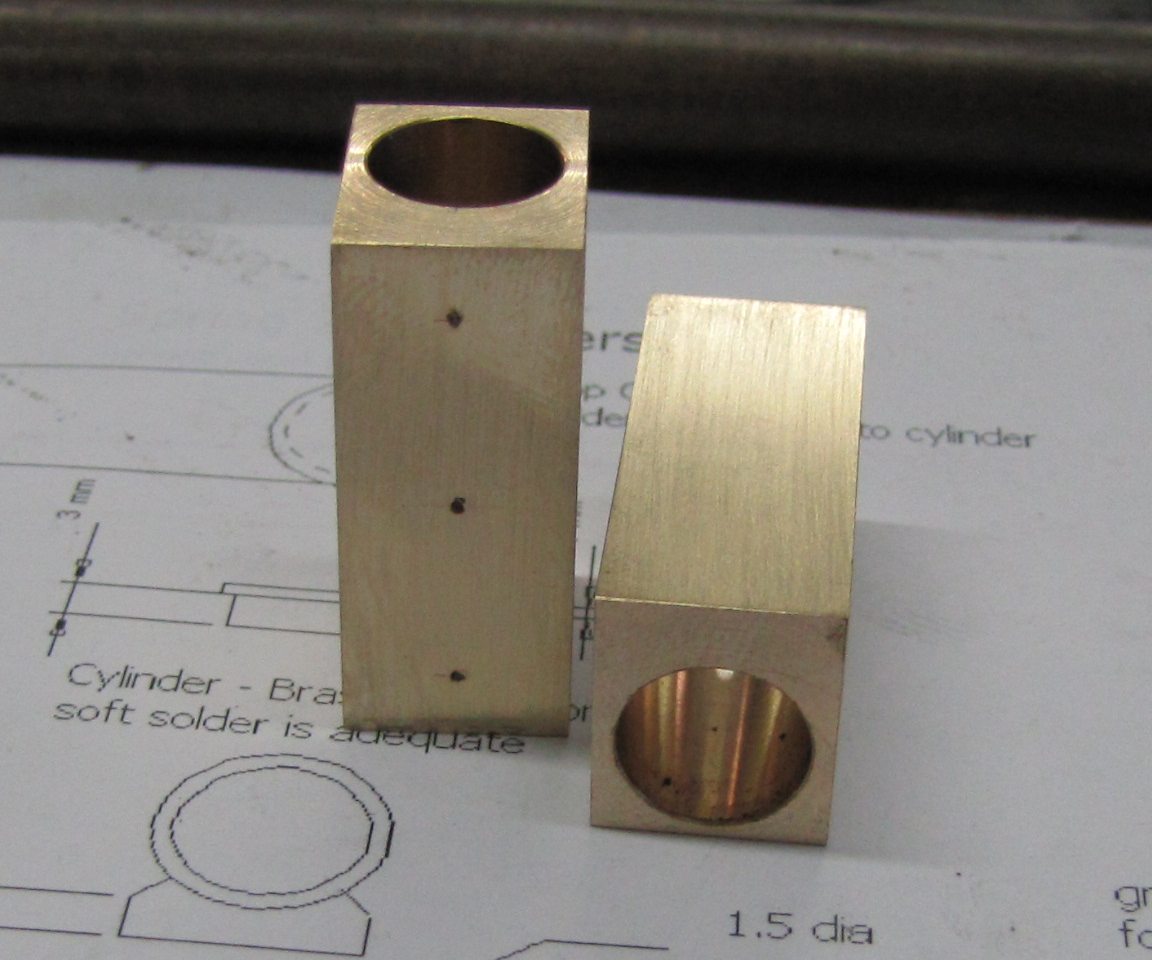
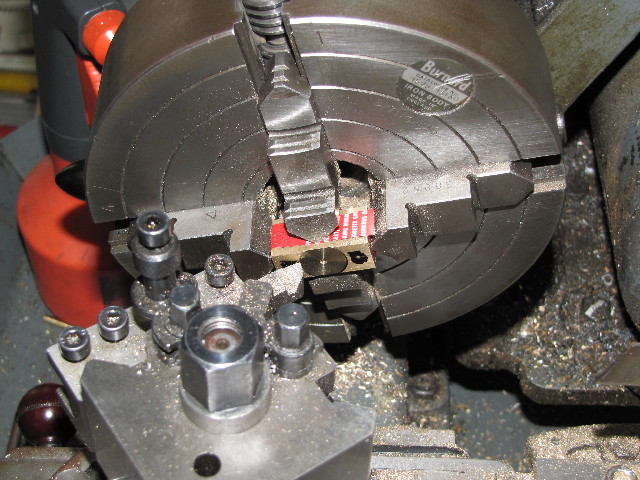
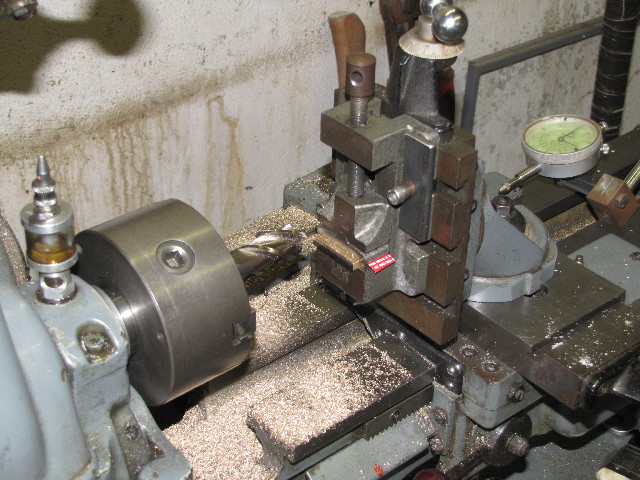
Finished off the cylinder blocks; I nearly got caught by an error on the plans. I'm basically building to the metric sizes. Dave specified the metric hole in the cylinder block for the trunnion pin as 2.5mm, but the pin itself as 2mm - that's a big difference. The imperial measurements are both specified as 3/32" - so I just settled on 2mm for both the holes and the pin. Conveniently, my 2mm center drill goes to exactly the right depth before starting to cut for a 60 degree center, so it made getting the correct depth easy. Here a photo of work on one of the cylinder faces - trunnion hole drilled 2mm, and the undercut faced off:
s0168.jpg


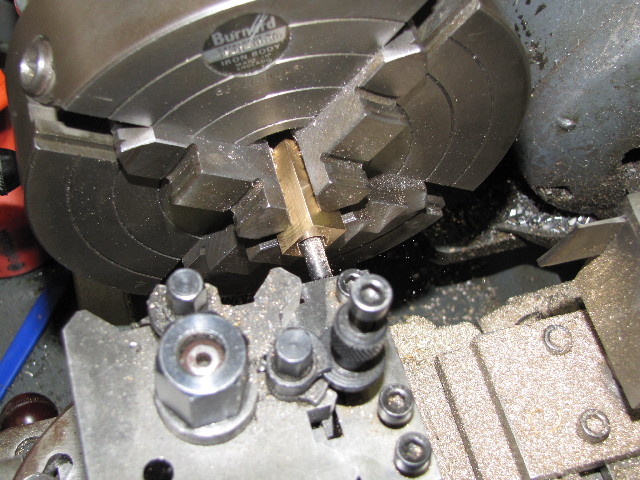
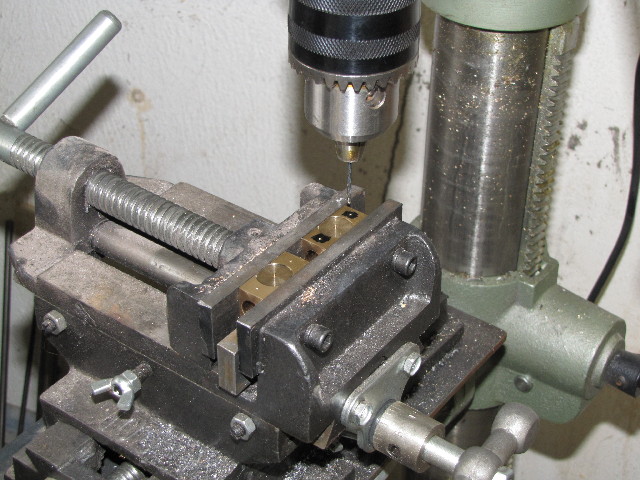
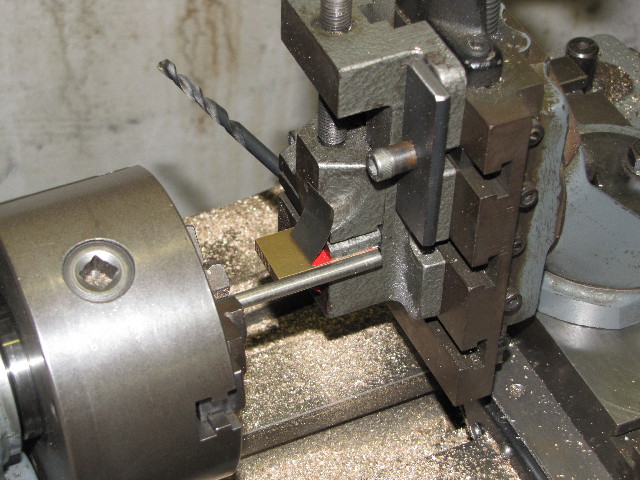
After finishing the other cylinder the same way, I moved to the drill press & drilled the port holes:
s0169.jpg


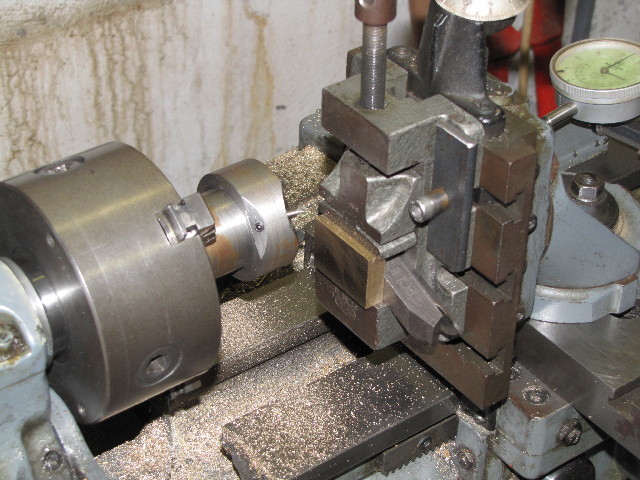
Then I set up the lathe with the vertical slide and flycut & milled the piece of brass for the port block to size:
s0170.jpg

s0171.jpg


With slightly un-square (is that a word?) top and bottom on the port block from the bandsawing, this is the method I used to set up to mill them square - the drill sticking out at the other end of the vice is to keep spacing correct across the jaws:
s0173.jpg


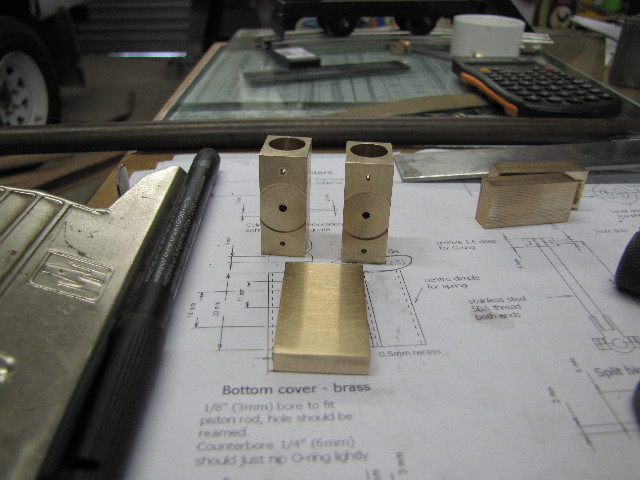
I stopped work on Fred today with the finished cylinder blocks, and the port block ready for layout and some very deep drilling... :
s0175.jpg


Regards, Arnold
 
Thanks for pointing out the trunnion pin error, I've made a note on my printed copy of the plans, so it doesn't catch me in the future.

I know what you mean about the locomotive need... there's a Cracker loco that's filling the same need here. ;D
 
The cylinders look great, Arnold.
You make nice stuff!

Dean
 
Great work arnold. Your loco is going to be fantastic. You certainly know how to get the best out of your myford too. I'm not the biggest fan of them (having said that, I haven't used a new or one in really good condition) but you can't deny with all the kit that you can get, they are versatile.

nick
 
Thanks for checking in guys :)

Pleasure Vernon - I think everyone on this forum has a similar "need" deep inside ;D
Dean, thank you for the compliment - I still have a lot to learn though!
Thanks Nick - I don't think I'd change my myford for any other lathe, and I have a very good range of accessories for it. I might get additional lathes in future - a smaller one for the small jobs and a bigger one for bigger jobs, but this one will remain my pride and joy.

A little update and a very special Thank You - I received a parcel in the post today; inside was a Christmas card and a neatly wrapped present. I was expecting the parcel and some of it's contents, but not all the extras it contained... Rob - Thank you very, very much indeed mate! :bow: :
s0184.jpg

s0185.jpg


Regards, Arnold
 
Arnold, this is looking great. I love these detailled build threads, it gives us newbies the confidence to have a go ourselves.

Going back to your orgininal post, could you post the details of your adapter ring that holds the morse taper in place on your drill press. My chuck has an inclination to separate itself from the quill on my drill and your gizmo sounds just the job

Thanks

Jim
 
Wow Arnold, you've been moving along too.
Like all have said..this is a fantastic thread. I'm learning a lot.
I can not wait to see this run.
 
Those are dandy "Fred" plates. Nice care package, too. Much better than the boozy smellin' fruit cake I got!
:D
 
Rob, way to go man! Those plates are the coolest! 8) Arnold, that is going to be a sweet loco when done. Keep it up.

BC1
Jim
 
arnold, may I add my compliments to the others for your work and for this friendly, explanatory thread?

fred will be a great live steam loco :bow:

I noticed that you don't own a mill (at least, you don't use it in this build). I have great respect and admiration for model engineers that build their engines with a lathe & a drill press. I admit that without a mill I'll be in serious difficulty :-\


Latest posts

Back
Top