Brian's Donkey Engine

Home Model Engine Machinist Forum

Help Support Home Model Engine Machinist Forum:

This site may earn a commission from merchant affiliate links, including eBay, Amazon, and others.
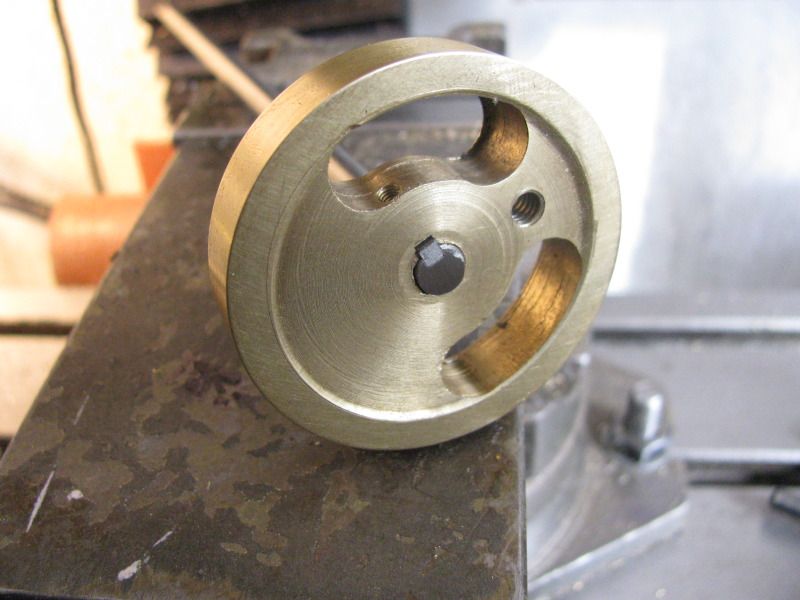
Itsi all still looking great Brian. The broaching shouldn't present any problem. Is the window for the 26 degree set screw hole large enough to let a center drill in there so you can keep the drill on the correct angle? Keep up the amazing progress :)

Bill
 
Well there!!! I've broached my first two keyways.---and as Bill Lindsay said, Its "Easy -Peasy"!!! (Well, Bill didn't actually put it that way, but he was right, its easy.) However----As in all things there apear to be a couple of caveats that I was unaware of. I used lots of cutting oil and ran the broach thru the first flywheel on the left, was thrilled with how easy it was. and took everything apart. But wait----the keyway was way to shallow. Okay, from what reading I have done to bone up for this test, thats why there is a spacer included in the kit. So---I put the spacer back in and ran the broach through again. Great!!! Now the damn keyway is too deep!!! Now I'm starting to feel a bit like Goldylocks.---(Ref the 3 bears.) On the next flywheel (on the right) I ran the broach through once, then put in the spacer, then ran the broach half way through the second time.---Now thats what a keyway is supposed to look like. i'll remember this for the next time I broach something.------And no Bill, I didn't have a center drill small enough to get in there and start the holes. I did however have a long, 2 flute, 1/16" diameter end mill that did the job quite nicely.
KEYWAYS005.jpg
 
Whats the best way to but a 1/16" keyseat in a shaft? If I use a 1/16" endmill, it always cuts a bit wider than 1/16". If I use a 1/32" endmill, I break it. How about those woodruff key type cutters 1/16" wide---just run it out at the end of the shaft instead of cutting a true woodruff pocket?
 
Brian Rupnow said:
Whats the best way to but a 1/16" keyseat in a shaft? If I use a 1/16" endmill, it always cuts a bit wider than 1/16". If I use a 1/32" endmill, I break it. How about those woodruff key type cutters 1/16" wide---just run it out at the end of the shaft instead of cutting a true woodruff pocket?

Brian, that would probably work just fine. On the other hand, why don't you just use a woodruff key?

Chuck
 
I've spent the afternoon in the continuing education of Brian. First---Nobody in the world (at least the part accessable to me) carries nor can get 1/16" square keystock!!! However, they can get 3/32" square keystock overnight. Secondly---BusyBee tools doesn't carry 3/32" woodruff key cutters---(They didn't even seem to know that there is such a size). Thirdly, Brafasco tells me that there is no source for 1/4" x 1/4" shoulder bolts (For where my con-rod attaches to the flywheel) and that they would be special order and would cost $26 each. Fastenal tells me that they cost $2.18 and can be brought in for tomorrow. Barrie Welding tells me that 3/4" diameter brass will cost $4 for 4", but only if I can find a "short" in the rack. If somebody has to cut 4" off for me then it will cost $8.00. The guy who can get me 3/32" keystock overnight can also get me a 3/32" woodruff key cutter overnight. Thirdly, the broach bushing that fits my 1/4" bore in the flywheels will also accept the 3/32" broach.---thats a good thing!!!! I've learned a great deal this afternoon!!!!
 
Why not cut the key from the edge of a bit of 1/16" sheet? That's what I do - up to 1/8" or so. In that size there is no need for hardened stuff.
 
Not a bad plan Tel. These are just "first time" pains. Once I get a foot of 3/32 square in here (Its only about $10 for a foot) that will be enough to last me for years. Same deal with the cutters.----Brian
 
Yesterday during all the hoo-haw about shaft keys, I did manage to actually make some parts. I designed, built and installed a pair of pinion shaft bushings and got a good start on the crossheads.---A note about those bushings.---You will notice that the o.d. is about .005 undersize from the holes for them in the bearing stands and caps which call for .312 reamed holes. I did this on purpose, because the bearing stands set so far apart that there is no way to ream them both in one set up. I can completely dismantle my pinion shaft from the flywheels and pinion gear and slide it out thru the bushings without ever actually removing the bearing caps. So---a light came on. Pull off the bearing caps, slide the bushings over the shaft, lay in a bed of "liquid metal epoxy" where the bushings set, and bolt everything back together with bushings and shaft in place and leave overnight. This morning the shaft turns freely in perfect alignment with no binding in the bushings.
DONKEYCROSSHEADS001.jpg

DONKEYPINIONSHAFTBUSHINGS.jpg
 
Making itsy bitsy pieces this morning. Not very exciting, but definitly needed for the engine to run. Pictures are already posted of Donkey crosshead and Donkey connector pin.
002-1.jpg
 
Man, this is really starting to get exciting now!!! I lapped the crosshead into the crosshead tube today with 350 lapping compound and put a retaining bolt through the top of the brass crosshead support loop into a tapped hole in the end of the crosshead tube to keep everything positioned properly. I made the connecting rods up this afternoon from a piece of 1/4" brass bar. They are not finished yet, I still have to relieve both sides down to a 3/16" total width except at the end where they attach to the flywheel. I just had to dummy things up to see what it would look like assembled. I love it when I get to this stage and things finally start to look like the finished model!!!
CONRODONENGINE001.jpg
 
This morning I had a lesson---"All about Keyways"!!! I had read that you can not mill a keyway for a given size of key with the same size of end mill. Not always believing everything I hear, I had to try this and see. So---First up was a keyseat milled with a 3/32" two flute carbide endmill. Guess what?? Everybody was right. 3/32" as a decimal is 0.09375" The slot the cutter made is .104" wide. The key fits---SURPRISE-- SLOPPILY.
keyways002.jpg
 
Next up was a keyseat cut with a 3/32" woodruff key cutter. The 1/8" pin you see sticking out sideways was not in there while I was making the keyseat cut. It is my "horizontal reference" for when I have to rotate the shaft 90 degrees to put the keyseat in the other end---Remember, the two cylinders will be 90 degrees out of phase to make the engine self starting, and I need to be able to find that 90 degrees when I cut the keyseat in the other end of the shaft. Again, everone was right . This keyseat turned out to be exactly 0.094" wide. Only problem was, I screwed up my height calculation and the keyway was not on the center of the shaft.
keyways003.jpg
 
You make the key fit the slot ;)

Stew
 
Moving right along----Of course every shaft has two ends, so we went to the other end and repeated a cut with the woodruff style cutter.---And BINGO!!! Everything was dead nuts like it was supposed to be!!! One caveat-----When you do this have only enough shaft stuck out past the end of the vice to clear your cutter. Small shafts like this one will deflect away from the cutter a lot if it can.
keyways006.jpg

keyways005-1.jpg
 
That should be enough for today. Keyways are cut and keys installed. Both crossheads are lapped into their respective tubes, and both con rods are installed. The engines turn over by finger presure on the flywheels, but its getting stiffer as more and more pieces go together. One thing about it, when you get to this stage of the build and everything revolves completely, at least you are assured that you haven't muffed a dimension and that a piston is trying to bash its way out through a cylinder head at one end or the other. This coming week I hope to build the elliptical cams and associated linkage to operate the valves.
bothconrodsin003.jpg

bothconrodsin004.jpg
 
Brian

I've been following this thread for a while now. Your engine build is moving along quite well but I really enjoy the way you explain how you go about doing things in detail. Keep it up.

Vince
 
Thanks vince. When I first started machining things 3 years ago, I seen such wonderful things on this forum, but on many of them I was left thinking "Oh my God, how did they do that? I am far from being an expert at this stuff, but I am good at documentation and technical write ups. I hope that what I'm doing will give some of the less experienced out there enough knowledge/courage to try some of this stuff on their own. Just one thing----I have a bad habit of using my milling cutters mounted in the chuck. Don't do that. Its hard on the bearings in the head of the mill.
 
Back
Top