


BobWarfield
Well-Known Member
- Joined
- Dec 27, 2007
- Messages
- 1,151
- Reaction score
- 1
Lately I've been doing a lot of sheet metal work to build chassis and other components for the electronics of my CNC mill conversion. I needed a fixture to do the work on the sheet metal panels, so I whipped up this simple one:
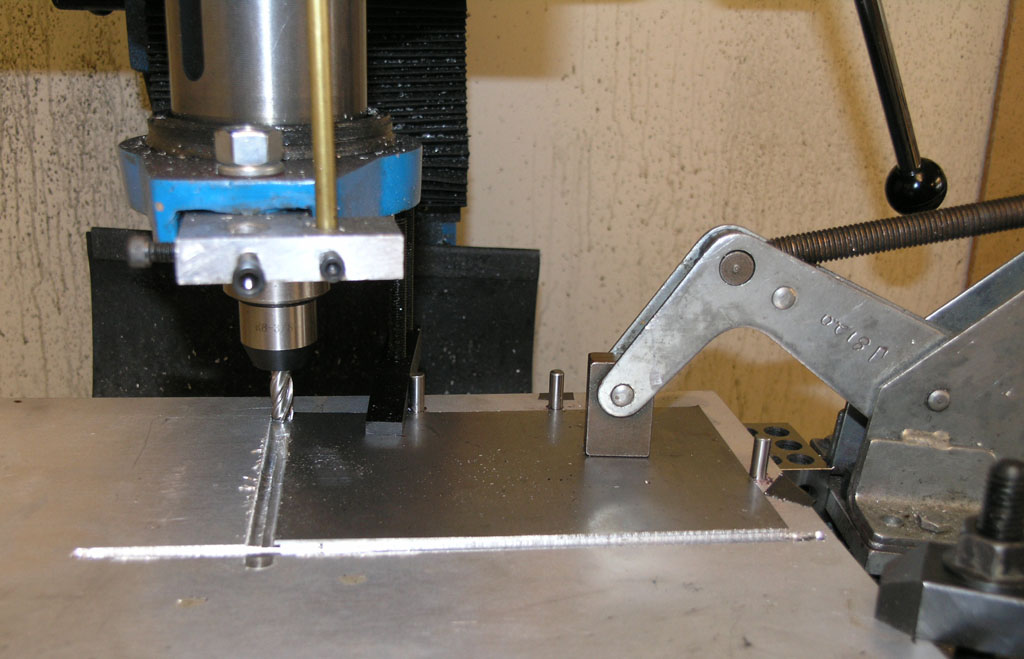
It's a 12" square piece of cast aluminum tooling plate (means its flat on the big edges). All I had to do was drill and ream 3 holes for 1/4" x 1" dowel pins. Such pins are very handy to have around and a box can be had from Enco for $12 per box of 100. They come chamfered, heat treated, and very accurate. In fact, for assemblies, you really should use pins rather than bolts where precision matters. Bolts are for squeezing together more than locating in most cases. But I digress.
The configuration of the pins, 2 at top, 1 on the side, is intentional. One's instinct may be to use 2 pins on both sides, but there is a method to the madness. Treatises on making fixtures will talk about not "overconstraining". Carr Lane offers an excellent book on fixturing if you are interested in the details, but let's try a thought experiment that gets a lot of it across. Imagine 3 points in space, all on the same plane (our sheet of tolling plate). No matter where those three points are, they will locate 2 of the edges of another piece precisely. Hence you can drill the 3 holes even by eye and your fixture will be fine. You may need to dial it in to achieve a desired orientation relative to a mill axis, depending on your purpose, but since you didn't overconstrain, the location of the holes is less critical.
Okay, so we drill and ream the three holes to fit the dowel pins just so. They come 0.0002" oversized on purpose, BTW. Mine dropped in with a nice fit, but were by no means fixed, and I wanted them fixed, so I simply Loctited them in place, which was fine. Now I can pop the fixture plate onto my mill table (I like to set it on 4 1-2-3 blocks) and clamp it down. I align workpieces to the pins and clamp the work in place. I can be assured that any workpiece aligned to the pins is accurately positioned relative to the last workpiece. So I go to a lot of trouble laying out the first one, and then for each operation, I just swap workpieces and it goes real fast.
To make the setup on the first workpiece easy (after all, this is just sheetmetal work and not accurate to a tenth!), I used a 1:1 scale CAD drawing. Just put it under the clamp and spray liberally with WD-40 and it stays down real nice:
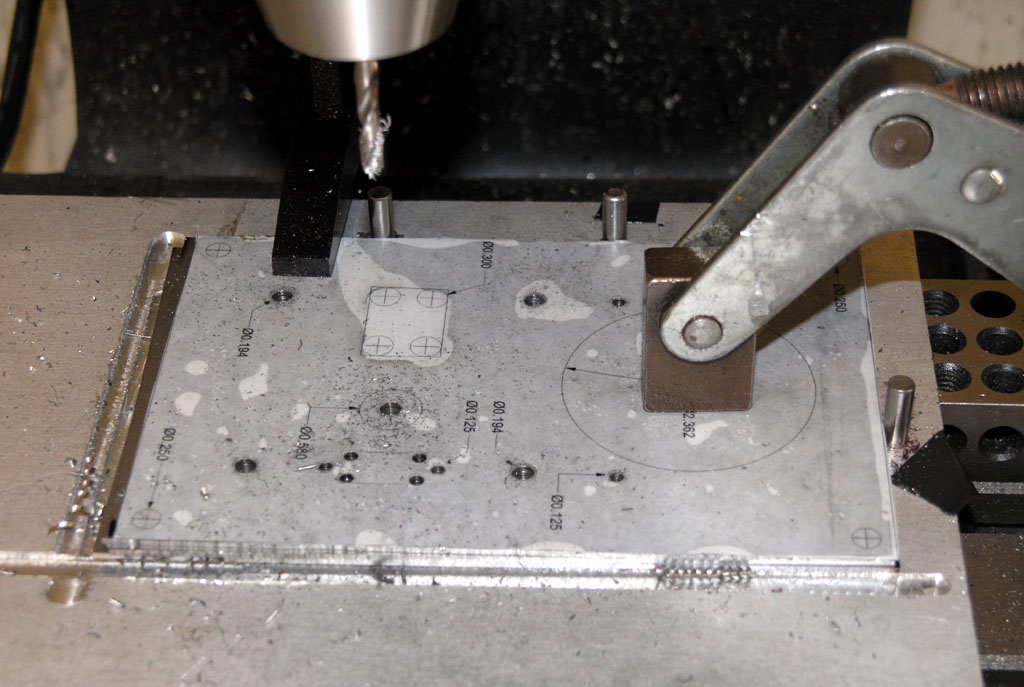
In this case I ran through 3 of the panels at a time and did all my hole drilling. The plates are held down with my big T-slot Kant-Twist and a machinist's parallel clamp.
When I got to milling out the larger openings for switches and such, I got to deal with the Joys and Perils of Climb Milling. In other words, the climb milling put some forces on the workpiece that caused a clamp to slip. DOH! Usually we hear about climb milling being a problem vis a vis backlash in an axis. I run gibs tight on a pretty heavy mill with light cuts when climb milling, so haven't had that problem, but it can also make a workpiece slip in the clamps, so beware.
My answer to that was to borrow a common CNC practice. Often, the first task on a CNC job is to drill a bunch of holes. You can then use those holes to hold down your workpiece as your progress to more complex features. Same here:
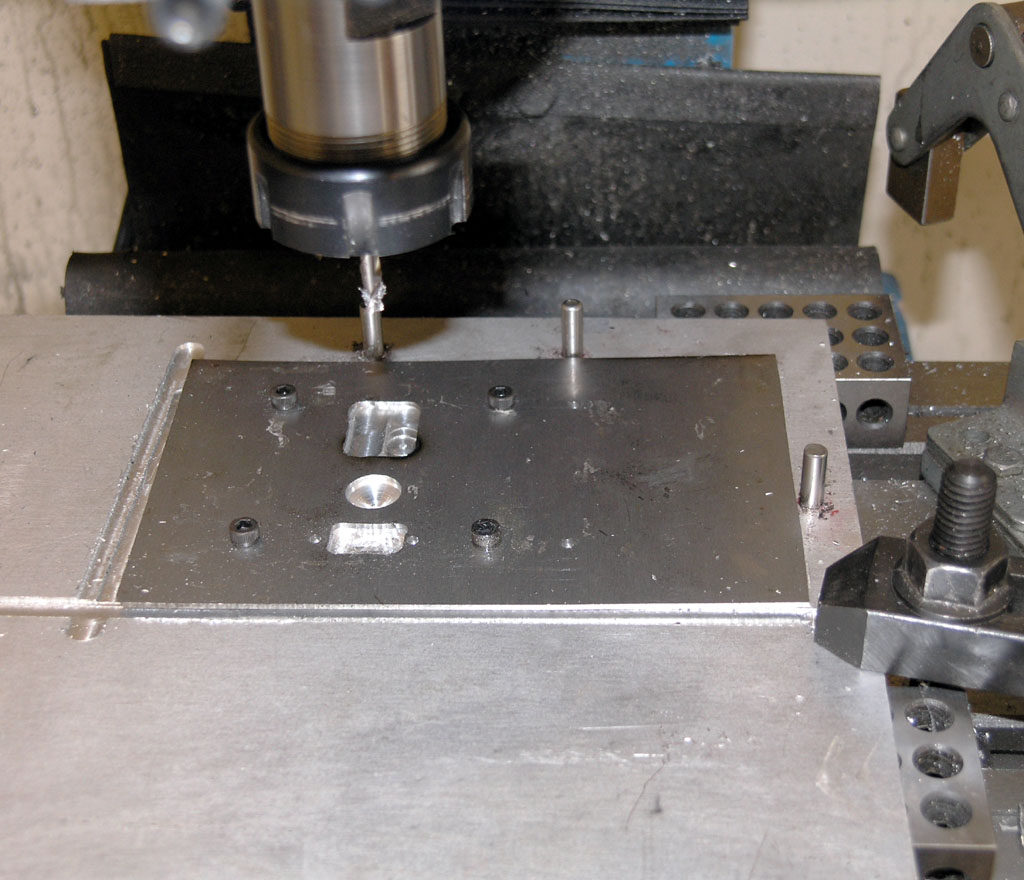
I did not want to overconstrain my workpiece and have the hold down bolts fighting my dowel pins for position, so I moved off just a scosh and milling those holes was pretty easy with the workpiece securely held by 4 bolts in holes that had to be there anyway.
Fixture plates are pretty handy. If you have a good one, they can be a lot nicer than T-slots by themselves. If you go to a lot of trouble on one and want to keep it nice, poly board (or some use MDF) can be used as a spoil board underneath the workpiece.
It's a 12" square piece of cast aluminum tooling plate (means its flat on the big edges). All I had to do was drill and ream 3 holes for 1/4" x 1" dowel pins. Such pins are very handy to have around and a box can be had from Enco for $12 per box of 100. They come chamfered, heat treated, and very accurate. In fact, for assemblies, you really should use pins rather than bolts where precision matters. Bolts are for squeezing together more than locating in most cases. But I digress.
The configuration of the pins, 2 at top, 1 on the side, is intentional. One's instinct may be to use 2 pins on both sides, but there is a method to the madness. Treatises on making fixtures will talk about not "overconstraining". Carr Lane offers an excellent book on fixturing if you are interested in the details, but let's try a thought experiment that gets a lot of it across. Imagine 3 points in space, all on the same plane (our sheet of tolling plate). No matter where those three points are, they will locate 2 of the edges of another piece precisely. Hence you can drill the 3 holes even by eye and your fixture will be fine. You may need to dial it in to achieve a desired orientation relative to a mill axis, depending on your purpose, but since you didn't overconstrain, the location of the holes is less critical.
Okay, so we drill and ream the three holes to fit the dowel pins just so. They come 0.0002" oversized on purpose, BTW. Mine dropped in with a nice fit, but were by no means fixed, and I wanted them fixed, so I simply Loctited them in place, which was fine. Now I can pop the fixture plate onto my mill table (I like to set it on 4 1-2-3 blocks) and clamp it down. I align workpieces to the pins and clamp the work in place. I can be assured that any workpiece aligned to the pins is accurately positioned relative to the last workpiece. So I go to a lot of trouble laying out the first one, and then for each operation, I just swap workpieces and it goes real fast.
To make the setup on the first workpiece easy (after all, this is just sheetmetal work and not accurate to a tenth!), I used a 1:1 scale CAD drawing. Just put it under the clamp and spray liberally with WD-40 and it stays down real nice:
In this case I ran through 3 of the panels at a time and did all my hole drilling. The plates are held down with my big T-slot Kant-Twist and a machinist's parallel clamp.
When I got to milling out the larger openings for switches and such, I got to deal with the Joys and Perils of Climb Milling. In other words, the climb milling put some forces on the workpiece that caused a clamp to slip. DOH! Usually we hear about climb milling being a problem vis a vis backlash in an axis. I run gibs tight on a pretty heavy mill with light cuts when climb milling, so haven't had that problem, but it can also make a workpiece slip in the clamps, so beware.
My answer to that was to borrow a common CNC practice. Often, the first task on a CNC job is to drill a bunch of holes. You can then use those holes to hold down your workpiece as your progress to more complex features. Same here:
I did not want to overconstrain my workpiece and have the hold down bolts fighting my dowel pins for position, so I moved off just a scosh and milling those holes was pretty easy with the workpiece securely held by 4 bolts in holes that had to be there anyway.
Fixture plates are pretty handy. If you have a good one, they can be a lot nicer than T-slots by themselves. If you go to a lot of trouble on one and want to keep it nice, poly board (or some use MDF) can be used as a spoil board underneath the workpiece.