Craftsman 109 Lathe

Home Model Engine Machinist Forum

Help Support Home Model Engine Machinist Forum:

This site may earn a commission from merchant affiliate links, including eBay, Amazon, and others.
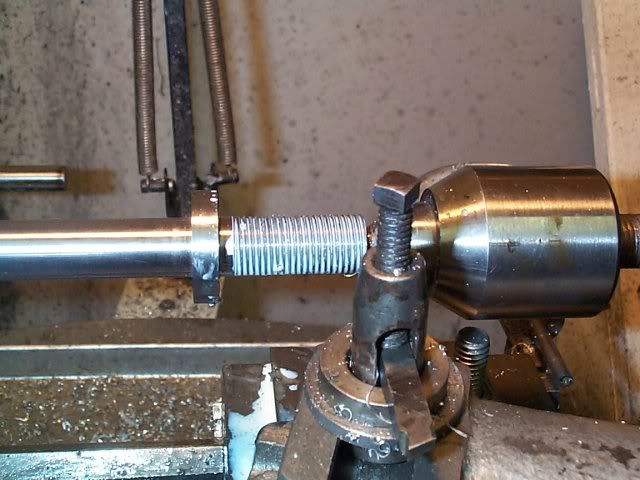
I do the same thing as Vette. Take the drive gear off the left end of the lead screw.

I can turn the lead screw hand wheel okay with the gear on the lead screw and the feed set to neutral, but there is a bit of extra effort because you're turning all the feed gears up to the tumbler. If the back lash on the gears is set well, it's not too much effort, but if the gears are a little tight, it's hard to turn. You're trying to power a ratio from high to low, and if the two top gears are a little tight, it's like trying to take off in a car in high gear.
 

Tailstock Ram

Having issues with mounting a chuck upon the tail stock ram has finally brought me to the "Fab a new one" stage. A completed version can be found HERE and this is my attempt at same.

Started with a piece of 1144 and rough turned to shape. That stuff likes a sharp bit with the little round over on the point, and on center for any hope of a decent finish.

ram-a1.jpg


While bring down to size the diameter was checked and tailstock "nudged" to reduce the taper. The 109's are finicky in this regard so its a constant check and double check.

End of the day the shaft came to a dia of 0.501 across the length of it plus or minus half a tenth thousand. Took for me changing from the live center to a dead center for the final cuts.

ram-a2.jpg


Thread cutting time and of course, the one change gear I needed I didnt have. Flea bay and a week later one ea gear in the mail and time to reset up for threading. Piece back in and after a few bumps here and there the part is again inline. At this point I touched up the face that will register the drill chuck. Part is dead on between centers so the register face should be right on square to the shaft axis, at least i hope so :)

ram-a3.jpg


Back to the live center which is one reason for this part being made, gain a little extra room between tailstock and slide. Lots of cutting fluid and did the threading. Have never done this before, yet it went along well. Slow speed, ran it to one end, stopped machine, ran in reverse to bring bit back to start, feed bit in a little and repeated process till thread depth was perhaps 60-70 %. Still had a bit of flat on the surface. Finished with a regular die, actually turned out fairly decent. Lots of cutting oil

ram-a4.jpg


Put a little undercut at the thread base. Now its time to drill and tap the hole for the Ram feed screw on one end and ponder what to do with the other.

Robert
 
This is a good improvement for the old 109s, Robert. Keep 'er up!
 
Deanofid said:
This is a good improvement for the old 109s, Robert. Keep 'er up!

Drilling that hole for the 5/16 24LH thread now. Would like to keep the travel at least 1 inch or better. I see that you made it at 3/4, wondered why but am getting the picture. The deeper the tap the slower it goes, tap a turn or two, all the way out to clear chips and repeat. Ah nothing but time :)
 
Looks like you're making good progress.

How did you come by having a 109?
 
I got the one I had from ebay. Bidding was low and it was a "pick up only" in Chicago. Checked with my son who was then living in Chicago to be sure he could go get it and placed a low bid. Ended up getting it and then doing a fairly complete rebuild and doing most of the mods and updates on it. Then put it on Craigs List and found it a new home. If the price is low enough I might end up buying almost anything I think I can sell for more.
 
Foozer said:
Drilling that hole for the 5/16 24LH thread now. Would like to keep the travel at least 1 inch or better. I see that you made it at 3/4, wondered why but am getting the picture. The deeper the tap the slower it goes, tap a turn or two, all the way out to clear chips and repeat. Ah nothing but time :)

Robert, the travel on mine is just shy of an inch. That's as long as the thread cutting portion on the tap I had.
The 3/4" part you saw was for the stub end of the crank handle end. It's screwed onto the threaded rod that sticks out of the back end of the tail stock.

Dean
 
Deanofid said:
Robert, the travel on mine is just shy of an inch. That's as long as the thread cutting portion on the tap I had.
The 3/4" part you saw was for the stub end of the crank handle end. It's screwed onto the threaded rod that sticks out of the back end of the tail stock.

Dean

Got Ya. Yup and the travel is limited by the position of the little key screw that keeps the ram from rotating, so an inch or a tad better is about all one can get.

But not to fear, as I'm chuckling as I write, I hosed up the part. Thinking I could just drill through the center line, bring it up to a .312 thru all save about a half inch of thread for the crank screw. Duh, when I turned down the little relief at the end for the drill chuck I went just a tad to deep. Something about a 375 dia relief and a 312 hole, not a lot of meat left. It'll shear sooner or later so attempt number 2 coming up

Chuckling again :)

Robert
 
Foozer said:
Here that a few of these are hidden away behind work benches and other objects long forgotten.Been described throughout the range of "Cute" to "Boat Anchor" But its what I'm stuck with and if it can turn out a Rocker Motor I'll slide it toward the "Cute" category.

So I have the 109-20630 model, sleeve bearing head stock and all. Have most of the change gears and the threading dial gizmo. Changed the motor over to a treadmill variable speed DC type and am very happy with the results.

So now that the "Rocker Fever" has passed its time to fix some of the little things that need attention. First off is the cross slide. Time to get it into a smoother operational condition, has yet to be seen.

Original gib plate is steel, just doesn't like to slide as well as I'd like. Using a vertical slide to fly cut stock just plain gets hard on the fingers. Loosen the gib to ease the turns and well, that don't work. So cut one out of brass, its natural slipperiness ought to help some.

Before that, I spent some time with some 600 paper on a piece of glass and ran the separate components over it a bit to identify and knock down any high spots. Not looking to remove metal, just enough back and forth to get a consistent shinny surface. Then some Bon-Ami and oil mix, more back and forth till it felt decent. Enough for today.

Next is the addition of another screw for gib adjustment. It only has 2, one at each end and at extreme travels the ends sorta hang out in mid air. That can be improved.

aa109-a1.jpg


Robert
 
I have the stub gears and idler gears everything but change gears for one of these lathes if anyone needs them i will have to dig them up let me know.
 
Greetings....

New to the forum...new to 109 Lathes...ready to jump in with like-minded people and learn more.

Picking up a 109 next week. Ready to do modifications, and explore her limitations.

I want to tighten up, and perform the mods mentioned here. Also want to build a radius/ball turner right away.
I was thinking about using a spare compound base and adding/adapting a tool holder from there...
I would really like to correspond with more 109 users. (Not meaning to hi-jack the thread, sorry.)

I'm not a model engine builder, Im a custom motorcycle builder/restorer. We do much of the same things, I just ride them when finished. ;)

Thanks in advance!

-Luke
 
Thanks Tin Falcon....most likely going to build a bedair type tool.
I will keep you posted.
;)
 
Here is my Atlas 109, picking her up tomorrow. ;)

I have a few parts on the way:
New brass replacement gibs.
New spindle with 1/2-20 threads for Jacob's chuck.
1/2" Jacobs chuck and key.
A quick change tool set-up, also with a parting tool.

Plan on adding the third gib screw right away, along with dis-assembly and cleaning/lubing.

Also working on the radius turning design, as we (I) speak. ;)

I have a new bench made for her. Topped with 1/4" plate and stiffened with angle. I hope by adding the weight and security, harmonics will be reduced.

-Luke

'49 Atlas Lathe.jpg
 
Here is the quick change set-up I just purchased.
--Made in the USA!

This should be an improvement over the lantern style 109 tool holder.

Quick change blocks 109.jpg


Quick change blocks 109 b.jpg
 
I finally got my 109 home...
Did a test cut, of course, like a 12 year old kid, I couldn't wait.
Kinda rough. Much looseness in the gibs???
so I started taking things apart.
This is what I found, and this is my repair.
I may have to add a larger solid block and a third screw,
but this will do for now. Going to try another test cut.

Setting things up...cleaning and lubing.
;)

IMAG1279.jpg


IMAG1281.jpg
 
Tightened up considerably...
the cuts are still very grainy. Its leaving lines, not looking like a lathe should.
Any advice???
No sure of the quality of the bits...or anything else.
Also have an issue with the tailstock. There has been a larger Jacobs chuck added,
but the taper looks home-made. I know these 109's don't have a STD #0,
the previous owner told me it was a MT#2. Clearly not. It wobbles and bottoms quickly...pushing itself out.
I have a new taper and chuck on the way. Hope that make it usable. Cant even drill with it like it is.
-Luke
 
'A poor finish can be caused by many things learn the basics.


back off on tail stock the taper should seat.

The tapers likely will be shop made I made a few.

for my two.

Tin
 
I should receive my new chuck and taper in a few days...I'll hope to see an improvement.
( now the chuck attachment 'bottoms' in the hole before becoming tight.)
I've started reading up on the basics...much to learn.
This machine has been 'monkey'd up' by the previous owner...much to sort out.
Tons of gear noise, and a mysterious spring holding up on the arm inside the gear box...
Will look at that today, after mounting and leveling. :)
Thanks T.F.!

-Luke
 

Latest posts

Back
Top