Wood Beam Engine fabricated by SAM

Home Model Engine Machinist Forum

Help Support Home Model Engine Machinist Forum:

This site may earn a commission from merchant affiliate links, including eBay, Amazon, and others.
Thanks for showing how you made the brackets, Sam. They look really good. Also, kind of 'old-fashion-y', which I think is a nice appearance. The brazing/soldering looks like it went just fine.

Nice work, Sam!

Dean
 
It's been a while since I posted to this build thread.

Life has gotten in the way of this hobby.

This past week, I made a little right angle bracket that supports the valve beam pivot. Pretty straight forward, a few well placed hammer blows, a few holes drilled and a little bit of filing.

WoodProject003-3-1.jpg


Excuse the rubber band, it is temporary.

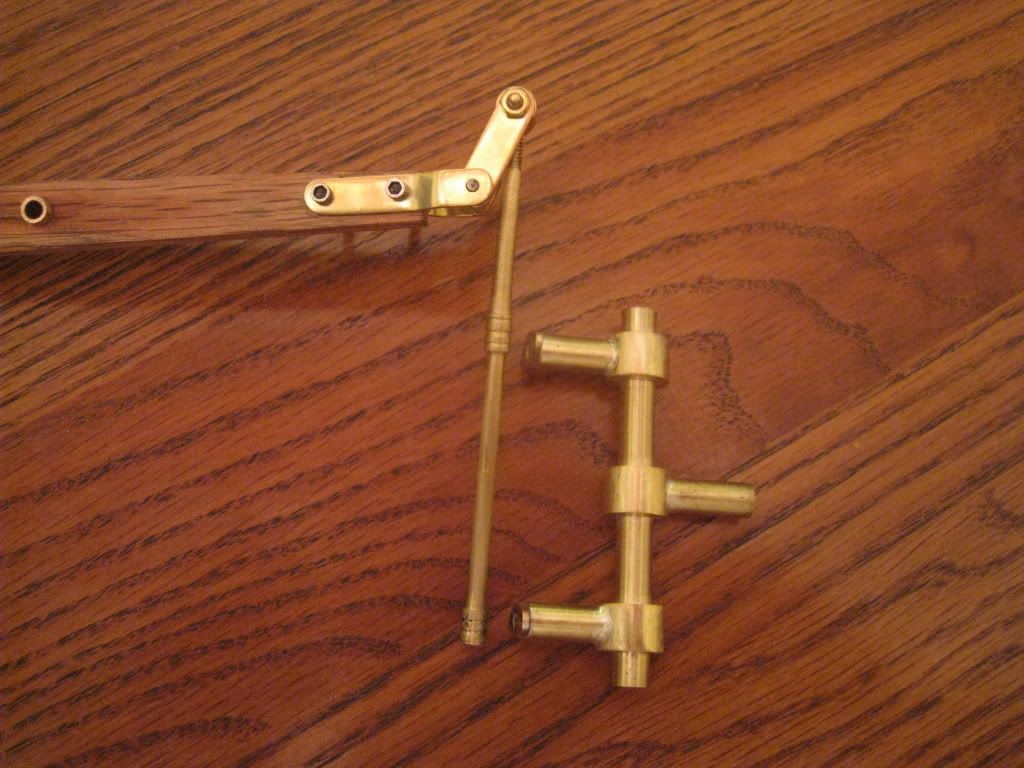
The piston valve body has given me fits. I believe this one is the fourth attempt. The previous ones were soldered up from tubing. Details of my previous efforts have been documented in earlier posts.

This valve body was made from round stock. I milled sockets in it and hard soldered the small tubes into. Since the body was thicker, it was much easier for me to get a good soldered joint without warpage. Next I mounted the valve body on a mandrel and turned down the areas between the inlet and outlet ports.

WoodProject006-6-2.jpg


In the previous photo you can also see the piston rod which has two sealing areas.


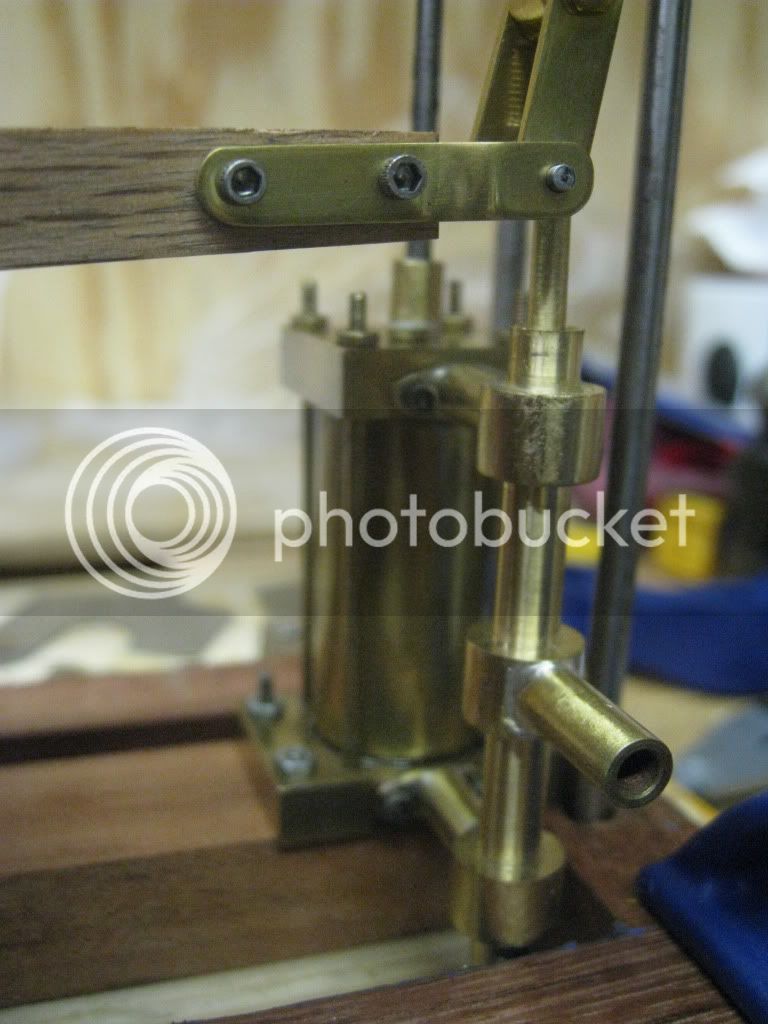
The next photo shows the valve assembly mounted to the power cylinder.

WoodProject002-4-1.jpg


It looks like all that is left is to make up a bunch of fasteners, pivot pins, and of course, make it run.

Wish me luck.

Thanks for stopping by.

SAM
 
Sam
That little machine is coming along beautifully. I'm rather envious.

Steve
 
Looking really good, Sam. Hope you get some more time to work on it!

Dean
 
Excellent work Sam.

The valve body looks a lot better than the original design.
Well Done Thm:

Not much more to do now.

I can't wait to see the video.

Kel
 
Nice going Sam. :bow: :bow:

Looking forward to the Pinocchio video. ::)

Best Regards
Bob
 
Cedge said:
Sam
That little machine is coming along beautifully. I'm rather envious.

Steve

Cedge, Thanks for the kind words. You inspired me to turn down the areas between the ports on the valve body. In hind site, I wish that I had left more material on the valve body and put some curves in it.

Deanofid said:
Looking really good, Sam. Hope you get some more time to work on it!

Dean

Dean, Thanks. I'm hoping to finish the bulk of it this week.

kcmillin said:
Excellent work Sam.

The valve body looks a lot better than the original design.
Well Done Thm:

Not much more to do now.

I can't wait to see the video.

Kel

Kel, Thanks. I wish that I had considered this method earlier. Though the path I took gave me many opportunities to practice hard soldering.

Maryak said:
Nice going Sam. :bow: :bow:

Looking forward to the Pinocchio video. ::)

Best Regards
Bob

Bob,

I am also looking forward to the video.


Thanks for stopping by to visit.

SAM
 
Sam, good going, and great parts Thm: ;D
Life has gotten in the way of this hobby.
That happens ;) Don't worry about it :D - The rest if Life is more important Thm:

Regards, Arnold
 
arnoldb said:
Sam, good going, and great parts Thm: ;DThat happens ;) Don't worry about it :D - The rest if Life is more important Thm:

Regards, Arnold

Arnold,

I wasn't complaining. I was blessed with the opportunity to go to Scout camp. I took my son and 20 other boys to Scout camp. They had a great time and I got to sweat a lot. Its amazing the things you learn about yourself when you interact with children. Being at camp gives me time to reflect on what I have been doing and where I am going.

SAM
 
I'm still working on this engine.

Today I needed a boost, so here is a preview warts and all.


woohoo1

Note the rubber bands and clamps to hold everything together.

Loctite will be needed to keep the fasteners from shaking out while its running.

My 6 HP compressor puts out 5 cfm @ 40 psig, and this little engine needs every bit of it.

Not the most efficient engine, but it did give me a boost to see that it will run.

I ran out of brass rod to finish making the bolts/screws and I want to dress up the brass columns.

Thanks for stopping by.

SAM
 
Good stuff Sam!!! The more you run it, the less air pressure it will take, as the bearing surfaces and cylinder "wear in". Beam engines are extremely finicky about valve timing. A timing change of as little as 1 degree seems to make a big difference in engine performance and air requirements.----Brian
 
Brian,

Thanks.

I have not fooled with the timing since it started to run.

When everything is finished, then I will fine tune it.

I just needed to see it run.

SAM
 
Looks great, Sam. But, good lord, man, slow it down. Those beam engines ran at a sedate, stately pace. It will look better and use a lot less air/steam.
 
Marv,

The engine is still very stiff so it needs to run at a higher than desired speed. I still have some alignment issues and need to install the braces to stablize the overhead structure. The timing is rough, I will fine tune it after I finish everything else.

SAM
 
Well, this is it.

This video shows the engine running a lot slower than the previous one.

[ame]http://www.youtube.com/watch?v=AChTQNhoEK4[/ame]


I made some fasteners and installed the braces for the overhead structure.

I used some Teflon tape to make some rope type packing for the piston rod.

WoodProject002-4-2.jpg


I cut a piece of the tape about 2" long and rolled it up like a sausage. It really cut down the amount of air leakage past the piston rod.

I still need to come up with some rusty steel to fabricate some weights for the valve beam and the power cylinder end of the main beam.

I used oil as the finish on the wood. The moving pieces of wood are a white oak and the stationary wood is from the species "unknownium".

This engine was a real challenge for me. The most frustrating part was learning how to silver solder. I'm sure the next time I need to silver solder it will be much easier.

Thanks to all of you who helped me along with this project.

Thanks for stopping by.

Kind regards,

SAM

 
Looks awesome SAM.
Brass and wood go very well together.
Very nice.
I like that style engine.

Congratulations!

 
Great job, nice engine, always like those beam engines.


IronHorse
 
Back
Top