The Spinster

Home Model Engine Machinist Forum

Help Support Home Model Engine Machinist Forum:

This site may earn a commission from merchant affiliate links, including eBay, Amazon, and others.
Thanks very much hobby. Much appreciated.

Thanks Robert. It hadn't occurred to me to think about the other tool post. I'll look at that.

In the meantime I've realized two more (well 1 really) boo-boos.
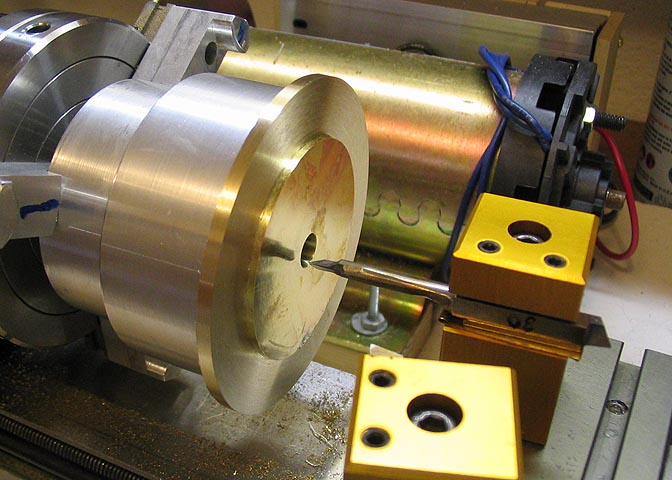
The hole going through the spindle needs to be chamfered. Otherwise the yarn/thread coming through it can snag.
Similarly, the orifice and front maiden needs the same.

I'm already thinking the scale can be 1/8 instead of 1/4. But that would make for a very small bobbin with a 1/16 through hole.
The hooks on the flyer would be fun too. The holes on the spindle would have to be 1/16 too.
Big problem might be the various screws.

Hm...not too late to think about this. I'll look at the plans when I get home.
 
So I got home and looked at the plans.
The biggest issue is the spindle.

The drive pulley would be 3/8 diameter and 1/16 thick. Maybe make it an integral part of the spindle but that means turning 3/8 down to 1/16 for the rod. The rod would be about 3/4 long...so maybe not bad.

But the flyer would be 1/8 square and the rod goes through it. Original plan was to thread the flyer on but that's just too small. A press fit might be the way to go.

The bigger issue is having something to hold onto while turning the orifice end. The center part is 5/32 round by 5/32 long. Kind of small. Don't have a collet for the lathe and I'm wondering if that's enough to hold onto anyway.

I could make my own collet...haven't had the best luck doing that...and having enough material to grab might still be an issue.

Worth a go.

Drat. Now I'm excited to make it smaller. It would be much cooler...more miniature and less toyish.

This is fun.

But it's time for my 'thinking juice' and I'm starting to ramble.

'go' will have to wait.
 
Stick to you're guns on that fly wheel don't let that little niggling doubt win :big:
best of luck with the build was thinking about it today seeing one of my fathers spinning wheels at my mothers
best wishes Frazer
 
I like the spindle part, Zee. Even if you end up having to re-do it, still looks neat.

For turning big flat things, here is something that may make it easier. Called a super glue arbor:

supergluearbor.jpg


I use these frequently for turning gear blanks, and other largish flat things that are other wise hard to grip. Each of these has two diameters, giving me options of a 1.25", 1.5", 2" and 2.5" faces for different sized blanks.
The face of each has a number of grooves turned in which lets the super glue cure quickly. Each also has a small bore and a set screw going into that bore. A small shop made center can be run into the bore to aid in centering a work piece.
In use, a few dots of super glue are spotted around the rings of the chosen face, and the work piece is held against the arbor while the arbor is held in the chuck. To release the glue after the work is done, gentle heating with a propane torch does it. Take care not to vaporize the glue. Then the residue can be cleaned off with acetone.

These are equivalent to a face plate, but being smaller, you can still easily do work on the OD of your piece.

Dean
 
Thanks Frazer. I got old guns but I'll try.

Thanks Dean. Nice idea but the faces are a bit large. I needed 1/2".

Question about press fit.

I may need to press fit a couple of small parts together. Brass on brass...maybe aluminum on brass.

Let's say I want to press fit a part that has a hole that measures 0.625 (1/16). What would the tolerance be on the mating part? 0.625 + 0.0005?

Would that be true if the parts were 0.125?

I looked at the plans for the loco. They called out 0.94 + 0.0005 for the piston rod. What was interesting was that the piston and rod end were called out at 0.94 -0.000 +0.002.

I'm guessing that if they had been drilled/reamed to 0.942 then the piston would need to be 0.9425 for a press fit.

While I'm here...if I go to 1/8 scale instead of 1/4...then the hooks for the flyer are really tiny. I figure on taking some spring from a pen and cutting off some bits that would form a partial eyelet. Think of the shape of a question mark. How to put them into the legs of the flyer? It would take a tiny tiny drill I know, but press fitting I'm thinking won't work. Maybe loctite...or better...superglue? I'll experiment...but wondered if anyone worked this small.

Thanks again!
 
Zee,

1/16 = 0.625" ?? Wanna try that one again?

For your benefit (and that of others who might be reading this), there's a program on my page called, appropriately enough, FITS, which will answer questions like this for eleven classes of fits. Here's a sample run of your case...


SHAFT/HOLE FIT COMPUTATIONS

Number of data items read = 11
1 Shrink
2 Force
3 Drive
4 Push
5 Slide
6 Precision Running
7 Close Running
8 Normal Running
9 Easy Running
10 Small Clearance
11 Large Clearance

Fit desired [4] ?
Nominal diameter of shaft [1 in] ? 0.0625

Diameter of shaft for Push Fit = 0.06233 in
 
Zee here is a spreadsheet that I believe one of the members here put together that covers the various clearances of mating parts. I've never had reason to use it as yet but keep it in the archives just the same.

BC1
Jim


View attachment fits.xls
 
zeeprogrammer said:
Thanks Dean. Nice idea but the faces are a bit large. I needed 1/2".

Half inch? I was talking about if you had to re-make or re-work the wheel, Zee. It looks to be well over 1/2". ;)

I think Marv has a good program for your fits. Just to address your specific size question, .0625" + .0005" for a press into a 1/16" hole will work, assuming the hole is really 1/16" (.0625").
If you plan to drill and ream the hole to hit size, you will probably want to do a couple of test pins in scrap of a similar material to allow that the reamer may cut a little over size. Means you may have to experiment on a few sizes of pins to press into the test hole.

I would probably just Loctite the thing.
 
I'll echo Dean here and recommend Loctite as well. Even if you can get the hole and pin size dead nuts on you've still got the problem of driving/pressing the pin home. With a pin that small, bending/deforming it is almost guaranteed.
 
Thanks Robert, Frazer, Marv, and Dean.

mklotz said:
1/16 = 0.625" ?? Wanna try that one again?

Oops. I was stuck in the 10x universe. I sometimes go there and daydream about when I was younger...and things worked...and nothing had shrunk yet.

Right. Back to reality. 0.0625.

Thanks for the FITS Marv.

I'm with you all when it comes to the Loctite.

Dean...I was wondering how I would do the facing from 2.25" from center down to less than .375 from center.

Wait...no I'm good...I'm still in the 1x universe. Sigh.


zeeprogrammer said:
Dean...I was wondering how I would do the facing from 2.25" from center down to less than .375 from center.

Wait...no I'm good...I'm still in the 1x universe. Sigh.

Since I'm not sure which universe I'm stuck in, this may not make any sense. If you use something like those super glue arbors, you can face from the OD right down to dead center of the piece. It's glued to the arbor so you don't have a center from the tail stock in the way. Does that make sense?

Maybe this will help, (or I'm barking up the wrong galaxy..).

8boregreatwheel.jpg
 
Ah thanks Dean. That helps a lot. I understand now.
For whatever reason, I thought one of them was on the cutter side.
 

Hey Carl,

Just want to say I think this build is a great Idea and you have done some nice work.
I'll be following along.

Cheers.

 
I'm still struggling with whether or not to stay with this scale or go smaller.
In any case, there are several pretty small parts and I'm thinking I could use a set of soft jaws for the milling vise.

I figure on milling the side faces, mounting it, face it, flip it and and then face it and mill a small ledge. And maybe that's not the right procedure.

I don't know how to place the mounting holes.

I looked around for some threads on making them but didn't find it.
If anyone has a quick link I'd appreciate it.

I'm pretty sure I'm going smaller. Then I can commiserate. :big:
 
zeeprogrammer said:
I'm still struggling with whether or not to stay with this scale or go smaller.
In any case, there are several pretty small parts and I'm thinking I could use a set of soft jaws for the milling vise.

I figure on milling the side faces, mounting it, face it, flip it and and then face it and mill a small ledge. And maybe that's not the right procedure.

Universe 10X and wondering at the first moment of the Big Bang where laws of physics were non existent, speed was infinite, mass zero negative, all countered by our law bound reality. . . What Piece(s) are you thinking of? Goes from plural, (soft jaws) to singular (it). Way to early for me to be confused, thats an after lunch affair.

Robert
 
Zee', I'd think it might be easier for you (?) to make your model the scale you started with in order to get the bugs worked out and then move on to the task of downsizing the beast once the larger version has been perfected.

Spindles! .... yes!.... must have spindles! he says, mmm?

BC1
Jim
 
Wot Jim said - do both! And when you're done, take the smaller one and scale it down by half and ......
 

Latest posts

Back
Top