Slow Motion

Home Model Engine Machinist Forum

Help Support Home Model Engine Machinist Forum:

This site may earn a commission from merchant affiliate links, including eBay, Amazon, and others.
Joined
Dec 26, 2008
Messages
3,697
Reaction score
685
Location
Crewe, Cheshire, UK
A few of you may have read where I have bought a new camera to help me in the shop.

I have been waiting for a ring light to fit around the lens so I can get up close and personal with bits of metal with the macro, and allow me to do vids in slow motion.

So this is my very first outing with hi speed shooting, done hand held, just to see what it turns out like.

I still need to get the focusing sorted, as it is very complicated on that side of things when you have a long zoom lens and you are shooting from rather close, in this case, about 6".

So I will just explain what this horrid vid is about.

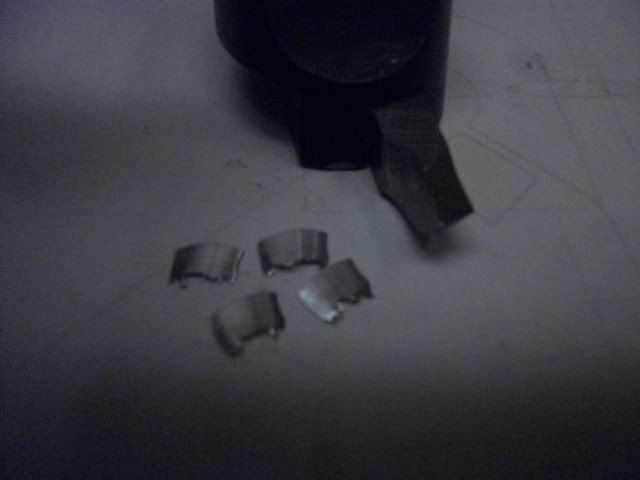
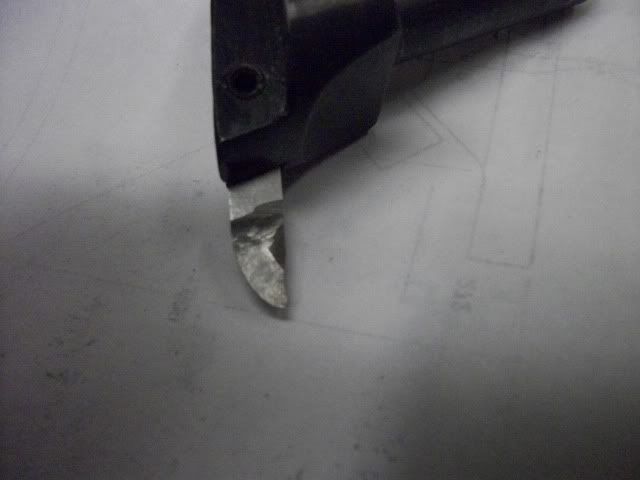
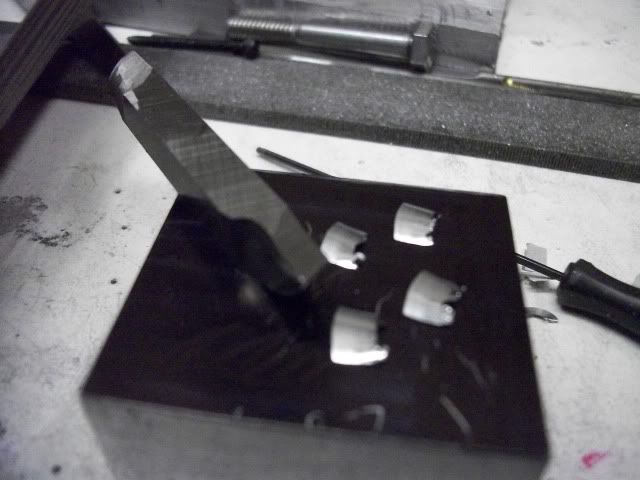
I was always fascinated because of the way I grind my flycutters, and really, within reason, even with a large depth of cut, I still get mirror finishes.

So this is my flycutter at about 400 RPM, on a fairly slow feed (under power) and a cut depth of approximately 0.100" (2.5mm).

I took it at two speeds, 448FPS and 1000FPS (frames per second), then it is automatically slowed down to 25FPS. The first minute is at the slower speed.

http://www.youtube.com/watch?v=FipAdIUr5OE&feature=youtu.be

This has shown me that instead of one piece of swarf being generated on each sweep, there are multiple cuts being done across the whole cutting face, all being formed into tightly curled pieces of swarf. So the way I understand it, maybe as though a half a dozen cutters, all acting at different depths, and because the lower one is so fine, it gives the mirror finish that you can see on the metal being cut (aluminium with no lubricant).

Can anyone see anything else?


I promise, it will get better.

John

 
Now that is neat!
Usually when i fly cut i am jumping around brushing the hot chips off me! ;D

What would be a very cool video in slomo would be a good cut with a curling chip on the lathe!!!

I think it is an excellent start John!
Not much else to add!

How much space does a slow mo video take?

Andrew
 
That is really amazing video John. Had you posted info on the camera here on HMEM previously. I am thinking it could be quite a useful tool for making some videos for the machine shop class I teach. Concepts like milling cutter feed per tooth per revolution, single pointing threads, flycutting, etc.

Bill
 
Give me a chance Mike, this is only the first time I have tried it in the shop. But I did do a slow feed on purpose, because if a faster feed was run, the chips would have maybe merged together and I wouldn't have seen the different cutting layers so easily. Next time I will do a fast feed, just for you.

Andrew,

The clip that was uploaded was about 11MB. But the originals were 35MB each on the photocard for 20 seconds worth each. The camera only takes 20 seconds at a time. When you consider that at 1000FPS, it is slowed down 40 times to 25FPS, so would give you 13mins 40 secs of rather boring video, about half that for 448FPS, so I knocked them back to 1min each. As I said, I am still playing at this time, I need to be a bit further away and use the zoom to get better focus, the limit is my ring light, only useful to about 1 metre. But that should do me just fine, I don't want to fill the shop with photo lighting etc

Bill,

Mine is a Fuji Finepix HS10, two times removed from the latest model (and less than half the price), but there are a few camera now that have slomo, Casio is one that jumps to mind, and is very reasonably priced, but is only a compact.

Be careful as to what format they generate, I have stuck with Fuji for many years now, purely because I know that I can cut and chop the videos very easily (about five minutes to chop 'em up and join together). In fact you can do most of the work in the camera itself.


John
 
Awesome John,
This brings to mind something my father once said. (I'll probably get it wrong) Any cutting action is actually a burning action. I has something to do with heat created by friction which actually melts the material being cut.
I don't claim to know the science behind it but when my Olde Dad told you something, it was a fact.
Feel free to corect me.
Alan
 
Very cool videography! If you ever feel ambitous, I'd like to see
- a multi-cutter tool in action
- when a flycutter cutter is 're-surfacing' along the material segment already been cut. Typically, thats where my surface gets shiny surface, I guess knocking down the tops of the hills
- 2 flute vs X flute end mills

hmm... this could go on & on ;D

 
Alan,

I won't argue with you at all, purely because many moons ago, that topic was discussed on here in detail, and is rather heavy for what this post is about.

But please raise another topic about it if you want to know more.

I can't remember who the culprits were, but I think Rick was involved somewhere in the discussion.
My offerings were absolutely zilch on the subject, I knew about it, but not enough to get involved, so I kept my mouth shut (very rare).


Peter,

I wanted to see what a deep cut with my flycutter would show up to see how my radiused tool worked, but as I get better at it, I am sure other tooling will get involved.

If you noticed on the second minute, it only does a very narrow band shot at the high FPS. That is because of the camera limitations, trying to get as much detail into a very short space of time, it can't cope with a full screen, plus the resolution isn't very good, but good enough to see what I want to see.

I think what everyone has to realise, a few years ago, to get such video would have cost megabucks, but now it is coming into the realms of the masses to achieve, with relative ease and fairly low cost.

I wish I had this camera in the early 80's, when doing a couple of years as a professional photographer between engineering jobs, I could have made a fortune.


John
 
Now that is very danged impressive! You'll find a lot of use for that set up I imagine!
 
Very nice video, John. I spent most of the day yesterday with a fly cutter, which is ground to your example, on aluminum. I have been using this style of cutter for a while now and I am always impressed by how well it works and how easily it cuts. I love this tool and the results it gives.

I was surfacing a piece of aluminum that was 1.5" wide with a cutting radius of about 2" and taking .100" DOC while coming to size with finer finish cuts. Feed was hand controlled but I kept the chip load full and I did not feel that my little X2 mill was stressed.

Jerry

My bench and shop floor is covered with chips but the chips are nearly flat with just a little curve but certainly not curled. I'll try to get some pics and measurements of the chips if you are interested.
 
John, that's very interesting, not to mention fun to watch. Might even help people understand
how this tool grinding stuff works to their advantage.
Thanks for the videos!
 
Great video very neat to watch, I have the one of the casios you mentioned, the fs10, and experimented a little when I had my southbend. The tool was probably incorrectly ground/ incorrectly used as it was just left over in the box of stuff I got with the lathe and my first time running a lathe, but still could be of interest.

Thanks for taking the video I cant wait to see more machining operations done by a pro in slo motion. ;D

[ame]http://www.youtube.com/watch?v=9iE89Lx1oI0[/ame]
 
Bogstandard said:
Can anyone see anything else?

When cutting with such a generous radius the actual depth of cut per chip feathers away to zero directly under the tool - even on aluminium you can see the tool riding off the material occasionally - evidenced by the differing "widths" of the chip coming off (or am I delusional).

I think I can also see galling build up on the cutting tool just behind the edge which is normal cutting dry.

Brilliant video - I'm guessing that camera is going to be used for all sorts of diagnostics.

Look forward to seeing more discoveries related to the quirks of our hobby.

Regards,
Ken
 
Jor2,

Very nice video shots there. One thing mine can't do is slow down and speed up during a take. Camera limitations on my part I expect, but I do know that the Casio does make a fair job of things.

I am far off being a pro, I'm just someone who looks at home machining from a different angle than the norm. Putting my many years of general experience to good use, trying all sorts of things and getting around problems in an easy way, rather than sticking to the 'written in stone' way of doing things.
Many of the professional machinists on here would run circles around me when it comes to getting some jobs done, where I score is that I have experienced such a lot of different types of production, I can bring ideas into my workshop that have come from areas not normally associated with machining, but very relevant.


Ken,

I think it was a bit of an optical delusion, maybe caused by a little out of focus and the varying shadows. But I could be wrong, and that was why I asked, two (or hundreds) pairs of eyes are better than one.

I too had noticed the galling, but I didn't want to add any lube because it would have hidden my view of the cut.

Just this basic take has shown me what I wanted to know, how the chips form tight spirals rather than chunks. That is maybe because I have a fairly large top rake ground onto the cutter, and yes, when I get a little more proficient, it might answer a few more tantalising questions I have in my head.
One thing I really want to look at is parting off, even though I don't have a problem with it, others might benefit from seeing how chip forming etc can affect the way a tool and material reacts, or even how a touch of lube changes the whole process.


John
 
John,

The shot was actually all taken at the same speed 420fps I think, but initially I doubled its speed about 3 or 4 times in windows movie maker to make it look close to the actual speed. Not really helpful to analyzing anything but does give you a rough idea of how fast its actually moving.

George
 
+1 on producing a parting off video John ;). Thanks for sharing the flycutting video - I'm off to grind up one of your cutters.

Cheers Garry
 
John

I know the thread is about slow mo cameras but the flycutter chip is also worth talking about. Here is the cutter that I was using and the chips it produced;

whatzit054.jpg


whatzit052.jpg


whatzit049.jpg


The depth of cut was about .060" across a 1.5" wide surface. The cutting radius is about 1" turning about 700RPM with a fairly aggressive feed rate. The chips are very uniform in size and shape. The convex side is bright and smooth while the convex side is dull and rough. The top edge (to the left in photos) is uniform and solid and the lower edge (to the right in photos) is very thin and ragged. In addition to these chips, The operation produced a lot of very fine slivers, almost fluff. The finished surface is very smooth but shows some tool path circles. A higher speed, fine finish pass eliminates that.

All of this seems to be just what I expected, EXCEPT for the uniform short length of the chips which I estimate to be about .25 inch. With the tool making a cut across a 1.5" surface, I would expect longer chips, or at least some longer but not the uniformly short chip.

Any explanations?

Jerry
 

Latest posts

Back
Top