Silver solder?

Home Model Engine Machinist Forum

Help Support Home Model Engine Machinist Forum:

This site may earn a commission from merchant affiliate links, including eBay, Amazon, and others.

oregonsteam

Active Member
Joined
Jul 29, 2008
Messages
44
Reaction score
0
A plan calls for the crankshaft to be built up from steel and "silver soldered" I have soldered copper and brass with a propane torch and plumbers solder. Are the tools and techniques similar for silver solder? Would plumbing solder work on steel?


Thanks
 
Not sure what your application is (i.e. steam/air vs. IC). For smaller compressed air type engines you may well get by with Loctite. Another option would be to pin the assembly together. Silver soldering can be done with propane but again, depends largely on the sizes of the components, oxy/acetelyne is preferable though others may have different opinions. Plumbers solder would not be the equivalent. I am sure others will chime in here, but just wanted to suggest the other options in addition to silver solder

Bill
 
I've just finished silver-soldering a pair of copper boilers, using an Oxy-Propane torch. It wasn't as tough as I'd expected, and I'm looking forward to more.
 
Silver solder (more correctly silver brazing, but the common term is silver solder) melts at more or less 1200F, +/- depending on the exact alloy. Common tin/lead solder melts around 425F +/-, again depending on the alloy. So....you need a lot more heat, different flux, etc. For "small" parts a propane torch will do it.

If you're good at low-temp soldering, you can probably handle silver soldering. The same basic rules apply: CLEAN surfaces, flux, heat the work, not the solder.

But, as Bill suggests, there may be alternatives. I recently made a built-up crank assembled with Loctite 609, then pinned.
 
Plumbers solder will work on steel but isn't strong enough for an IC engine. It may work for a small compressed air motor.
 
Propane and air is plenty hot for silver solder. The usual problem is insufficient volume of heat. I have silver soldered some fairly large parts by placing them on the kitchen stove (natural gas) and then using the propane torch for additional heat close to the joint area.

If you do a search for silver solder on this board, there are lots of threads and some have links to other sites.
 
Well, for the last two weeks I've been trying to silver solder a crank, too. First off, I bought a couple of 'nickle silver brazing rods' flux coated. Working temp 1150F., 1/8" diameter. My propane/air (bernz-o-matic type) torch barely melted it. Then I borrowed a hunk of 'Safety Silv" and the proper flux for it. That's what I used on the left hand and center pieces. The bigger one was being heated for the second time, thus probably not clean enough(heat scale/oxidation), and maybe not quite hot enough. Large diameter solder hard to control application. The center one seemed to heat real quick with torch, plenty of heat. I used small bits of SS clipped with sidecutters and dropped on with tweezers. The dull silver color is after soaking in "Real-lemon" juice from the Mrs' kitchen.
The piece on the right was a try with Plumbers solder and a butane pencil torch. I used zinc-chloride flux. Plenty of heat and easy to do, just trying to get the stuff to flow.
Crank0399a.jpg

My bottom line is:
It's going to take some practice. Don't muck up your finished parts experimenting.
Keep it CLEAN.
Too much heat will burn the flux, and scale up the parts.
I'm still trying to figure out how to reliably get small bits of solder to work with ( smaller than my 1/8" axles )

Hope your luck is better than mine.
DB
 
Silver solder comes in various alloys and shapes. Almost all of my silver soldering on models is done with .031" wire with occasional use of .031" ribbon cut into small pieces. Bigger work can be done with .062" wire but I don't know where you could use .125" silver solder in model work unless you hammer it out to a thin ribbon.

I am not familiar with the term 'nickel silver brazing rod' so I did an extensive search and the best idea I can get is that it is a low percentage (10%) silver rod. Silver solder is a high percentage (40%+) silver and is the recommended material for model work

I have used a lot of rod generically called SilPhos in 5%, 10% and 15% silver and it is very useful but in a different application. Silver solder gets its strength from a very thin layer sucked into the joint. SilPhos will suck into a joint (like a copper tubing joint) but it can also be built up like a weld bead while in the plastic state. You can bevel the ends of brass pipe, butt braze with SilPhos and then machine down to finish size.
 
I repaired a speedometer drive last week, consisting of a forged steel gear and a pressed steel ring, using silver solder for the first time. I scrounged a part packet from an Air con engineer that visited my worksite. He uses it for Cu-Cu and Cu-Fe joints, he said the packet had been damp and the flux tended to fall off the rods, he donated the packet complete with the flux in the bottom.

The solder used was "silver-flo 38", found on this page http://www.jm-metaljoining.com/products-pages.asp?pageid=60&sectionid=3

I cleaned up the sufaces with wire wool, I used a little bit of the flux coating mixed with water to paint the surfaces before pressing them together.
I got the parts hot with a antique pump up paraffin blowlamp, the work being stood on a temporary hearth made from 5 ordinary bricks.
Putting the fire to the metal and giving it a good heat up until the flux melted and went "glassy", I just kept touching the rod to the metal joint until I could see the solder was "going over" (solid to liquid) with a defined "pasty" stage in-between.
I put the heat up a little more, the solder went completely fluid and seemed to "wick" into the joint, much the same as plumbers solder. I turned the heat off and left the drive for 5 minutes.
I washed it in tapwater with a nailbrush, silver solder has a distinct yellow sparkle when polished up.
Examining the finished joint gave me a 10 out of 10 feeling for job satisfaction. ;D

The availability of an excess of heat seems to be a key factor, I just hold the lamp further away to turn the heat down, moving the lamp side-to-side "licking" the work seems a good technique to evenly distribute the heat.
 
If the drawing needs the crank to be finish machined after soldering then I would stay with the silver solder, soft solder will not have the shear strength and it may com apart with the cutting forces.

Looking at those pictures of various cranks the problem is that the work is not being heated enough, the rod has melted and just sat on the surface of the webs which were too cold. Also remember that Silver solder requires a couple of thou clearance for it to flow, too little and it will just form a fillet on the outside and not penitrate the joint, too much and it can't bridge the gap.

Also if using flux coated rod then heating with propane or map gas will cause the work to oxidize before the flux has a chance to melt, better to mix up some flux so the job is coated before any heat hits it.

Jason
Jason
 
Hi

Some facts about brazing:

- It is a lot better to use blank silver solder rods and flux thats beeing applied to the components before heating it up. The reason is, when heating it up, the components will oxidate and when using bonded silver solder then the flux will have to "remove" the oxyde first. If you apply flux before heating it, the soldering joint won't oxydate and the solder will flow immediately.

- You should always use some fireclay bricks and make a corner; then put the workpiece into the corner where the heat gets reflected from the fireclay. When i do brazing work on steam boilers, i try to cover as much sides as possible; sometimes this means that 5 of 6 sides are coverd. If possible, cover it at the top because this highly reduces the heat loss. (stack-effect)

-Avoid working in a drafty area as this will cool your workpiece down

-Heat will ascent; you should heat at the bottom of the parts

-massive components need more heat; so you should start heating up with the biggest component.

-The worse the heat conduction of the used material, the less heat is required as the heat rather concentrates to the point where the flames hit the components.

-And in the end: the used torch should be powerful enough to heat the workpiece to more than soldering temperature. If its just able to heat it up to working temperature and not more; you will fail soldering bigger pieces as some heat gets lost by the air and heat radiation.

If your torch almost isn't capable enoug for doing the soldering job, it may help to cover one more side.

If you use a cartridge torch, be sure to use a full cartridge as the have a higher pressure than the ones with only half the amount of gas left. Also, when soldering for a longer time, prepare a bowl with warm water (max. 40°C).
If your cartridge gets too cold, the pressure will collapse and the power will be very poor. Then put the cartridge into the warm water for some seconds, remove, wait some seconds so the gas and cartridge have the same temperature. Repeat this until it has reached a temperature of (in about) 20°C. Then you will have some power again for a while.

Florian

 
"""Good thread. I'm learning a lot here.''''' +1 :bow: Thanks for the tips

Looks like I'll have to 'pay' a call to the welding supply house to get some more flux and some small dia wire or sheet silver solder. I tried giving thicker stuff 'the good news' with a hammer, that stuff is tuff, and I think the hammer or anvil may have contaminated it.

Thanks again for the tips, will try soldering again in a few weeks. Probably going to use a side crank on current project, 'engineering change' as they say in the business... :big:

DB
 
As has been pointed out, some sort of hearth is a good idea rather than trying to solder in an open area.

Fire clay bricks were mentioned for the hearth, but silicone bricks are much more efficient at reflecting the heat. Also, if you have some Rockwool or Fibreglass blanket, that is good for putting into void spaces or areas where heat is not required for the job, like a boiler chamber, when silver soldering. It cuts down greatly the amount of heat loss from the job.

When silver soldering steel, use 'Tenacity' flux (a Johnson Matthey product) or equivalent. This flux stands the higher temperatures required rather than the usual flux reommended for copper and non-ferrous alloys.

Dave
The Emerald Isle
 
You may want to try a product called Stay-brite It's a low temp. silver solder used in Radio control hobbies. Melts at about the same temp an plumbers solder and is pretty easy to come by. Most Radio Control hobby shops carry it. Its not expensive.Will easily melt with just a propane torch.
 
Hi Davyboy
As Florian said..this is...If it helps have a look on my post I had similar problems and I received a lots of useful advertising...
Best regards
Paolo
 
Engine Maker said:
You may want to try a product called Stay-brite It's a low temp. silver solder used in Radio control hobbies. Melts at about the same temp an plumbers solder and is pretty easy to come by. Most Radio Control hobby shops carry it. Its not expensive.Will easily melt with just a propane torch.

But it will never reach the strength of "real" silver solder.
Also it won't have a good temperature stability (which is important when soldering steam boilers)

Florian
 
It happens every time a US member asks about silver soldering.

Confusion arises because of a name.

We have no such problems in the UK.

In the engineering circles, we have three (or four if you break brazing down into two) methods of soldering.

Soft soldering, this is used mainly by the plumbing and electrical trades, and is usually a lead based (or more modern, I think, antimony based) product with a low temperature melt and is used with a free flowing either paste or liquid flux (or in the case of electricians, it is in the solder itself in the form of a core). This is only used in engineering where a low temp, non load bearing joint is required. It is of no use for making up cranks or stressed parts.

Silver soldering (this should not be confused with jewellers silver soldering, that has a lot more silver in it) is classed as hard soldering, and go into any engineering supplies, ask for silver solder and you will invariably be given a stick of easiflo, about 3 ft long and 1/16" in diameter, it has a slight silvery/golden colour to it. If you buy it from a model engineering suppliers, then you will usually be asked for temperature range and diameter. The temp range is so that you can start a fabrication off with a higher range, than as you reheat, you use lower temp silver solder so that you don't melt the previously made joints. But for most applications, easiflo (or its equivalent) will do just fine. Most of my work is done with 0.5mm thick easiflo wire, and only use the larger 1.5mm for large assemblies (I used to use that when I produced boilers).
As for fluxes. It seems that the US market is devoid of any flux standards, and I have even seen people being told to use Borax. That was OK maybe 60 or 70 years ago, but we have come out of the dark ages now. The generally accepted flux is again Easyflo flux, and that will cope with most materials, but not the higher ranges of heat required. I always swore by Tenacity #4a flux, but have now found an updated one called Tenacity #5. This is designed for silver soldering stainless steel, and will take prolonged overheating before the flux becomes overwhelmed and gives up the ghost. I have found this perfect for model engineering use, and will allow soldering of all the normal metals and will allow over abuse by the blowlamp.

The third method is brazing, which can be divided into two. Brazing and bronze welding. Both use the same rods and flux (1/8" diameter brass rods and Sifbronze flux), The difference between the two methods is that with brazing, the rod and flux is used in a similar way to silver soldering and is usually carried out with a large propane torch, bronze welding is a different technique where the metal is fillet prepared like for normal welding, and the operation is normally carried out with an oxy/ acet setup with a carburising flame, and the rod is used as a filler like normal gas welding, but instead of melting the parent metal, flux is used to assist the bond of parent metal to filler rod. This is usually the method used for joining cast iron.

Just a note about what to use for the heat source. Propane or butane gas torches are ideal for silver soldering, oxy/acet is NOT. The oxy setup is just too hot a flame, and will usually kill your flux off instantly, unless you are working on a large fabrication such as a loco boiler, in which case it can be used for localised heating, in conjunction with a propane burner that keeps the main fabrication hot.

If you follow a few basic rules, silver soldering is a doddle.

Silver solder works by capillary action, so it needs a gap to flow into to make the joint. Don't force fit a pin into say a crank then silver solder it afterwards. You are wasting your time, the solder is only sitting on the surface, just more cleaning up to do. Make the part of the pin undersized slightly or the hole it is going into very slightly oversized (a 0.002" clearance is ideal). Wack the bit that is going down into the hole with a hammer, to deform it, so that part of it grips on the inside of the hole, a straight knurl does a very good job of leaving enough gap. If the pin has a clearance of 0.002", just as you see the knurl being formed is about 3 thou, so a nice tap in fit into the hole. The silver solder will flow down the hole and make a perfect joint.

Cleanliness is paramount to a good joint, any contaminants will stop the joint being formed.

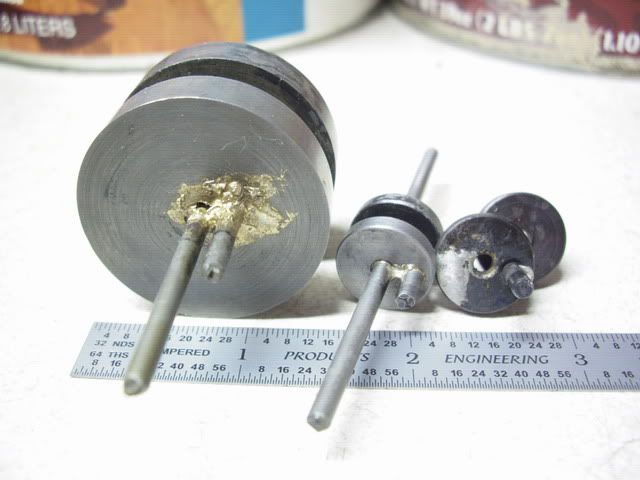
Solder and flux will always flow towards the heat. If you look at the mess of silver solder around a hole on one of the previous posts, that looks just like the heat was directed straight at the silver solder and flux. The flux was exhausted and the solder was melted before the main part had heated up enough to join the two parts. The correct way to heat up and make a joint like that would be to dip the pin into flux and put it down into the hole, paint around the hole and pin with flux (not too much, wherever the flux goes, the silver solder will go as well), put a pallion (please look it up, it will explain it a lot better than I can) of solder around the joint, then heat from the underneath of the disc. As the disc gets hot (Cherry red) you should see the solder run into the hole and form a perfect fillet around the pin. It just cannot be explained any easier than that.

If you are in any doubts as to what the supplier is giving you to carry out your silver soldering, then I would suggest you bite the bullet and order direct from the UK, where every model engineering supplier will be able to give you exactly what you require.

I showed this on another post on here the other day, it shows a little of what I have tried to explain above. There are bits about silver soldering all thru the article, which isn't quite finished yet.

http://madmodder.net/index.php?topic=1370.0


Blogs
 
Very useful post by the Bogster as usual-- I went through the "how/what/when/where" of silver soldering not long ago, so here's what I discovered about regional differences that might save a little time--

-- In the US silver solder mostly comes in wire coils sold by the ounce rather than sticks
-- Flux and silver solder can be found at welding supply places, but the solder I found was thick and not so useful for small models.
-- Jewelry Supply places have a slightly different sort of silver solder and flux (Cd free, different color and temp ranges). It works, but no need to seek it out.
-- Online a good supplier is http://www.sra-solder.com/brazing_wire.htm BAg1 is the equivalent of "EasyFlo". I like the .031" wire. You get a lot of wire for 1oz.
-- I've used "Handy Flux" (welding store) and "Superior 601" (SRA) for silver-soldering and they both did ok. Haven't tried the others
 
Back
Top