Rob Roy

Home Model Engine Machinist Forum

Help Support Home Model Engine Machinist Forum:

This site may earn a commission from merchant affiliate links, including eBay, Amazon, and others.
Henk

You are right. I get the same thing, I've redone the search and all the other links lead back to the same sponsored links. Maybe they are doing some web admin and it will come right later.

However, one of the links does quote it as freeware;
.........He (Charlie) has generously made the software available by placing it in the public domain as freeware. Charlie has discontinued his own web page but the software can now be downloaded from the....

I did download the entire package so could post it back here on the downloads page if the moderators are OK with that.

Pete
 
WOW! running perfectly, double top! I wonder how hot the flue gas is, can't see a wisp of water vapour or steam from the chimney. :)
 
CompS

It was a warm dry day here in NZ (20degC). I believe the flue gas temp is OK . If you trawl back through my thread you'll see the stainless baffle installed with the burner, it tends to keep the heat in the firebox. I static ran it once with the new burner and no baffle and I've got a bit of paint damage on the smoke box now.

Zee

Glad you liked it, but please don't make a mess on my account? I wouldn't want Mrs Zee taking me to task about your habits.

Pete
 
thanks double top, you will probably see it puff billows of steam on a cold damp winter's day! ;)
 
Hans

Thanks; in fact I stumbled across this less than a week ago myself and only today commented to one of my local mentors that it was a few months too late.

I came across it looking for details of the oiler as I'm going through oil like nothing (mentioned previously). The book describes building it but there are no drawings. It turns out my dad used a commercial oiler which looks like it was built to the LSBC design documented in Shop Shed & Road. Comparing the dimensions the LSBC oiler will pump 2.5 times more oil than the Martin Harris version. Trouble is I can't make the MH version, as I said, I don't have the drawings.

That brings up another issue discovered today, and the doc on the link you provided doesn't cover, is the hole in the bottom of the smoke box for the steam/exhaust pipes to the cylinders is an oblong slot that nowhere is it mentioned that it needs to be bunged up to get the firebox to draw properly. That's the next job.

Thanks for letting me know though.

Pete
 
It looks like the drawing for the lubricator was an oversight in the original drawings and the book. In my search for it I find that there is a separate drawing for it available from ME/MEW team at MyHobbyStore for £5.95. However, postage to NZ is £6.98!!! for what can be no more than one sheet. Even phone call didn't help so a suitably crafted snotogram has been sent to the ME/MEW editor and the MHS manager. Hopefully they can resolve.

In the meantime I have a fuzzy thumbnail image of the drawing from the MHS website and the Martin Evans words in the book. Hopefully I can reconcile and make some sense of it.

Pete
 
I've been in dialogue with MyHobbyStore about the drawing for £5.95 and postage to NZ is £6.98 and their attempt to justify it. Apparently I was offered a discount on the postage but the email never arrived. In the meantime I realized it was only one sheet and there is a fuzzy copy of the drawing on the MHS link .

10221.jpg

(Direct link to MyHobbyStore web page)

Along with the words in the book it was enough to get going, so I set to.

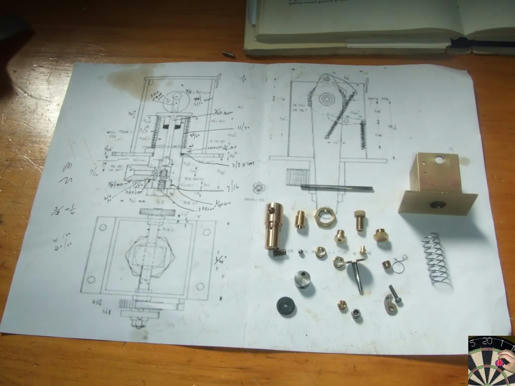
In my spare parts draw I had another lubricator of the LBSC type that is already fitted to the loco. It would give me the container and ratchet mechanism to the right size so it would be form and fit to the original. All I needed to do was replace the insides

All the new parts with the existing container.

y779rg07eb741b54g.jpg


I had to modify some of the dimensions to get it to fit the container, but as I didn't have some of them anyway and had to derive them by scaling from the fuzzy drawing. I was remarkably close as found out when I subsequently sourced the Rob Roy and William book, which has the missing drawing included. (Thanks Chris).
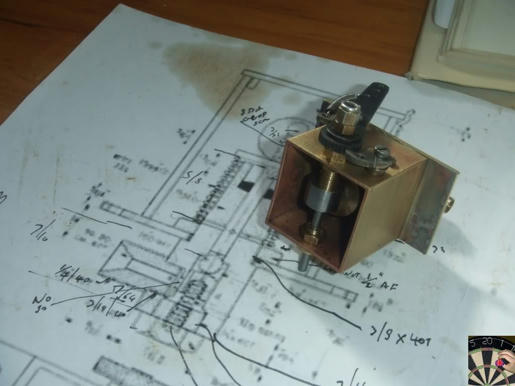
All assembled

8n34vjlpyamh8mg4g.jpg


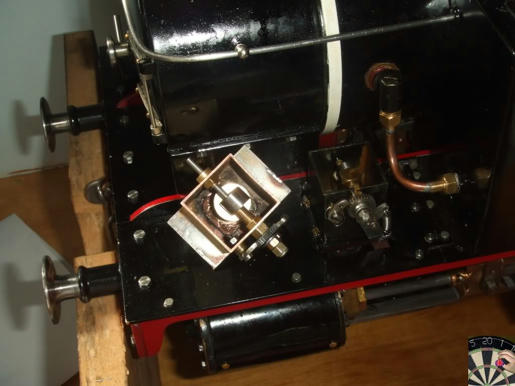
Alongside the existing.

w12w1or23nk66j24g.jpg


You can see how messy the loco is as a result of the amount of oil the existing lubricator has been pumping out

Left over parts from the original LBSC type.

58j7g7i30s81bwb4g.jpg


I've tested it by hand with dish washing liquid, it was the nearest to oil without the mess and easy to clean up under the tap. It worked ok emitting a drip or so every few strokes of the piston. It remains to be seen what happens when it is pumping oil against steam pressure.

Now it is all stripped down and the mounting flanges drilled and tapped ready for mounting on the running board. I've just given it a blast in the sand blaster and a coat of etch primer, so that's it for the day.

Pete
 
Not seen a lubricator like that before Pete, how does it work? Can't quite work it out from the drawing.

Nick
 
Nick

I wasn't too sure myself when I first read the notes in the book but the fuzzy diagram helped.

Its an eccentric bearing on a spring loaded disc on top of a thin rod acting as the piston in a fixed cylinder. There are 4 oil entry holes at 90deg to each other, just above the hex nut holding the cylinder in the container. As the piston is on the up stroke it draws oil into the cylinder. when on the down stoke, and once the end is past the inlet holes, the oil trapped in the remaining length of the cylinder is pushed past the non return valve in the base, and on to the loco cylinders.

That's what I think happens, it remains to be seen if it works in service. Martin Evans write up appears to say it does. The effective piston stroke is way less than the LBSC design, which is what I need

Hope that helps

Pete
 
John

Thanks

I'd heard about those one way bearings in the past few days but hadn't followed up. Its new technology when I'm working with something from the 70's. In my case I had all the ratchet and pawl bits and bobs as that what is on the original and I had less to change around as the new lubricator will drop straight in where the original was; same fittings, linkages etc.

If this doesn't work then a whole new line will need to be taken which may be an opportunity for using these.

I know somebody will come back and propose a displacement lubricator, the drawing update link Bentprop posted proposes using one but LBSC wasn't very complimentary about them. I don't really have an opinion I'm just trying to stop my loco emulating the Torrey Canyon or Exon Valdiz before the enviro police get on my case.

Pete

Pete
 
Thanks Pete, so it just pumps the little bit of oil that's sucked in through the holes and runs into the bottom. Yeah it does have a rather limited pumping stroke but if that's the idea in this case great, it looks more controllable. There are less places for it to fail too. With the oscillating type there are more interfaces etc.

I know some people have great results with displacement type lubricators - the design of sweet pea (much larger loco) is just to have a displacement type on each cylinder but I prefer the look of mechanical lubricators on a loco.

Nick
 
That's the theory; it remains to be seen if it works in practice.

After painting the new lubricator casing I reassembled everything and before I installed in the loco thought I'd give it another test with dish washing liquid; nothing.......... So I stripped it all down again and set to understanding why it didn't work now. I tried a few things but there seemed no particular reason for it not working so I thought I'd better try some steam oil rather than cheating with the dish washing liquid. The real oil worked fine so its in the process of being put back together again..........

(there's a lesson in there somewhere)

Pete
 
Steam Oil's pretty viscous stuff I suppose. Is the piston silver steel, with a ground rod and reamed cylinder it should have agood enough fit, wonder if you could put some small o ring on there to help the seal though.

Nick
 
I'm thinking that there is a possibility that the bore may have been damaged in the making, test, assemble and disassemble processes. The piston rod is only 3/32" (2.37mm) The ball in the valve is 1/8" (3.175mm) I could remake the piston in 2.5mm or 3mm and re ream the bore. At least the design is that simple it allows that to be done fairly easly without having to remake a whole lot of parts.

I am going to put it all together today as it is and give it a run to see how it goes.

Pete

 
All went well and it works fine. I steamed it up and ran the steam through the cylinder drain cocksto get rid of any remaining oil. I then ran it for a while with the new lubricator. It didn't gobble up all the oil like the last one and when I opened the drain cocks there was plenty of fresh oil was dumped.


http://www.youtube.com/watch?v=-XstkME3vi4


Pete
 

Latest posts

Back
Top