Rob Roy

Home Model Engine Machinist Forum

Help Support Home Model Engine Machinist Forum:

This site may earn a commission from merchant affiliate links, including eBay, Amazon, and others.
Good going Pete, and thanks for the video; I was wondering how fast it had to turn!

Regards, Arnold
 
I had wondered about the offset disc acting as a cam as intuitively it had the wrong profile. However the proof of the pudding is that it all seems fine. It turns freely by hand, so there isn't much loading.

But that also goes to show how wrong it was using the LBSC lubricator. LBSC design suggests ~30 teeth on the ratchet and one click per loco wheel rotation. The Rob Roy setup does 3-4 clicks/rev. I had said previously that based on piston dia and stroke the LBSC lubricator was doing 3 times the volume of the Martin Evans version. In fact it's more than 6 times by virtue of the way it works the Martin Evans version only effectively pumps the volume contained below the 4 inlet holes and the top of the ball valve

34aku33bfl3x31x4g.jpg


Pete
 
I thought the ratchet was flying round at a fair rate in the video there but as long as the two have balanced out it's all good! ;D
 
Its been a bit quiet lately tweaking, tuning and getting things to run right as things break, fall off or just don't work properly. Problems have included; loss of steam pressure when running, the pin falling out of reversing lever release handle (which was inconvenient as I was running at the time), the new lubricator packed up and occasionally it would run backwards when forwards was selected ???.

I started looking into the loss of pressure on the valve/piston side of the regulator and think I now understand the reason for that. However, the going backwards when forwards was selected also became obvious. The linkage was loose. This has meant the tanks, cab, running boards, boiler in fact just about everything had to come off to fix it. So now I'm back to a pile of parts.

maprz450yn8k94l4g.jpg


This may seem major but I had been thinking about a strip down to re-paint or touch up all those parts that have been affected by the constant work I've been doing sorting things. So I'm pretty positive about the whole thing. In fact after tonight there are more bits off than the picture shows.

Pete
 
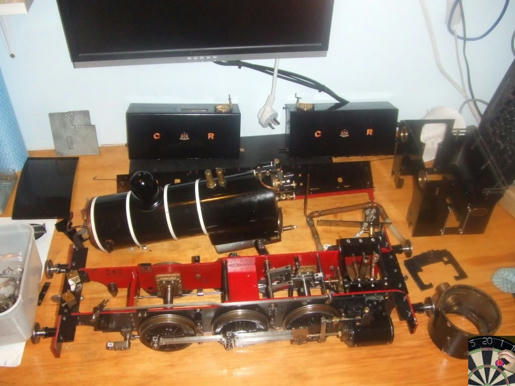
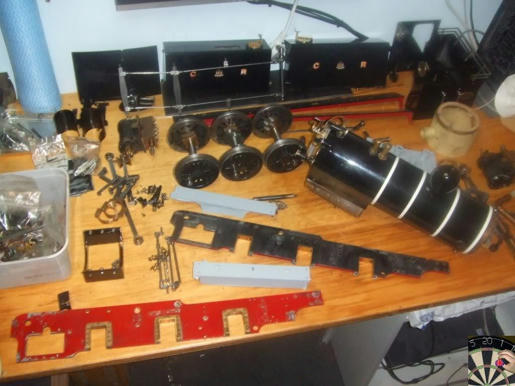
I'd got it this far and realised the paintwork on the frames was getting a bit rough with all the work that I'd been doing. So
why not take the opportunity to keep going and complete the strip down and get it sorted.

k1akd5veve4sa5u4g.jpg


You can see what I mean by the state of the paintwork on the frames.

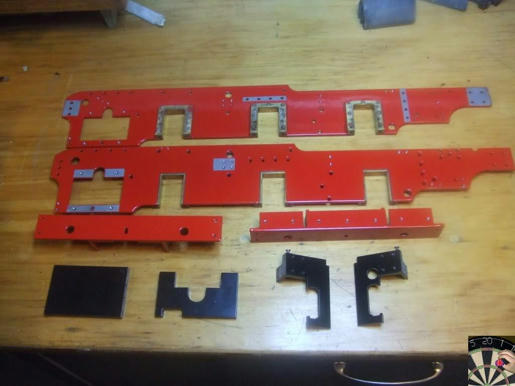
The guys at work got involved in a discussion on painting and convinced me to look at powder coat. So another session in the sand blaster and off the frames and stretchers went to the local powder coaters.

ireflojrid66eyn4g.jpg


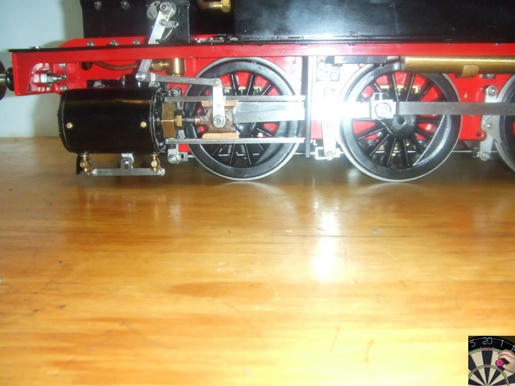
That's way better and far more likely to last a lot longer, $85 well spent. They can't do two colour as the powder flashes through the holes to the other side, so it was either black or red. I chose the red as it give the contrast to the black upper parts and allows the buffer bar faces to be red. The purists will tell me I've got it wrong as these locos were red on the inside of the frames and black on the outside. But this isn't a railway buffs site so who's complaining?

OK there's some wisdom that powder coated frames can have an issue with heat. However, I'm running on gas and the burner is way up in the firebox and there's a water jacket around it. So I'm guessing the heat on the outside of the boiler gets nowhere near the 250degC they use to fix the paint.

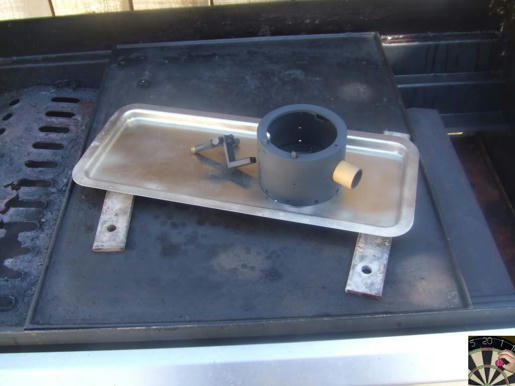
While I was onto this second re-refurbish the spray paint job on the smoke box was showing signs of over heating after attempts to produce more steam. So that came off and was sprayed with 3M heatproof paint that goes to 650degC. That needs curing at 200deg C and using the household oven didn't go down well last time so I barbecued it. My barbeque has a temp gauge in the cover so 3/4hour at 240degC did the job.

0n3bsa2m3a19emh4g.jpg


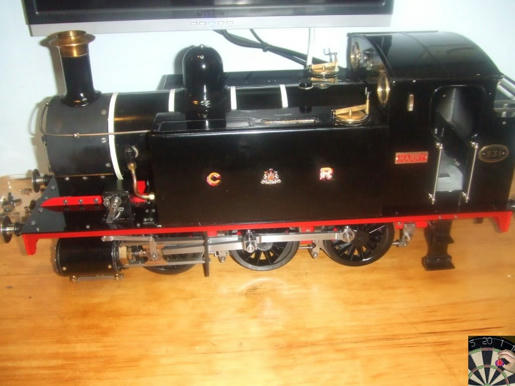
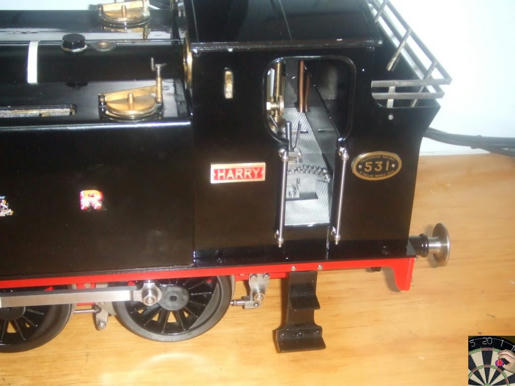
Now I've just got to put it back together again.

Pete
 
Thanks for that

The lubricator discussion is interesting. I run without internal lubrication on my boat as I run condensing.

However,

I have a two piston lube pump similar to yours to lubricate the big ends of the connecting rods.

At 600 rpm, there are two chances of getting oil into a cup and down to the big end....slim and nil.

However, with this set up it works great. I run 50 weight oil and I run 1 click per revolution and it provides WAY more than enough to take care of the conrods. I connect to the rod via flexible teflon tubing, one end anchored to the back columns, and the other attached to a fixed point on the crosshead. From there it flows via ridgid brass plumbing down to the big ends. It works really well.

Dave
 
Dave

Mine works well by itself but when lubing the cyliders its pumping against steam pressure, which could be as much as 80psi (but rarely is). When lubing the conrods its just pumping against air pressure.

Pete
 
I've got it all back together again and thought I'd spare you the blow by blow and you've seen it all before. Hopefully I've fixed a lot of things along the way

  • Pinned the reversing lever actuating arm, so forward now means "forward" and not occasionally "back"
  • Leaking gland nuts repacked
  • All seals and gaskets on the boiler re-done,
  • Valve ports re-lapped
  • Extra frame spreader between pistons so frame geometry is maintained. The front drivers now have some sideways clearance so it may go round corners now! (this is a recommendation from the Rob Roy mods somebody pointed out to me on here)

Hopefully all this will help it run a whole lot better

Nicely repainted frames

ctfc7kb2au0dw0k4g.jpg


6gc741p6z7cv05z4g.jpg


You'll notice its got a name now. The guys in the club kept asking me what I was going to call it. There was only one choice, "Harry", my Dad and the guy who did all the work in the first place.

o6yhcdwb0jb653o4g.jpg


The name plates were made by "Imagineering" Murray. He's just CNC'd his SX3 mill and I challenged him do me some name plates. They're only 30mm x 10mm so required 0.8mm (1/32") end mill to get the tool paths. It took 3 to get the job done. The first broke when the feed rate was way to high. The second when the zero point wasn't set correctly and the machine vice took it out. To be on the safe side we set the feed rate set so low it took 15 hours to machine each plate.

axfgw054zt4hxpi4g.jpg


Next thing is to try running it again. That's for the weekend

Pete
 
Harry looks really good to me Pete - I love the red chassis Thm:

I'm holding thumbs for your steam-up this weekend!

Regards, Arnold
 
Thanks Arnold

I'm going to give him a run on the rollers today just to make sure its all back together properly and I haven't missed anything. It will allow me to finish off things like sealing the pipework going in and out of the firebox (no point in doing that until its been test run just in case it all has to come apart again).

Weather report for Sunday isn't too flash but we'll see how it is on the day.

Pete
 
Well that was an amazing day; as you know for weeks now I've been trying to get my Rob Roy Harry round the club track and it always stops at the same point 3/4 of the way round. So nobody was happier then me when I'd made it back to the start, in one go. The other club members were also surprised to see me as they are used to me being stuck somewhere out on the track. I was sharing the track with the club 5" Speedy and it kept holding me up. But I did manage four laps non stop at one point, despite Speedy not living up to its name.

Speedy was retired through loss of its fire so I had the track to myself. The guys were passing me bottles of water to top up the tanks and I managed thirteen laps non-stop. I only finished when the lubricator ran out of oil.

Here's a video of a full lap of the track before the camera batteries went flat. You'll see it struggling on the corner it never normally gets round. This time a bit worse than the other laps, probably because I wasn't paying full attention with a camera in my hand

[ame=http://www.youtube.com/watch?v=URngsOTW3hE]http://www.youtube.com/watch?v=URngsOTW3hE[/ame]

And on the subject of paying attention here's a better example of going round the same bend but with different outcome from videoing on the move.

[ame=http://www.youtube.com/watch?v=vj-OMyUKYO8]http://www.youtube.com/watch?v=vj-OMyUKYO8[/ame]

It wasn't as bad as it looks.

Now I know it can do it, its just a case of improving technique.

Pete
 
;D ;D ;D Great going Pete ! th_wav th_wav

Little Harry sure delivered the goods there! I'm sitting here many thousands of miles away with a big grin on my face after seeing those runs ;D

Looks like you've got the burner sorted out as well; you had a lot of steam from the safety valve ;D

Well done - I think you and your dad did a right good job :bow: :bow: :bow: :bow:

Kind regards, Arnold ;D
 
Thanks Arnold

All the little bits of observation, testing, improving parts, trying new things all came together. Its true what they say about these little locos being hard to master. One little thing goes slightly off the norm and it has a major effect on the whole. Later in the afternoon the wind came up a bit giving a headwind into the bad bend and it noticeably slowed me down.

The next thing I have underway is a driving trolley of my own. The loaner trolley I am using weighs over 35Kg (77lbs) and the loco weighs less than 18kg (40lbs). I'm making my new trolley out of aluminium and will only weigh about 10kg (22Lbs). That should improve things a bit more I hope.

Thanks again

Pete
 
Finally we managed to get all the planets aligned and we had the loco, camera, weather and assistants in the same place at the same time. Our track is effectively two concentric rings with the 7.25" gauge track running around the outside of the 3.5"/5" raised track. Murray (Imagineering) co-opted the driver of one of the club locos to follow me around. So here's a few laps of me with "Harry" doing its thing.

[ame]http://www.youtube.com/watch?v=5B0fDVx62o0[/ame]

Things were going well so one of the larger gauge loco owners suggested that I should try with a bit more of a load. So a riding truck was rolled out and tagged on the back with the intention of doing a few laps with it. The boys couldn't resist a photo opportunity so all jumped aboard.

8g1yb9tc8lol0dh4g.jpg


It was meant to be a bit of a joke but nobody really expected it to go anywhere did they?

[ame="http://www.youtube.com/watch?v=dqCynkwWiOk"]http://www.youtube.com/watch?v=dqCynkwWiOk [/ame]

OK; it needed a bit of a helping foot to get it rolling, then again there's a lot of oil on the tracks in the station area as a result of locos starting out with their drain cocks open. The bend it stopped on has always been "Harry's" nemesis as there is a slight rise at that point.

Train weight. The loco is 18kg, I'm 100kg and the driving trolley is 35kg. Dave on the front of the passenger car said he's around 70kg so lets say they are all 70kg and then the passenger car lets say 20kg so that's 453kg total or 996lbs with gas bottles, water etc I think we can call it a round 1000lbs.

Pete
 
That's great, Pete! Pulling 25 times it's own weight. What a fun video, for me. I reminds me how much of a kid I still am at my age, and how much I'd like to have see him run in person.
Good job on getting him back on the rails!

Dean
 
Very good going Pete :bow:
It's really surprising how much power little Harry have!

Kind regards, Arnold
 
Very Very Nice Pete, looks like lots of fun :) :) :)

I have really enjoyed this thread. Thanks for sharing...

Jeff
 
Thanks for the ride along Pete! Very happy to see it finished and performing well. I have been following along and you have given me a much greater appreciation for the locomotive arts. :)
 
Back
Top